Steamly S2-S/SL Feaures
SECTION 12. SL FEATURES
Contents
1 HUDS
The S-58 comes with three HUDS: a main HUD, a winch HUD and a preflight HUD. These are described in the following sections.
1.1 Main HUD
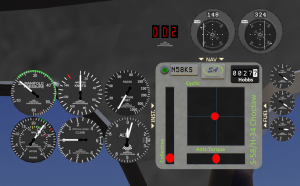
The main HUD (see Figure 1) attaches in the lower right corner by default. When not sitting in an aircraft, the HUD will be dark with the word "Disconnected" showing on it. You can connect to a helicopter by sitting in it in the pilot or co-pilot seat. If the HUD fails to connect, or becomes disconnected for some reason, you can click on the aircraft window and choose "HUD Connect" from the main menu. The HUD consists of a core part with the flight controls, and three pop-out instrument sets.
The core of the HUD includes the following elements:
- Collective - Red dot shows the current position of the collective which moves on a linear scale.
- Cyclic - Red dot shows the current position of the cyclic which moves in 2-dimensions.
- Anti-Torque - Red dot shows the current position of the anti-torque pedals which moves on a linear scale.
- Crossing Status - Indicator dot in upper left corner shows green when the HUD is active, and yellow when inactive for a region crossing.
- Tail Number - The tail number of the aircraft the HUD is connected to.
- HOBBS - The HOBBS time (total operating time) of the aircraft the HUD is connected to.
The HUD popouts are controlled by buttons around the edge. Click one of the buttons to show or hide a cluster of instruments as described below:
| Tab | Description |
|---|---|
| INST. | The main instrument tab is located on the left and includes the following instruments: Percent Torque, Airspeed, Radar Altimeter, Rotor/Engine RPM, Vertical Speed Indicator, and Altimeter. |
| FUEL | The fuel tab is located on the right and includes a fuel indication for each tank. |
| NAV | The navigation tab is located on the top and includes VOR indications for each VOR (with VOR1 on the left), and the DME readout. |
1.2 Winch HUD
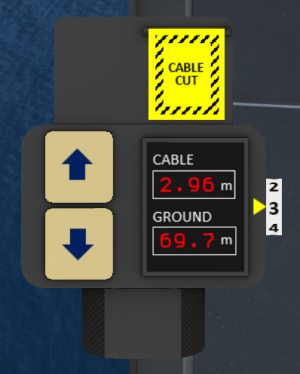
The winch HUD (see Figure 2) can be used to control the winch by any crew member in the the helicopter. In order for the HUD to be active, the helicopter must have hydraulic and electrical power, and the HOIST switch must be in the CREW position. The winch HUD has two buttons on the left side to raise and lower the winch. A digital display shows the current cable length and the current height above the ground. A dial on the right-hand side sets the winch speed. Finally an emergency cable cut button with a guard is located on the top portion of the HUD.
1.3 Preflight HUD
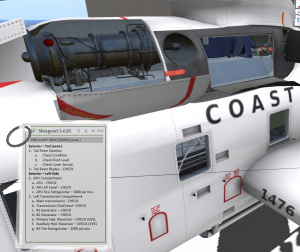
A preflight HUD with the preflight checklist is provided to assist with the preflight inspection. Arrows on the top can be used to change pages, and "home" icon can be used to return to the first page.
The preflight HUD can be found in the aircraft box, or can be accessed from the helicopter @Get menu or by using the "prehud" chat command.
2 Seating Access Control
For the purpose of access control, there are three classes of seats: pilot, crew and passenger. Each class can be set to "R" to show it is in restricted mode or "G" for guest mode. When a seat class is in guest mode, anyone can use that seat. When A seat class is in "R" mode, only the owner, or those explicitly granted access can use the the seat. The access controls are found in the @Admin menu which is accessible only by the owner.
2.1 Seat Access Control
Seats included in each seat class are described in the following table:
| Seat Class | Description |
|---|---|
| Pilot | Pilot and Co-Pilot Seats |
| Crew | Winch Operator Position |
| Passenger | All other seats |
2.2 Pilot Access List
Access to the helicopter can also be granted through a named-pilot access list via the @Admin menu. Pilots on this list have full access to the helicopter, except for the @Admin menu. They can pilot and/or service the helicopter. The following buttons in the @Admin menu are used to manage the access list:
- Add - Adds a new pilot to the list. The pilot should be standing within 10m of the aircraft to be added.
- Remove - Removes a pilot from the access list.
- List - Lists all pilots who are currently on the access list.
3 Seating and Seat Swapping
The seating system included with this helicopter lets your passengers switch seats in flight. Once passengers have taken an initial seat, they switch seats by clicking on a different seat by clicking on that seat. Seat swapping may be used by any occupant other than the pilot or copilot.
3.1 Seat List
The helicopter supports the following seats:
| Seat | Class | Description |
|---|---|---|
| Pilot | Pilot | Right seat in front of helicopter. This is the normal seat for operating the helicopter. |
| Co-Pilot | Pilot | Left seat in front of helicopter. The copilot's job is to assist the pilot. |
| Hoist Operator | Crew | Kneeling position near main cabin door. User can operate the hoist. |
| Troop Seats 1-9 | Passenger | Set of 3 collapsible seats on left and right sides of main cabin. Click a seat back to sit in it. Click on the seat part itself to fold the seats up or down. |
| Stokes Basket | Passenger | While inside the helicopter, the basket is used ad a patient litter. While outside the helicopter it is used as a winch load. |
| Rope | Passenger | Temporary seat while user is sliding down rope. |
| Harness | Passenger | Harness for SAR personnel. Can be used alone, or in conjunction with stokes basket. |
3.2 Rescue Equipment
Certain "seats" can be used outside the helicopter. You can transfer from inside to rescue equipment by clicking on it, and back to the inside by clicking on the floor of the aircraft. There must be less than about 1.5m of cable deployed, and the cabin door must be open in order to transfer in/out of helicopter.
4 Menus
Menus are only available to the owner and registered or guest pilots of the aircraft. In general button options beginning with an "@" are sub-menus, and options beginning with "( )" or "(*)" are options that can be toggled.
4.1 Main Menu
The buttons on the main menu are:
| Button | Description |
|---|---|
| Park/Unpark | Make the aircraft non-physical/physical. Normally this occurs automatically when you sit in the aircraft, but this option can be used to control this manually. |
| Eject | Select an occupant to eject |
| Safe Unsit | Slide avatar outside aircraft before unseating them. Useful when aircraft is physical. |
| @Options | Control various flight option settings. |
| @Get | Get various things include HUD and manual/help notecards |
| HUD Connect | Reestablish connectivity between helicopter and HUD if it becomes disconnected, or if you wear HUD while already seated. |
| @Admin | Access owner-only options |
| @Cheat | Displays the "Cheat" menu with options to bypass various procedures. See "CHEATS" below for more details. |
| @Realism | Enable or disable "realism" features of the aircraft flight characteristics. |
| @REGISTER | Access the aircraft registration menu. This button will only appear on the main menu if an N number had not yet been assigned. (aircraft must be parked/non-physical) |
4.2 ADMIN MENU
The admin menu contains options only available to the aircraft owner. Buttons/Options are:
| Button | Description |
|---|---|
| Recal. W&B | If you make any changes to the linkset, you should use this option to recalibrate the weight & balance for the scripts. |
| (?) Pilot | Set pilot seat to guest (G) or restricted (M) |
| (?) Crew | Set copilot seat to guest (G) or restricted (M) |
| (?) Passenger | Set passenger seats to guest (G) or restricted (M) |
| Add Crew | Add an authorized crew member. A maximum of 12 crew members can be registered. The crew member to be added should stand within 10m of aircraft to be recognized by the system. |
| Remove Crew | Remove a crew member from the authorized crew member list. |
| List Crew | List the authorized crew members. |
| @REGISTER | Assign or changer your aircraft's registration. See "N-NUMBER ASSIGNMENT" in Section 1 for more details. (aircraft must be parked/non-physical) |
| @Paint | Change the color/markings of your aircraft. See "PAINTKIT SYSTEM" below for more details. (aircraft must be parked/non-physical) |
4.3 PAINTKIT SYSTEM
The paintkit system allows you to change the appearance of your helicopter. It is accessed through the @Paint sub-menu found on the @Admin menu. On this menu there are several built-in colors, and a "Custom" button to load a paint set from a separate "paintkit" prim. For custom designs you can either use a paintkit from a 3rd party vendor, or load your own texture set into the paint kit that came with your helicopter. To apply a paintkit, simply rez the paintkit near your helicopter and select "*Custom" from the @Paint menu. The helicopter will search for nearby paintkits and allow you to choose which you want to apply. Instructions on how to create your own custom paintkits can be found in the paintkit object.
4.4 OPTIONS MENU
The options menu is accessed from the @Options button on the main menu and is available to any registered pilot.
| Button | Description |
|---|---|
| (?) Controls | Select a control scheme. Control schemes are discussed in the CONTROLS section near the beginning of this document. |
| (?) Failures | Set the failure level: N=No failures, P=Progress failures, but no new failures, 1-9=Failure rate |
| (?) Governor | If enabled, the throttle will be controlled automatically while it full RPM. If disabled, all throttle control is manual. |
| (?) Int-Menu | Disables access to menu from clicks on the internal surface of the window. |
| (?) Chat | If enabled, information chat messages will be displayed. If disabled, all informational chat messages will be suppressed. |
| (?) Lag Safe | If enabled, autopilot will disconnect in high load sims to prevent instability. In very high load sims the aircraft will also go non-physical. |
| (?) Fragile | If enabled, a crash will cause helicopter to burst into flames and become non-responsive. Resets after a set time (or until ELT is turned off). |
| (?) Copilot | Enable or disabled copilot controls |
| (?) Adv Wx. | Enable or disabled advanced weather |
| (?) Fast Fluids | Causes engine oil, transmission and hydraulic fluids to be used at 100 times normal rate. |
| (?) Alerts | If enabled, alert messages about collisions or other unsafe conditions will be given. If disabled, no alert messages will be issued. |
| (?) Dust | If enabled, dust effects are produced when the aircraft is near the ground, water, or over a prim. |
4.5 CHEATS MENU
The cheats menu accessed from the @Cheat button on the main menu allows you to access functions to bypass several of the normal procedures.
| Button | Description |
|---|---|
| RENEW | Replace all components, repair all damage, charge battery, fill all fluids, empty bilge. |
| Charge Bat. | Charge the battery to full. |
| Fill Fluids | Sets all non-fuel fluids to full. |
| Fast Start/Stop | Use this button to start or stop your helicopter without going through the full procedure. You will still need to wait for the rotors to come to full speed when using Fast Start. |
| Repair All | Repairs all accumulated damage and failures. |
| Replace Parts | Replaces all service time limited components. |
| @Fuel | Accesses a sub-menu that lets you set the fuel level to a specific level. |
4.6 REALISM MENU
The realism menu lets you enable or disable some of the RL helicopter flight characteristics. The features that can be enabled/disabled are:
| Button | Description |
|---|---|
| Cold Start | If enabled, the engine must be preheated before start-up in cold weather. If disabled, that requirement is ignored. |
| ASE | If disabled, additional ASE chat commands not realistic for the time period of this helicopter are enabled. |
| Battery | If disabled, the battery will not run out. |
| Fluids | If disabled, fluids (oil, etc.) will not be consumed as helicopter runs. |
| Density | If enabled, density altitude will have an effect on aircraft performance. This comes in play when operating at high altitudes. At high altitudes hover height and climb rate will be reduced from their values at lower altitudes. |
| ETL | If enabled, additional lift/performance is gained when forward airspeed goes above about 20 knots due to the main rotors constantly moving into clean air. When disabled, the additional performance is always available. |
| Torque | When enabled, the main rotor produces torque that must be counteracted with tail rotor. |
| Low RPM | When enabled, pulling excessive collective can result in decay of main rotor RPM. |
| Vortex | When enabled, the helicopter can be subject to "vortex ring state" also known as "settling with power". This can occur when the helicopter is in a vertical descent of more than 300 feet/min with a forward speed of less than 30 knots while collective is at more than 50%. When vortex ring state occurs, the helicopter will experience a loss of lift and begin descending rapidly, even if additional collective is pulled. |
| Translate | If enabled, the effects and compensation for translating tendency are disabled. |
| Wind | If enabled, wind will affect the aircraft. |


