Deicing Truck
|
Deicing Truck Add-on |
Note: This product is designed for, and is compatible with only the Lusch Hermes and Lusch Ajax truck systems.
1 Introduction
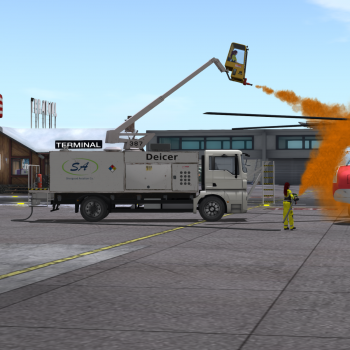
The Shergood Deicer is an add-on for the Lusch Hermes or Lusch Ajax Modular Trucks. It is compatible with select Shergood aircraft and can be used for both deicing and anti-icing purposes. The truck has a 1500 gallon main tank for Type 1 deicing fluid, and a 300 gallon secondary tank which can be used for Type 2, 3 or 4 deicing fluids. Fluids can be applied through a sprayer on a boom mounted bucket, or through a hose system at the back of the vehicle. The truck is refilled using 250 gallon totes.
2 Installation
To install your deicing add-on, use the following procedure:
- Rez your deicer add-on (of the matching type) next to your Lusch Hermes or Lusch Ajax truck.
- Click the truck and select "EDIT MODE" from the menu.
- Wait approximately 5 seconds for the hover text on the truck to change to "EDIT MODE ON!".
- Right click on the deicer add-on and select "Edit".
- Hold shift and click on the truck.
- Select "Link" from the edit menu. The deicer add-on should snap into place.
- Click on the truck cab and select "YES" when it asks if you want to exit edit mode.
Your deicer truck is now ready to use.
2.1 Truck Number
When you first attach your truck, it will be assigned a random number between 0 and 999 that is displayed in on the base of the boom. This number is used to identify your truck when filling fluids. You can set your own number by clicking on the deicer part of the truck and selecting Number from the menu.
3 De-Icing and Anti-Icing Fluids
3.1 Fluid Types
There are four main times of de-cing and anti-icing fluids used for aircraft: Type 1, 2, 3 and 4. Type 1 fluids are applied hot, have the lowest viscosity and are generally used for removing existing ice from an aircraft. Type 2 and 4 fluids include a thickening agent to make them stick to the aircraft to prevent ice from adhering to it. Type 3 fluids have an intermediate thickness between Type 1 and Type 2/4. Note that the anti-icing fluids Type 2,3,4 generally do not do well at ice removal. For the reason it is generally recommended that line personal first clear ice from the aircraft with Type 1 fluid, then if current weather conditions are conducive to icing, apply the appropriate anti-icing fluid. For Shergood aircraft, Type 3 anti-icing fluid should be used.
Each fluid is characterized by a HOT (Hold Over Time), and a minimum rotation speed. The HOT is the time the fluid will remain effective at preventing ice build-up, and the minimum rotation speed is the airspeed required to shear off the fluid. Type 2 and 4 fluids are generally used on large transport aircraft with high rotation speeds, while Type 3 fluids are used on medium sized aircraft. Type 1 fluids are suitable for all aircraft. The characteristics and colors of the four fluid types are summarized in the table below:
| Fluid | Color | HOT (min.) | Min. Rotation Speed |
|---|---|---|---|
| Type 1 | RED-ORANGE | n/a | n/a |
| Type 2 | STRAW | 0:30 | 100 Kts |
| Type 3 | YELLOW-GREEN | 0:20 | 60 Kts |
| Type 4 | EMERALD-GREEN | 1:00 | 100 Kts |
3.2 Tank Levels
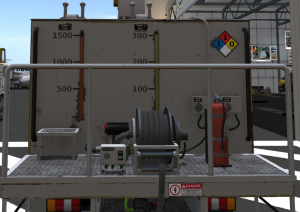
The deicer truck has two fluid tanks with levels shown with sightglasses on the back of the truck (see Figure 1). The left sightglass shows the level in the 1500 gallon tank for Type 1 fluid. The right sightglass shows the level in the 300 gallon tank for type 2, 3 or 4 fluid. Only one fluid type at a time can be used in the right tank. The fluid type in the right tank can be determined from the label next to the sightglass, or from the fluid color as seen in the sightglass.
3.3 Servicing
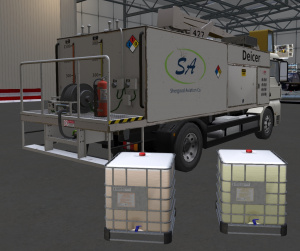
Fluid for the deicer is distributed in 250 gallon totes (see Figure 2). There are separate totes for each fluid type. You can identify the fluid in a tote from the color and the label on the tote.
To transfer fluid from a tote to the deicer, using the following procedure:
- Rez the tote near your truck
- Click on the tote
- The tote will scan the area and search for nearby trucks. Click on the number for the truck you wish to fill.
If a tote is not completely used, its fluid level will be visible on the side of the container. Type 1 totes will always fill the 1500 gallon tank on the left, while any other fluid will fill the 300 gallon tank on the right. If the right tank contains a fluid other than that in the tote, then fluid in that tank will be replaced with the fluid in the tote.
By default, totes can only be used by the owner. You can change the access to the tote by clicking on it and choosing "[ACCESS]". You can select between owner-only, group-only and public access. You must also have access to the target vehicle in order to for the tote to detect it.
Totes are available for free from any Shergood store or other distributer. Totes are no-copy and can be discarded once empty. Locations at which totes may be obtained include:
4 Bucket Operation
To operate the bucket, sit on the bucket. The arrow keys can be used to control the boom, bucket or nozzle with the PgUp key being used to select which part of the bucket is being controlled by the arrows. The PgDn key is used to select the fluid type. Use the left mouse button to toggle fluid flow from the nozzle on and off. The key functions are summarized in the following table:
| Key | Function |
|---|---|
 |
Rotates boom, bucket or nozzle left/right |
 |
Raises/lowers boom, tilts bucket or nozzle forward/back |
 |
Switches between boom, bucket or nozzle control |
 |
Toggles fluid type |
 |
Toggles nozzle on/off |
By default, the camera will be positioned above and behind the bucket, but you can switch to mouselook for a view from inside the bucket.
5 Hose Operation
To operate the hose, stand behind the vehicle within 4m of the hose and click on it. After a few moments, you will be offered an attachment. Click "Yes" and the nozzle will attach to your right hand. If you have experiences enabled (see below), the nozzle will attach without needing to respond to the permission request.
Once the nozzle is attached, you can then walk to the aircraft and use the left mouse button to toggle fluid flow on/off. Clicking the hose reel again while using the hose, or the switch next to it, will change the fluid type.
As you walk, the hose will pay out behind you up to the maximum length of the hose. If you attempt to walk past the hose length, you will be pulled back. You can click on any of the hose links to shorten the hose by cleaning up hose between yourself and the segment on which you click.
6 HUD
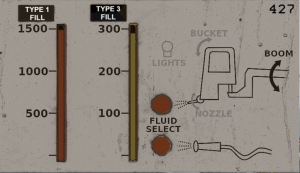
An optional HUD (see Figure 3 can be used to control certain elements of the deicer, and view the current state and fluid levels. The two vertical bars on the left side of the HUD show the current levels in the left and right tanks, as well as the fluid type in the right tank. The bucket diagram is labeled with arrows for the BOOM, BUCKET and NOZZLE to show which item is being controlled by the arrow keys for the bucket operator. The item shown in black is the selected item. You can click near the arrow or text to change the selected item. In addition, clicking on the light-bulb icon will turn the bucket lights on/off.
Next to the bucket nozzle and hose nozzle is the fluid type selector for each nozzle. Click the selector to change the fluid type.
7 Menus
7.1 Hermes/Ajax Menu
Clicking on a part of the base truck that is not part of the deicer will bring up the native Hermes/Ajax truck menu. You can access all the standard functions through that menu, though some customization functions are not appropriate for use with the deicer.
Of particular note are the Access functions (Owner, Group, Public) in the base truck. The Access selected for the truck will also apply to the deicer. When the access is set to owner, only the owner may operate the bucket, the hose or use totes to fill the tanks.
7.2 Deicer Menu
The deicer menu is opened by clicking on any of the deicer parts of the truck. The options are:
| Button | Function |
|---|---|
| HUD Connect | Forces any HUD you are wearing to connect to that vehicle. The HUD will remain connected until you remove and reattach it, or the vehicle goes out of range. |
| Get HUD | Gets a copy of the HUD |
| Number | Allows you to enter a new number for the vehicle which is displayed at the base of the boom. |
8 Experiences
For convenience, the nozzle attachment can be done using an experience rather than requesting permission each time. In SL, experiences are a way to grant permissions one time to a class of devices that are then remembered from then on out. To use the experience method you must:
- Have the land owner grant permissions for the "Shergood Aviation" experience on your land.
- Select "Yes" when attaching the hose for the first time.
After you have granted permissions for the experience, you will no longer need to grant permissions to attach the nozzle as long as you are on land that permits it.
8.1 Granting Land Permissions
To grant permissions for the Shergood Aviation experience on your land, click the parcel name at the top of your view to open the "About Land" dialog box, then go to the "Experiences" tab. Under "Allowed Experiences" select "Add...", then search for and add the "Shergood Aviation" experience owned by Kelly Shergood.


