S-64/Systems
SECTION 7. AIRCRAFT SYSTEMS
Contents
1 APP (Auxiliary Power Plant)
An APP is used to provide hydraulic and electrical power needed to start the main engines. The APP is mounted behind the main transmission with a shaft that drives the accessories section of the main transmission. When operating, the APP provides up to 72 HP and consumes 89 pounds-per-hour (14.1 gal/hour) from the forward tank. When operating the APP provides pressure for the utility and hoist hydraulic systems. AC electrical power can be produced by turning on either or both of the generators, and DC power by also turning on the rectifiers.
Power to APP starter is provided through a 3,500 psi hydraulic accumulator mounted behind the APP on top of the hydraulic plant. In normal operation, the accumulator is recharged when either of the engine starter motors are operated. If the APP is started, but the main engines will not be run, the starter motor on either engine should be run briefly to recharge the accumulator. The APP HYD PRESS LOW alert light is illuminated whenever there is insufficient pressure in the accumulator to start the APP. If the APP is shut off without recharging the accumulator, it will be necessary to use the hand pump on the accumulator to recharge it.
Starting the APP is performed through th AUX POWER PLANT controls on the upper control panel. First turn on the APP MASTER switch. The low oil pressure light should be illuminated. Then press the APP START button and monitor the RPM until it reaches 100%. Use the APP STOP button to shut down the APP. Once the APP has spun down to 0%, you may turn off the APP MASTER.
2 ENGINES
The aircraft is powered by two 4,050 shaft horsepower Pratt & Whitney JFTD12A engines. Engine gauges are located in the center of the panel with one column of gauges for each engine. From top to bottom, the gauges are:
- N1 - Shows the %RPM of the compressor stage.
- EXH TEMP - Shows the exhaust gas temperature.
- FUEL FLOW - Show the rate of fuel consumption.
- PRESSURE RATIO - Shows the ratio of pressure on the intake vs outtake side of the compressor.
- OIL TEMP - Engine oil temperature.
- OIL PRESS - Engine oil pressure.
In addition, the three needle RPM indicator shows the %RPM of the rotor and each engine N2 stage. Primary control of the engine is through the yellow N1 levers located in the forward portion of the overhead panel. The N1 levers have three positions SHUT-OFF when engine is not running, GRD IDLE used at start and for ground idle operations, and FULL OPEN for normal flight operations. Care must be taken when starting not to enable the igniters with fuel flowing to the engine, and N1 below 20%. An engine fire or explosion may result. See the start-up checklist for details on starting the engines.
3 FUEL SYSTEM
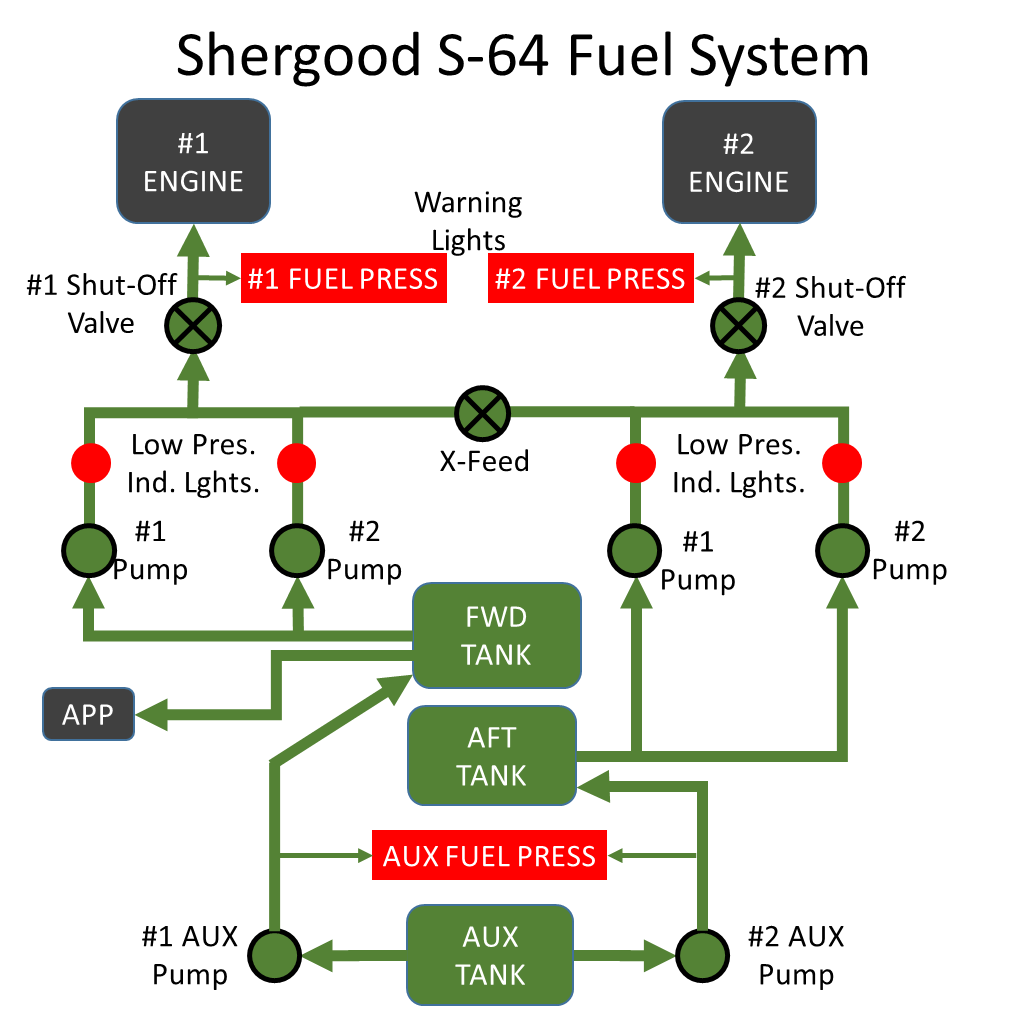
Fuel is held in three 431 gallon (2930 pound) tanks: FWD, AFT and AUX. The FWD tank is normally used to feed the #1 engine, while the AFT tank is normally used to feed the #2 engine. Each engine burns 323 gallons/hour (2200 pounds/hour). The AUX tank holds additional fuel that can be transferred through the AUX fuel pumps to the FWD and AFT tanks. The #1 and #2 AUX fuel pumps are powered by the #1 and #2 AC buses, respectively. The #1 AUX pump transfers fuel from the AUX tank to the FWD tank, while the #2 AUX pump transfers fuel from the AUX tank to the AFT tank. The AUX FUEL PRESS caution light will illuminate if an AUX pump switch is on, but there is no fuel pressure at the pump. This can occur if there is a malfunction of the pump, there is no fuel in the AUX tank, or there is no power on the AC essentials bus.
Fuel to each engine is supplied by opening the appropriate fuel shut-off valve next to the engine N1 lever, and turning on the AC driven pumps. Two pumps are provided for each tank. The #1 pump on each tank is powered by the #1 AC bus, while the #2 pump on each tank is powered by the #2 AC bus.
The fuel cap on a tank must be removed before servicing the aircraft. Note that each of the tanks are serviced separately and have separate caps. You can use any compatible refueling system (including typing "refuel" in local chat). For more control over your refueling, you can use any KellyFuel system that implements version 2.0 or later of KellyFuel. To use KellyFuel, make sure the aircraft is within 10m of the pump and click on the pump. It will search for nearby aircraft which have had their fuel caps removed and display a list by N-Number. Choose the N-number of the aircraft you wish to fuel. Click the pump again to get a menu of refueling options. Refueling options include:
- Check - Check the current fuel level.
- Gal - Add n gallons (various quantities are listed) to the tank.
- Fill - Fill tank completely.
- Done - Exit menu and disconnect from aircraft.
While a fuel pump is in use, it cannot be used by anyone else until they have selected "Done", filled the tanks, or a 5 min. timeout has expired. Note that fuel has weight and will affect the performance of your aircraft. One gallon of Jet-A weighs approximately 7 pounds. If carrying a lot weight, it is sometimes useful to fill the tanks only part way.
4 ELECTRICAL SYSTEM AND GROUND POWER UNIT
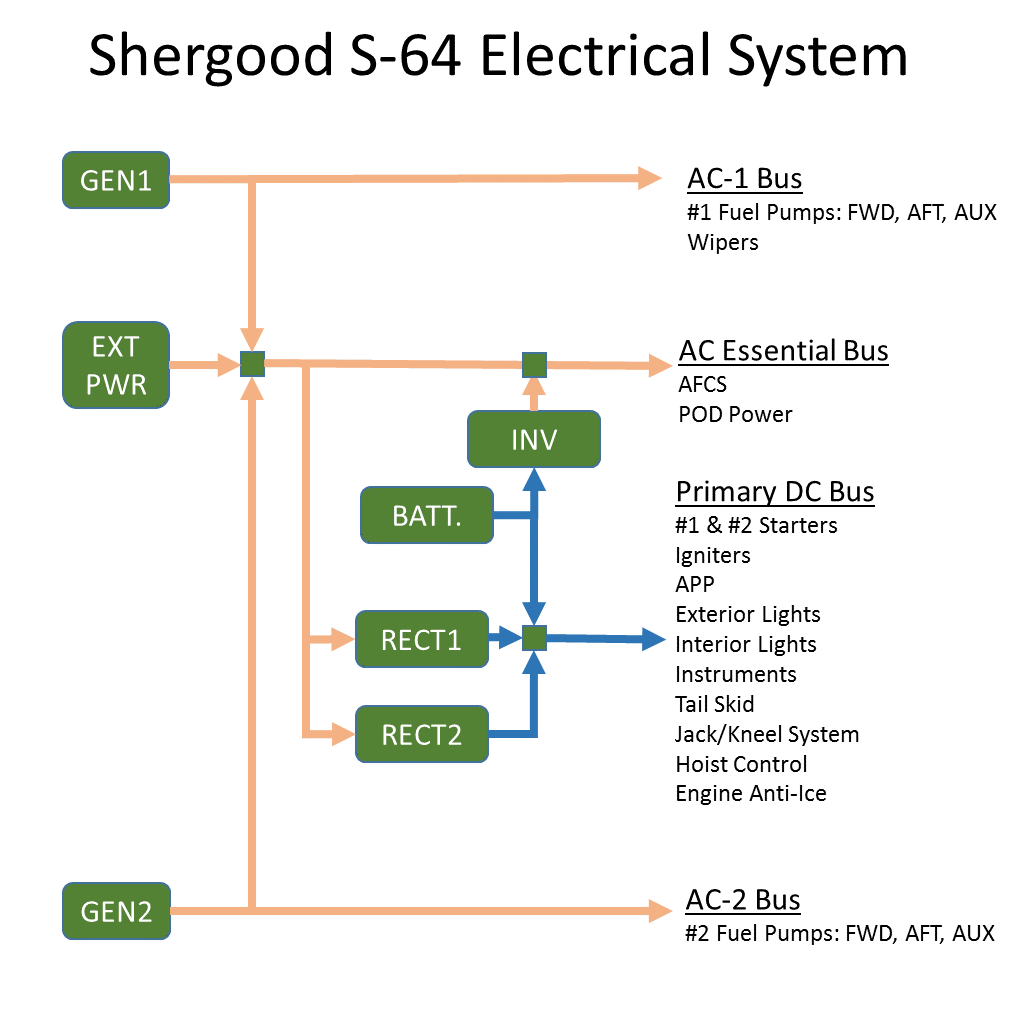
This aircraft utilizes four primary electrical buses: #1 AC, #2 AC, AC essentials and the primary DC bus. The #1 AC bus is powered by the #1 Generator while the #2 AC Bus is powered by the #2 Generator. The AC essentials bus is powered by either of the #1 or #2 AC buses, through external power, or through the battery using the inverter. The generators are powered through the main transmission accessories section and can be driven by either engine or the APP. The primary DC bus can be powered by the battery, or by either of the two rectifiers when the AC essentials bus is powered. Warning lights indicate when either generator or rectifier are offline.
The various electrical buses power the following systems:
- #1 AC Bus
- #1 Fuel pumps FWD, AFT and AUX
- Wipers
- #2 AC Bus
- #2 Fuel pumps FWD, AFT and AUX
- AC Essentials Bus
- AFCS
- POD power
- Primary DC Bus
- #1 & #2 Starters
- Igniters
- APP Control
- Exterior Lights
- Interior Lights
- Instruments
- TailSkid
- Jack/Kneel system
- Hoist Control
4.1 Using External Power
The external power port is located on the lower rear corner of the right side of the cabin. Click on the panel to open it, then rez and click on the GPU (Ground Power Unit). The GPU will search for and list aircraft available to be powered. Once you select your aircraft, it will move itself into position and connect to the aircraft. While connected, the battery will be recharged. You must select the EXT PWR switch to ON to power the AC essentials bus through the GPU, and additionally one of the rectifier switches to power the DC bus.
5 HYDRAULIC SYSTEMS
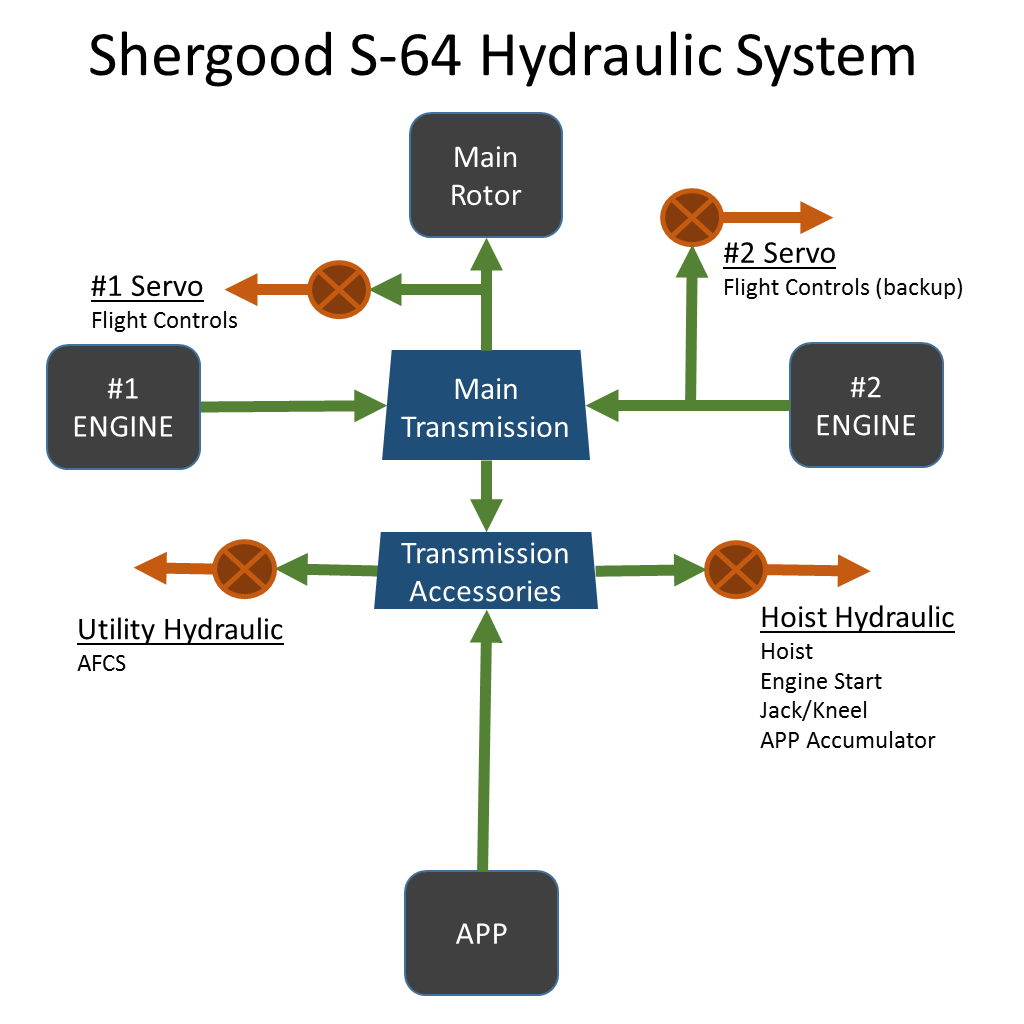
This aircraft utilizes four hydraulic systems: #1 Servo, #2 Servo, Utility Hydraulic and Hoist Hydraulic. The utility and hoist hydraulic systems are powered by the main transmission accessories stage and powered through either engine or the APP. The #1 Servo system is powered by the main rotor and is active when main rotor is turning. The #2 servo is powered directly by the #2 engine. Each system has its on pressure indicators and warning lights.
Systems powered by each hydraulic system are:
- #1 Servo and #2 Servo
- Flight controls
- Utility Hydraulic
- AFCS
- Hoist Hydraulic
- Hoist
- Engine Start
- Jack/Kneel
6 LANDING GEAR
This aircraft is equipped with a jack/kneel main landing gear system and a castoring nose wheel. The jack/kneel system is powered by the primary DC bus and the hoist hydraulic system. It can be used to raise/lower the main gear by approximately 0.3m. This system can be used to ease attachment of external pods.
7 ELT
This aircraft is equipped with an onboard ELT (Emergency Locator Transmitter). Controls for the ELT are on the upper console below. The controls consist of a light that will flash to indicate an ELT alarm has been triggered, and a two position switch. When the switch is in the "Off" position, no ELT alarms will be triggered. When the ELT is in the "Arm" position, a sudden impact will trigger an ELT signal which can be tracked by search and rescue personnel. If the ELT has been triggered, the alarm can be cleared by moving the switch to the OFF position.
8 EXTERNAL LIGHTING
External lights include upper and lower anti-collision lights, dual forward taxi/landing lighs and position lights for night use. In addition there is a hoist bay light that can be used for night hoist operations. External light switches are located on the upper panel.
9 COCKPIT LIGHTING
Cockpit lighting controls are located on the upper console. Three position rotary switches control the pilot, copilot and non-instrument flight lights. A separate three-position console light switch provides light for the consoles. Controls for the dome lights are located on the aft most portion of the upper console and include ON/OFF switches and RED/WHITE switches. Finally a separate three position rotary switch controls secondary instrument lighting. This switch overrides the normal dome light and provides red light of selectable intensity.
10 AFCS (AUTOMATIC FLIGHT CONTROL SYSTEM) / AUTOPILOT
The AFCS (Automatic Flight Control System) is a system for reducing pilot workload by taking over some of the responsibilities for handling of the aircraft. The AFCS panel is located at the back end of the center console. The AFCS is capable of "holding" one or more of airspeed (IAS), heading (HDG), altitude (ALT) or vertical speed (V/S). It is controlled either by touching the buttons on the panel, or by using the chat commands in the command summary above. The main display shows the current settings for each of the four quantities with a green bar over a quantity indicating the AFCS is currently holding that value. When the value itself is highlighted the + and - buttons on the left side will increase or decrease the current setting for that value. The select button (SEL) selects which value will be adjusted with the + and - buttons.
The mode buttons, IAS, ALT, HDG and V/S on the top of the panel toggle a hold for each of four values. Note that a hold of altitude and vertical speed are mutually exclusive, and only one or the other can have a hold at once. When you enable a hold, the current setting will be set to value for the current aircraft state. For example, pressing the ALT button will enable altitude hold at the current altitude of the aircraft.
The AFSC works by moving the actual controls which can be "felt" by the pilot. While altitude and vertical speed hold is always controlled through collective inputs, the airspeed and heading control is slightly different depending on the airspeed. When airspeed is below 40 knots, airspeed is controlled by forward/back cyclic and heading is controlled with the pedals. At this low speed, the airspeed hold also includes a lateral movement hold which is maintained through lateral cyclic control. Above 40 knots, the lateral hold switches off and instead lateral cyclic is used to control heading, while the pedals are controlled only for trim.
Note that even when the AFCS is enabled, any pilot inputs to a control will take priority over the AFCS. The AFCS can be disabled by pressing the disconnect (DIS) button. The AFCS will also disconnect when rotor rpm is less than 80% or primary electric power is lost. A tone will sound when disconnect to alert the pilot.
The AFCS also includes an "autohover" button labeled HVR. The autohover button is a shortcut for enabling heading and altitude hold at current heading and altitude, and airspeed hold with an airspeed of zero. When enabled at cruise, the aircraft will gradually slow and come to a stationary hover. It is important to note that autohover works by controlling the inputs for zero motion, not to maintain a specific position. It is therefore the pilots responsibility to monitor any small drift that may occur with autohover enabled.
10.1 Common tasks using the AFCS
- Takeoff with autopilot - Center controls and press the HVR button to enable autohover. The target altitude will be set to the current altitude. Change the target altitude to a value above the current value, and the aircraft will automatically lift into a hover at the selected altitude.
- Landing with autopilot - From a hover, enter an altitude below the ground level (e.g. 0). The aircraft will descent and land lowering collective when it touches the ground. You may also enter a negative value for the vertical speed with the same result.
- Adjusting position while in hover - When autohover is enabled (altitude, airspeed and heading hold), you can use small cyclic inputs to nudge the aircraft in a desired direction. The aircraft will move in the direction of the nudge, the re-stabilize at zero forward and lateral speed.


