Difference between revisions of "S-61R Pelican/Mission Equipment"
(→Hover Trim Control) |
(→Winch Chat Commands) |
||
| Line 85: | Line 85: | ||
|- | |- | ||
|w -|| Decrease winch speed (by chat) | |w -|| Decrease winch speed (by chat) | ||
| + | |- | ||
| + | |w x|| Stow all hook loads | ||
|- | |- | ||
|w b|| Deploy the rescue basket | |w b|| Deploy the rescue basket | ||
Revision as of 03:05, 23 June 2020
SECTION 9. MISSION EQUIPMENT
Contents
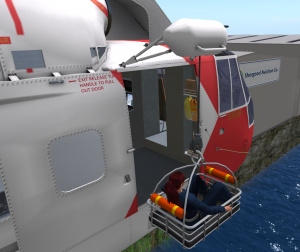
1 Rescue Hoist
1.1 Overview
The S-61R is equipped with a rescue hoist mounted above the main cabin door. The hoist is powered by the utility hydraulic system with control circuits powered by the DC bus. A switch on the overhead panel labeled HOIST MASTER has positions CREW, OFF and PILOT to disabled the system, or give control the either the pilot or the crew. When the winch is not in use, it is recommended that it be kept in the fully retracted position with no load and the HOIST MASTER in the OFF position. This will disable the timer loop in the hoist script and reduce script lag.
1.2 Hoist Loads
1.2.1 Load Types
The hoist is capable of being used with the following loads:
| Device | Use |
|---|---|
| Harness | Used for deployment and retrieval of rescuers only. Never to be used for patients |
| Rescue Basket | Used for the rescue of uninjured or lightly injured patients. May also be used for the deployment and retrieval of divers or rescuers not trained in hoist operations. Do not use for patients with suspected back injuries or broken bones. |
| Stokes Basket | Used for the rescue of injured patients, may be used in conjunction with the harness to allow a rescuer to attend to the patient during the hoisting process |
| Forest Penetrator | Used for the rapid rescue of uninjured or lightly injured patients, particularly through thick forest cover. Do not use for patients with suspected back injuries. |
| Rope | Used for the deployment of rescuers by rappelling. This is the preferred method of deployment on land or onto objects such as boats as the rescuer can control their own descent, which increases safety. It is also faster than lowering by hoist. |
1.2.2 Deploying
A load is generally deployed by clicking on it. For the rope and the harness, you can click on one of the bags in the storage area near the cabin door. The smaller yellow bag contains the harness, while the larger orange bag contains the rope. The rescue basket, stokes basket and forest penetrator are configured as a sit target as its default touch action, so a simple left click will result in sitting on that piece of equipment. If it is necessary to deploy rescue equipment while not sitting in the helicopter you can right click on it and select "Touch". If other rescue equipment is already deployed, the selected equipment will be swapped into the helicopter before the new equipment is swapped out. Clicking on the hook, will swap in all equipment. No more than 1m of cable should be deployed when swapping loads/out.
For the stokes basket and rescue basket, if anyone is sitting in them when they are swapped in our out, the avatar will be moved in or out with the load. For the forest penetrator and harness, however, it is necessary for the avatar to move into OnBoard by clicking on the floor of the main cabin before swapping in the penetrator. Failure to do so, will result in the avatar being unsat while outside the helicopter, potentially leading to serious injury or death.
1.3 Hoist Operation
Warning: Due to SL physics limitations, the hoist loads must be kept at least 1 meter from any solid object or surface, failure to do so will endanger the aircraft
1.3.1 Pilot Control
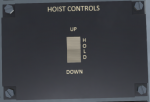
To use the pilot winch controls (see Figure 2), the HOIST MASTER switch on the upper panel must be set to PILOT. The hoist control panel, located on the lower consoled, consists of a single three-position rocker switch with UP, DOWN and a center HOLD position. The switch is spring loaded to the HOLD position.
A pilot hoist shear switch is located on the upper console. This switch can be used in the event the cable becomes entangled and must be cut free to ensure the safety of the helicopter. The switch has a guard which must be opened before activating the switch. The shear switch is active regardless of the position of the HOIST MASTER.
1.3.2 Crew Control
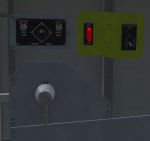
The crew winch controls (see Figure 3) are located to the right of the main cabin door. The HOIST MASTER switch on the upper panel must be set to CREW position to utilize them. The main control is a lever that can be tilted to the left or right to lower or raise the winch. The amount by which the lever is tilted will affect the speed of the winch.
The crew member occupying the hoist operator seat (kneeling by the main door), can also use key controls to control the winch. Use PgDown to lower the winch, and PgUp to raise it. These controls are only active when the hoist is in crew mode.
A crew hoist shear switch is located above and to the right of the hoist control. It is covered by a switch guard which must be opened to activate the shear. The shear panel also includes a shear test switch. To test the shear switch, first set the shear test switch to TEST. Then open and activate the shear switch. If the green test light comes on, then the shear circuitry is operating correctly. Be sure to turn off the shear switch and close the guard before turning off the test switch.
1.3.3 HUD Control
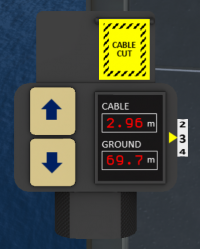
The winch HUD (see Figure 4) can be used to control the winch by any crew member in the the helicopter. In order for the HUD to be active, the helicopter must have hydraulic and electrical power, and the HOIST MASTER must be in the CREW position. The winch HUD has two buttons on the left side to raise and lower the winch. A digital display shows the current cable length and the current height above the ground. A dial on the right-hand side sets the winch speed. Finally an emergency cable cut button with a guard is located on the top portion of the HUD.
1.3.4 Winch Chat Commands
The winch can also be controlled through the following chat commands:
| Command | Description |
|---|---|
| w n | Move which so that n meters of cable are deployed. |
| w u n | Move which up by n meters. |
| w d n | Move which down by n meters. |
| w cut | Cut the cable. |
| w + | Increase winch speed (by chat) |
| w - | Decrease winch speed (by chat) |
| w x | Stow all hook loads |
| w b | Deploy the rescue basket |
| w s | Deploy the stokes basket |
| w h | Deploy the harness |
| w sh | Deploy the harness |
| w p | Deploy the forest penetrator |
| w r | Deploy the rope |
1.4 Hoist Limits
Operating Limits
- Duty Cycle: Continuous
- Maximum load: 300 pounds lowering, 600 pounds raising
- Maximum Airspeed with Hoist Cable Extended: 50 kias
1.5 Rappelling Rope
Unlike the baskets and harness, the rope attaches to a ring on the back of the winch. The rope can be used to quickly egress from the helicopter in a high hover to the surface. Click on the orange rope bag to deploy the rope.
Any passenger in the main cabin may use the rope by clicking on the rope or the winch body. This will position the user at the top of the rope in a rappelling pose. Use the down arrow to control descent. Once at the bottom, the user will automatically unsit from the rope and aircraft.
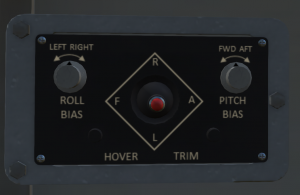
1.6 Hover Trim Control
The hoist operator station also includes a hover trim control (see Figure 5). This can be used by the hoist operator to control the helicopter position while using the hoist. Click near the control to move the lever and cause the helicopter to translate its position at about 1 m/s. The hover trim system operates by applying a small bias to AFCS. The AFCS must be on and in an active hover in order to use the trim control. It is also possible for the hoist operator to use arrow keys to control the hover trim.
