S-61R Pelican/Maintenance and Diagnostics
SECTION 11. MAINTENANCE AND DIAGNOSTICS
Contents
1 General
The S61R has 30 replaceable components. Four of these components (air bottle, and three fire extinguisher bottles) are replaced on use, while the remaining 26 have individually tracked lifetimes. Component lifetimes are tracked as a function of the HOBBS time of the helicopter. As a component ages, its failure rate will increase, increasing rapidly once its lifetime has expired. It is recommended that components be replaced at their individual lifetimes. In addition to the age of a component, excess wear is also tracked. Any mishandling of the aircraft (exceeding limits, etc) will result in wear accumulation by the affected component. Wear is not directly viewable but will affect the failure rate of the component, causing it to fail earlier than it might otherwise have failed.
Component times, wear and failure status are all synced with the Shergood servers. Whenever a new copy is rezed, the rezed helicopter will sync its component status with the server. Component times are synced by tail number, so if you have multiple tail numbers registered, each one will have its own set of component times.
2 Component Failure Rates
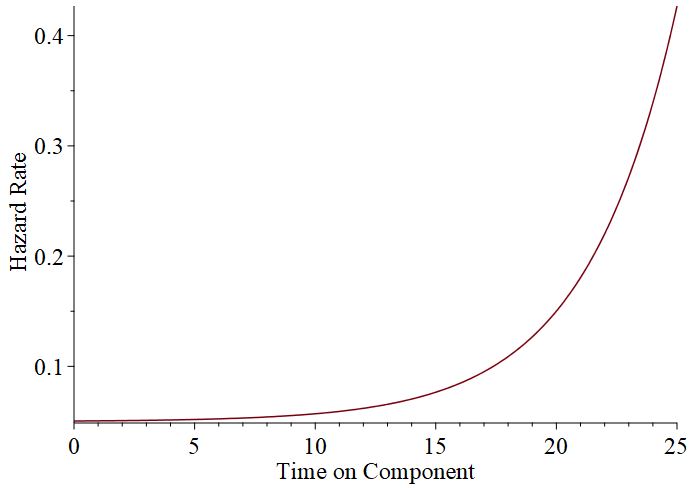
Failures in the S61R are individually calculated for each component based on the age and wear of the component according to a "hazard rate function". The hazard rate function shows the instantaneous failures/hour of a component as a function of the age of the component (with wear being treated as additional age). Figure 1 shows an example base hazard rate function for a component with a 20 hour lifetime. As you can see, the initial hazard rate is very small (but non-zero), and increases rapidly past the 20 hour lifetime of that component. This results in the possibility for components that fail early, a higher failure possibility as the component ages, and a very high chance of failure if components are not replaced at the end of their lifetime.
The base hazard rate is modified by the following factors:
- Failure Mode - A Failure mode multiplier of Low (0.25), Medium (1.0), and High (10.0) is applied to the based hazard rate for the component.
- Fluid Levels - When operating at fluid (oil or hydraulic fluid) levels below 50%, the hazard rate for that component is increased (as well as causing wear).
- Misuse - When a component is misused (e.g., exceeding max rpm or torque) the hazard rate is increased while the condition is in effect. In addition, wear is added to the component.
3 Failure/Fragile Mode
The handling of failures and crash damage is handled by the "Failures" and "Fragile" options in the "@Option" menu. When "Fragile" is on, crashes are detected and can cause damage to the helicopter. When "Fragile" is off, an information message is issued, but the crash is otherwise ignored. The "Failures" option has the effects shown in the following table:
| Mode | Description |
|---|---|
| None (N) | No Failures, and no accumulation of wear. Component times will accumulate normally, but will have no effect. |
| Passive (P) | Only direct causes will damage components and no accumulation of wear. Crash damage and progression of existing damage (i.e., transmission chip will progress to transmission failure) in effect. |
| L1 (1) | Crash damage, random failures, accumulation of wear in effect. Failure rate at 10% of normal rate. |
| L2 (2) | Crash damage, random failures, accumulation of wear in effect. Failure rate at 25% of normal rate. |
| L3 (3) | Crash damage, random failures, accumulation of wear in effect. Failure rate at 50% of normal rate. |
| L4 (4) | Crash damage, random failures, accumulation of wear in effect. Failure rate at 75% of normal rate. |
| L5 (5) | Crash damage, random failures, accumulation of wear in effect. Failure rate at normal rate. |
| L6 (6) | Crash damage, random failures, accumulation of wear in effect. Failure rate at 1.5 times normal rate. |
| L7 (7) | Crash damage, random failures, accumulation of wear in effect. Failure rate at 2 times normal rate. |
| L8 (8) | Crash damage, random failures, accumulation of wear in effect. Failure rate at 5 times normal rate. |
| L19 (9) | Crash damage, random failures, accumulation of wear in effect. Failure rate at 10 times normal rate. |
4 Replaceable Components
The following table lists all of the repairable components, the nominal lifetime of each component in hours, symptoms of a component failure, and causes of excess wear on the component.
| Description | Lifetime | Failure Symptoms | Wear Causes |
|---|---|---|---|
| #1 Engine | 100 |
Warning Symptoms:
|
|
| #2 Engine | 100 |
Warning Symptoms:
|
|
| Auxiliary Power Unit | 100 |
|
|
| Main Rotor Blades | 200 |
|
|
| Tail Rotor Blades | 200 |
|
|
| Main Transmission | 150 |
Warning Symptoms:
|
|
| Tail Transmission | 150 |
Warning Symptoms:
|
|
| Intermediate Transmission | 150 |
Warning Symptoms:
|
|
| #1 Generator | 20 |
|
n/a |
| #2 Generator | 20 |
|
n/a |
| #1 Eng. Fuel Filter | 20 |
|
|
| #2 Eng. Fuel Filter | 20 |
|
|
| #1 Eng. Fire Extinguisher | On Use |
|
|
| #2 Eng. Fire Extinguisher | On Use |
|
|
| APU Fire Extinguisher | On Use |
|
|
| Air Bottle | On Use |
|
|
| Primary Hydraulic | 20 |
|
|
| Auxiliary Hydraulic | 20 |
|
|
| Utility Hydraulic | 20 |
|
|
| #1 Eng. Fuel Pump | 30 |
|
|
| #2 Eng. Fuel Pump | 30 |
|
|
| #1 Forward Boost Pump | 30 |
|
|
| #2 Forward Boost Pump | 30 |
|
|
| #1 Aft Boost Pump | 30 |
|
|
| #2 Aft Boost Pump | 30 |
|
|
| Battery | 50 |
|
|
| Landing Gear | 100 |
|
|
| Wiring Harness (AC & DC) | 400 |
|
|
| #1 Eng. Fuel Controller | 75 |
|
|
| #2 Eng. Fuel Controller | 75 |
|
|
5 Inspecting Components
Most components can be inspected by clicking on them. When you click on such a component, a message indicating the general condition of that component will be displayed. The messages reflect both component age and wear. Besides a "damaged" message, the following status messages can be displayed based on the effective percent of lifetime of the component:
| Message | %Lifetime |
|---|---|
| The X appears to be in good condition. | <50% |
| The X appears to be serviceable | 50%-75% |
| The X appears to be well used | 75%-85% |
| The X appears to be well worn | 85%-95% |
| The X appears to be on its last legs | 95%-100% |
| The X appears to have seen better days | 100%-150% |
| The X appears to as if it might break by looking at it wrong | >150% |
6 Maintenance Table
The S61R comes with a maintenance workbench (see Figure 2) that can be used to monitor component times and replace components. Smaller components are laying on or under the table, while larger components are on palates or boxes near the bench. A logbook on the bench shows which aircraft is being worked on, and a laptop shows the time data for all helicopter components. Clicking on a component while the workbench is not connected to a helicopter will bring up a message indicating what it is. For example, clicking on the battery will display the message:
[20:06:59] SA - S61-workbench - v1.0: You inspect the battery. It appears to be suitable as a replacement part.
It is suggested that you familiarize yourself with all the components on the workbench by clicking on them. Clicking on any location other than a component will bring up the menu with the following options:
| Button | Description |
|---|---|
| CONNECT | Connect to a helicopter within 20m. |
| Public( ) | Sets the workbench to public use if selected. Otherwise only the owner can use the workbench. |
6.1 Connecting to a Helicopter
Pressing CONNNECT from the workbench menu will scan for nearby helicopters and give you a list by tail number. Select the tail number of the helicopter you want to work on. The selected tail number will be shown on the aircraft logbook sitting on the bench as well as on the laptop screen.
6.2 Access Control
Selecting "Public" grants access for anyone to use a workbench, but access to a helicopter is not automatically granted. In order to use a workbench, both the owner of the workbench, and the user of the workbench must have pilot privileges on the helicopter. Pilot privileges means you are either owner of the helicopter, or you have been added to the helicopter as a pilot by name.
6.3 Maintenance Laptop
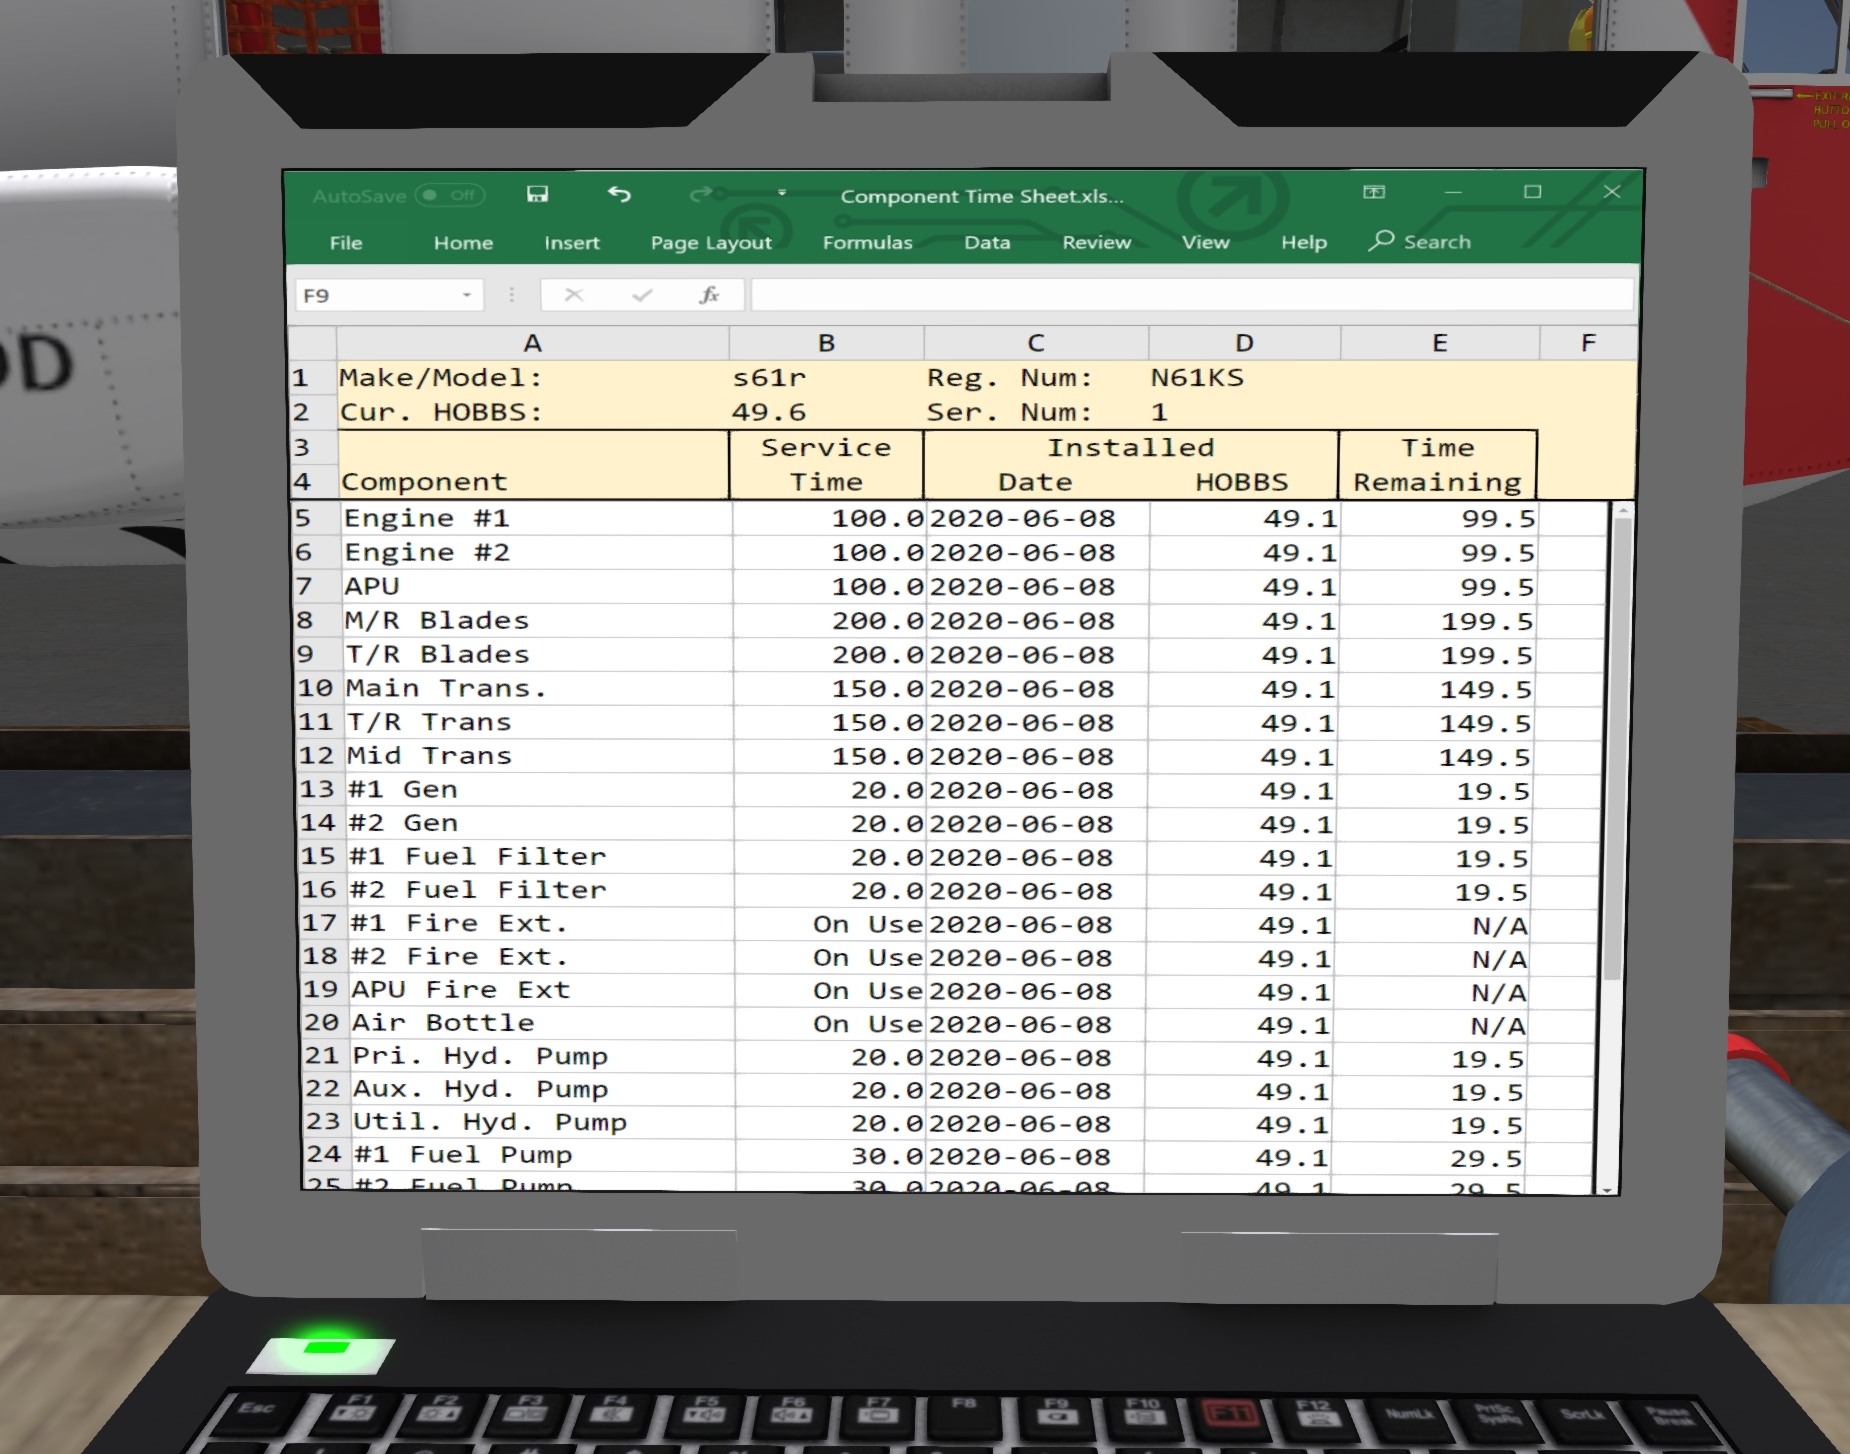
Once connected to a helicopter, the maintenance laptop (see Figure 3) will show the current times on all components. The laptop is implemented with prim media, so be sure you have media enabled and click on the laptop screen to see it. The header area at the top will show information about the connected helicopter including its make/mode, tail number, current HOBBS time and serial number. The rows will show the following:
- Component - The name of the component.
- Service Time - The lifetime (in hours) of the component when new.
- Installed Date - The date on which the component was installed.
- Installed HOBBS - The HOBBS time at which the component was installed.
- Time Remaining - The time remaining (in hours) before the component should be replaced. A negative value indicates replacement is past due.
Note that the list of items is scrollable. A scrollbar on the right can slide the component list up or down.
6.4 Replacing Components
Before you replace a component, the appropriate access panels must be open. For example, to replace the #2 engine, you must open the panel for the #2 engine. Components are replaced by clicking on the component on the workbench. If only one type of that component is used in the helicopter, a menu asking you to confirm the installation will be posted. Click "Yes" to install the component. If the appropriate access door is not open, you will get a message such as:
[20:27:17] SA - S61-workbench - v1.0: You cannot access that without opening the required access doors.
Otherwise, the component will be replaced, and the component time data updated on the laptop. For component types that are used in multiple places, you will be shown a menu asking where that component should be installed. Select the location to replace the component.
IMPORTANT NOTE: Replacement parts are shipped without fluids. Be sure to add fluid to the component before first use, or you will be replacing it again very soon.
6.5 Online Access to Component Table
The component times can also be viewed online via the Shergood web site. You can access the component times of your aircraft by navigating to your Shergood profile page, selecting the "My Aircraft" tab, clicking on the link for the tail number of your aircraft, then selecting the "Components" tab on the aircraft profile page. You can only view component time information for aircraft you own. Alternatively, you can navigate directly to the aircraft profile page with a link of the form:
https://www.shergoodaviation.com/aircraft-status.php?n=XXXXXX
where XXXXXX is replaced with your tail number.


