S-61R Pelican/Avionics
SECTION 3. AVIONICS
Contents
- 1 Radios
- 2 Navigation Control Panel
- 3 GPS/Navigation Systems
- 4 VOR Navigation Systems
- 5 Search Patterns
- 6 Radar Altimeter
- 7 IFF Transponder
1 Radios
The S-61R is equipped with radio communication equipment consisting of:
- Separate audio panels for the pilot, copilot and RDF operator seats
- Two VHF COM radios
- Two VHF NAV radios
- One UHF radio
- One HF radio
- Mirrored interface for each voice communication radio at the RDF operator station
The audio panels, COM radios, HF radio and UHF radio are described in the following sections. The NAV radios are described in the section on VOR navigation.
1.1 Audio Panel
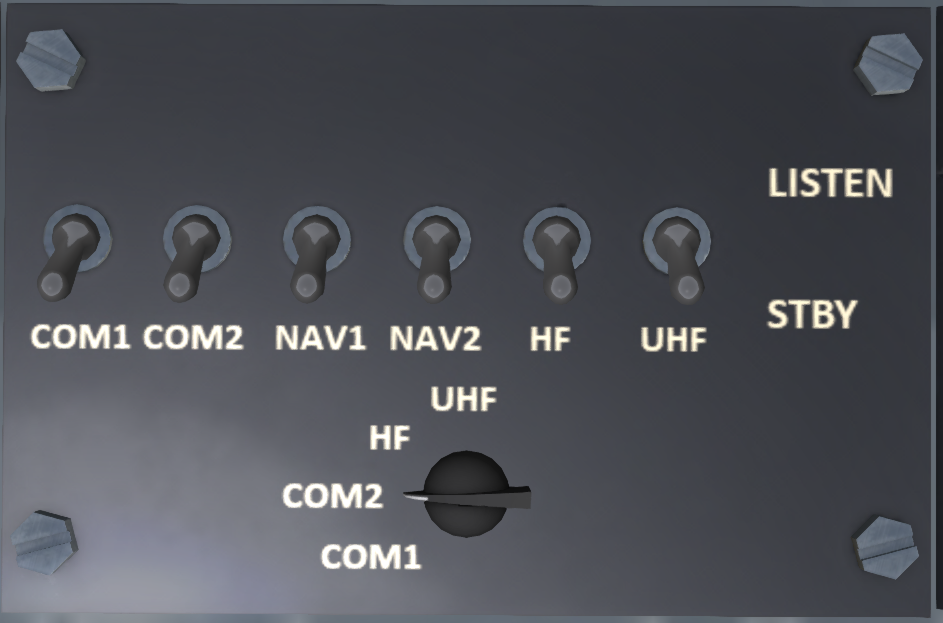
The audio panels are used to control which radios are being actively listened to, and which radio is used for transmitting. The pilot, copilot and RDF operator have separately controllable audio panels (see Figure 1). The pilot and copilot audio panels are located on their respective side panels, and the RDF operator audio panel is mounted on the front panel in front of the operator's seat. A row of switches select which radio sources are active for receiving. Flip the switch for a radio source into the up (LISTEN) position to receive that source. Each crew member may select as many sources as they like among the available radios. Received radio messages will be shown in local chat as a direct message to the receiving crew members.
The knob on the bottom of the unit selects which radio will be used for transmitting. Only one radio may be selected for transmit at a time. To transmit on the selected radio use channel 3 by default. For example
/3 White Star tower, Helicopter N58KS, 2km East at 400 feet, inbound landing with information Golf.
Might be the radio call to check in with the control tower at White Star airport.
1.2 COM Radios
The COM radios operate in the VHF band between 118.000 Mhz and 136.975 Mhz. They are the preferred radios used for most communications. COM radios have a maximum range of about 15 regions (3.75 km). As a station approaches the maximum range, reception quality will begin to degrade.
The selected frequency is shown in the middle of the radio. The knob on the left controls the whole MHz value, and the knob on the right controls the fractions of a MHz in 0.05 Mhz increments. A button labeled "+0.025" on the right hand side toggles an addition of 0.025 Mhz on the displayed frequency. In addition the chat commands "com1" and "com2" can be used to select a frequency. For example:
com1 128.125
would set the COM1 frequency to 128.125 MHz.
Each airport in SL, has a specific set of frequencies associated with it that may be viewed by clicking on an airport icon on the Shergood Aviation Map. These frequencies are:
- CTAF/TWR - When an airport has an operating control tower, this frequency is used for communication with the control tower. When no control tower is in service, this frequency is the CTAF (Common Traffic Advisory Frequency). The CTAF is used to self-announce position relative to the airport
- ATIS - Automatic Terminal Information Service - This frequency broadcasts weather and NOTAM information about an airport.
- Ground - This frequency is used for ground communication at an airport. Normally this frequency is used only when a control tower is in service. In other cases, the CTAF is used.
- VOR - Frequency of the VOR navigation beacon at an airport. This frequency is used by the NAV radios.
1.3 HF Radio
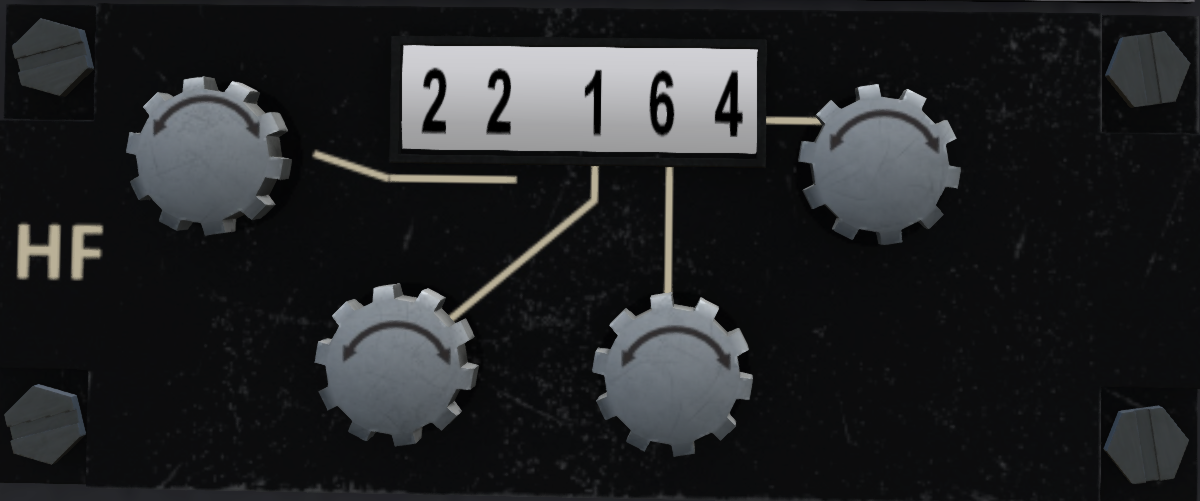
The HF radio works between 3.000 Mhz and 30.999 Mhz. Due to the lower operating frequency compared to the COM radios, the HF radio will operate over a longer distance, up to 100 regions (25 km). However, the overall transmission quality is poor compared to the COM radios even at short range.
The HF radio is tuned using four knobs on the panel. Each knob controls a different part of the selected frequency. In addition the "hf" chat command can be used to set a frequency. For example:
hf 22.124
would set the selected frequency to 22.124 MHz.
1.4 UHF Radio
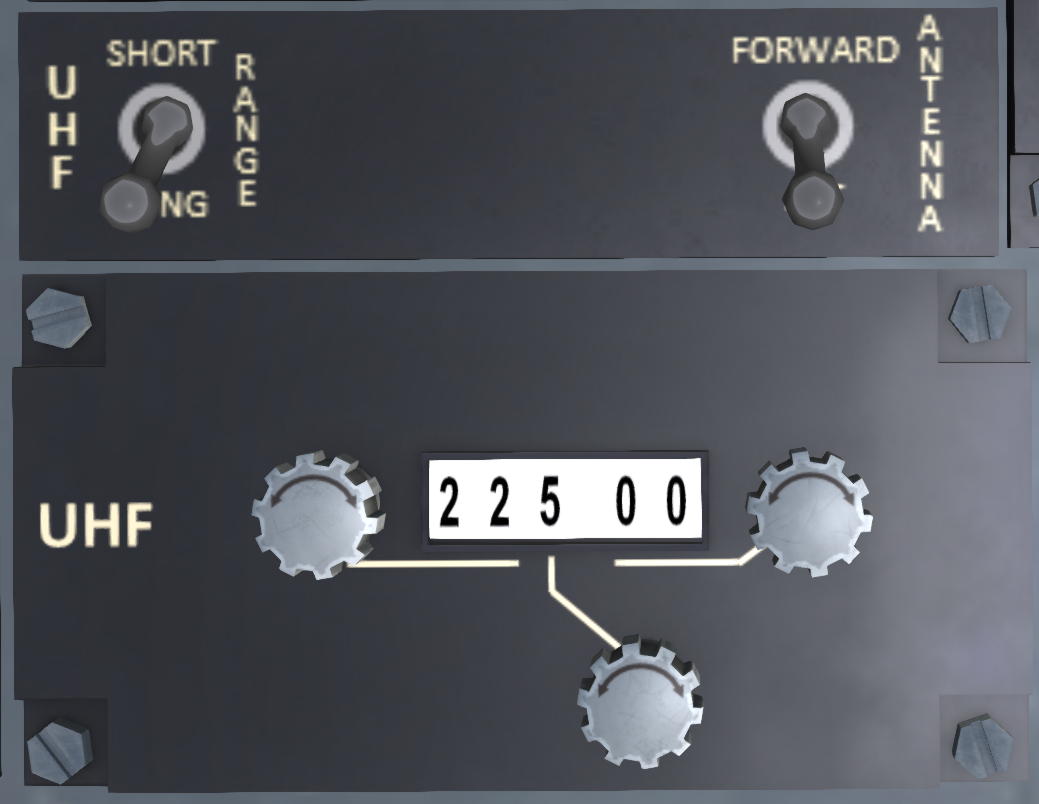
The UHF radio works between 225.00 Mhz and 399.95 Mhz. The UHF radio is tuned using four knobs on the panel. Each knob controls a different part of the selected frequency. In addition the "uhf" chat command can be used to set a frequency. For example:
uhf 225.00
would set the selected frequency to 225.00 MHz.
The UHF radio includes a panel above the radio to select transmit power (short or long range), and antenna select to improve reception forward or aft of the aircraft. These two switches are currently for role-play purposes only and will not affect the actual radio operation.
The navigation control panel (see Figure 5) serves as the central point of reference in the S-61R navigation systems. A selector knob on the panel selects which system to use for navigation. The NAV1 and NAV2 settings select one of the two NAV radios for VOR navigation. The GPS setting selects GPS Navigation. And finally the HOLD, SQR and LADDER settings select an Automatic Search Pattern. The indicator light and leg settings will be described in the search pattern section.
The navigation signal can be used to drive the CDI on the HSI, and as well as being coupled with the AFCS.
The navigation panel and associated radios accepts the following chat commands:
| Command | Description |
|---|---|
| nav mode mode | Set the navigation to mode where mode is one of: nav1, nav2, gps, hold, sqr, ladder. |
| nav nav1 f | Sets the frequency for the NAV1 radio. |
| nav nav2 f | Sets the frequency for the NAV2 radio. |
| nav crs crs | Sets the selected course on the HSI to crs. |
| nav com1 f | Sets the frequency for the COM1 radio. |
| nav com2 f | Sets the frequency for the COM2 radio. |
| nav hsi | Toggles the NAV enable button on the HSI. |
| nav legs n1 n2 | Sets the leg lengths for the search pattern. |
3.1 Introduction
The KG-9800 navigation system is comprised of: a main control panel; pilot and co-pilot side HSI; and pilot and co-pilot side marker beacons. The main control panel allows you to enter a sequence of waypoints that are then flown using the HSI. The marker beacons are used when flying ILS approaches to indicate waypoint passage in the approach. Up to twenty waypoints may be entered, including an approach at the destination.
3.2 GPS Main Panel
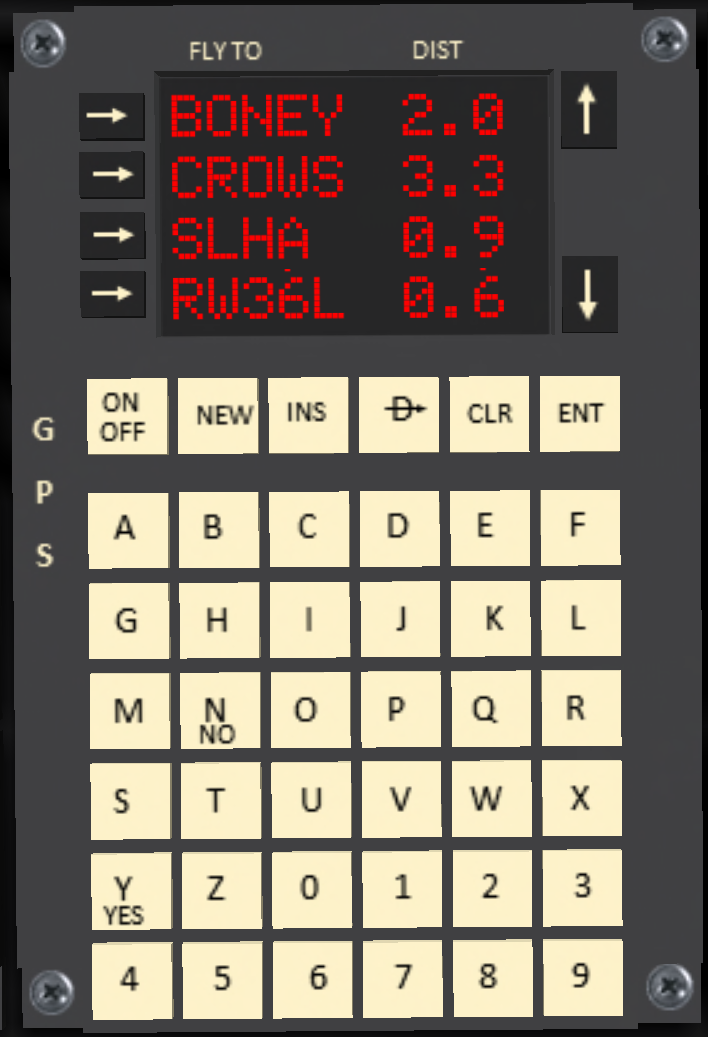
The main GPS panel is located on the slant panel between the seats. It is shown in Figure 6. It consists of a 4-line display, line selector buttons to the left of the display, scroll buttons to the right of the display, a row of function buttons below the display, and an alpha-numeric keypad on the bottom portion of the unit. The primary function keys are:
3.2.1 Main Display
When a flight plan has been entered (see ), the display will show the list of waypoints and distances in kilometers. One kilometer is 4 sims. The distances are segment distance from the previous waypoint to the next waypoint. In the case of the first waypoint, it is the distance from the start point of the segment to the next waypoint. Note this will not update in flight and you should look the the HSI display for the current distance to the waypoint. The up/down arrows to the right of the display can be used to scroll through the waypoints you have entered. Optionally, the last "waypoint" can be an approach for the airport listed above it. When an approach has been entered, the distance to the airport line is the distance to the IAF (initial approach fix) for the selected approach, and the distance listed on the approach line is the distance from the IAF to the MAP (Missed Approach Point).
The distance will be displayed as "???" when there is an unknown waypoint, or while the GPS unit is querying the Shergood server for waypoint positions. It will normally display "???" for the next waypoint while entering the waypoint above.
When there no waypoints have been entered, "ADD?" will be shown on the first line in the display.
3.2.2 Entering Waypoints
To enter a waypoint, you can use the ![]() button to enter at a specific point, or the
button to enter at a specific point, or the ![]() button to insert a new waypoint at the end of the current plan. Pressing either of these keys will put you in waypoint entry mode (see ). When in entry mode, a cursor will be displayed after the selected waypoint. You can enter any airport or waypoint from the Shergood Map System. Once you are done entering a waypoint press the
button to insert a new waypoint at the end of the current plan. Pressing either of these keys will put you in waypoint entry mode (see ). When in entry mode, a cursor will be displayed after the selected waypoint. You can enter any airport or waypoint from the Shergood Map System. Once you are done entering a waypoint press the ![]() button to exit entry mode.
button to exit entry mode.
3.2.3 Editing and Deleting Waypoints
To edit a waypoint, press the ![]() button next to it. You will go back into waypoint edit mode and can type additional letters, or use the
button next to it. You will go back into waypoint edit mode and can type additional letters, or use the ![]() to delete letters. If you press the
to delete letters. If you press the ![]() button after deleting all letters in a waypoint, the line itself will be deleted and you will exit waypoint edit mode. You can also press the
button after deleting all letters in a waypoint, the line itself will be deleted and you will exit waypoint edit mode. You can also press the ![]() button while editing a waypoint. This will move the current waypoint down a line, and insert a new waypoint at the current position.
button while editing a waypoint. This will move the current waypoint down a line, and insert a new waypoint at the current position.
3.2.4 Clearing All Waypoints
Press the ![]() button to delete the current flight plan. It will prompt you to confirm with a Y or N. If you press any key other than Y, the operation will be canceled.
button to delete the current flight plan. It will prompt you to confirm with a Y or N. If you press any key other than Y, the operation will be canceled.
3.3 GPS Chat Commands
Chat commands are available as listed below for the various gps commands described in this section:
| Command | Description |
|---|---|
| gps ln name | Enter waypoint name on line n |
| gps ln ins name | Insert waypoint name at line n |
| gps del ln | Delete waypoint on line n |
| gps ins name | Insert waypoint name at end of plan. |
| gps up | Scroll waypoints up |
| gps down | Scroll waypoints down |
| gps top | Scroll to top of waypoints |
| gps bottom | Scroll to bottom of waypoints |
| gps new | Delete all waypoints |
| gps direct | Go direct to next waypoint |
| gps route [wp1 wp2 ... wpn] | Set a full route as a sequence of waypoints. |
| gps save [label] | Save the current route to server |
| gps load [label] | Load a route from server |
3.4 Entering Routes
To enter a full gps route using chat commands, use the "gps route" command. The gps route command takes a sequence of waypoints. If the final waypoint is an airport, it can optionally take an approach designator as well by appending a "." plus the approach name to the airport identifier. For example, the route command:
gps route AREZO ELHAD SLSK.RW36
would set a route from the current position to waypoint AREZO , followed by ELHAD , and ending with the RW36 approach into SLSK.
3.5 Saving and Loading Routes
Route entered on the GPS can be saved/loaded to/from the Shergood Radar System. Routes can be created, edited and shared between the GPS unit and the route planner on the web site.
3.5.1 Saving Routes
Routes are saved by typing:
gps save
in local chat. If there is a waypoint (or airport) on the current region, that region will be prepended to the plan as a start location when saving. If there current region is not an airport or waypoint, then the path will be saved as entered.
An optional label may also be specified using the syntax:
gps save label
This will save a labeled route. Labeled routes give you the ability to save multiple routes between two points and use the label select the desired route.
3.5.2 Loading Routes
Routes are loaded using the command:
gps load [origin>]destination[.approach][/label]
Most parts of the command are optional except the destination. In its most basic form you can use a command like:
gps load SLHA
This would load any stored route from the current location to SLHA. There there are no saved routes to SLHA from the current sim, the system will look for routes with starting locations up to 2 sims away.
When a starting location is given as in:
gps load SLKA>SLHA
Then the system will load a route from SLKA to SLHA regardless of the current location. In this case, the GPS will first navigate to SLKA from the current location followed by the loaded route.
An approach can optionally be specified as in:
gps load SLHA.H1
The specified approach acts an override for any approach.
Labels are specified at the end after a slash(/):
gps load SLHA/plan9
Labels are used when you have more than one path stored for a given origin/destination pair.
3.6 HSI (Horizontal Situation Indicator)
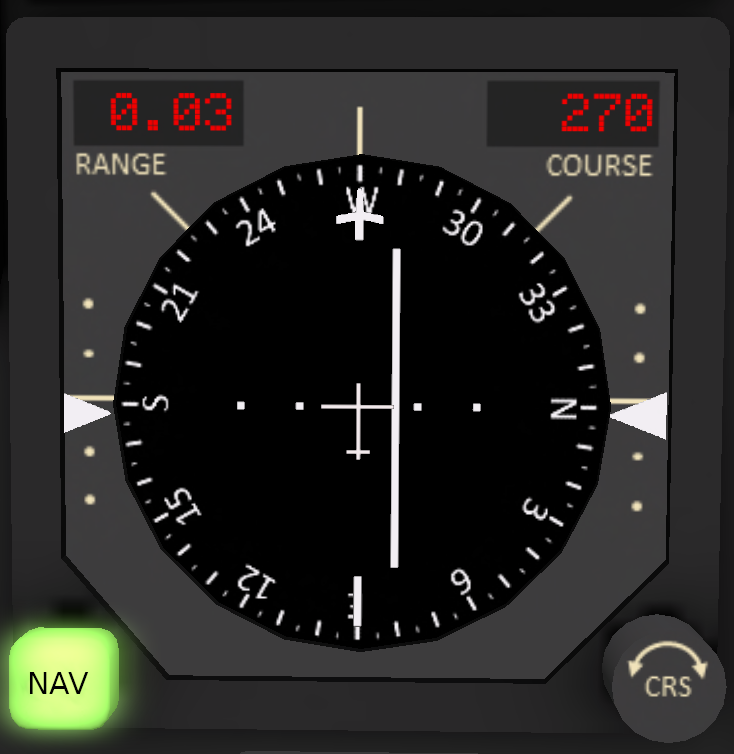
Navigation information is displayed on the HSI (Horizontal Situation Indicator) shown in Figure 11. To enable use of the navigation controller through the HSI, press the NAV button in the lower left corner to enable NAV mode. The HSI is comprised of:
- Rotating compass card showing the current heading
- Course indicator showing the current course overlaid on the compass card as a white "+" symbol. In NAV mode, this is the course for the current navigation mode selected on the navigation panel. When NAV mode is disabled it acts as a manually adjustable heading bug.
- CDI (Course Deviation Indicator) in the center part of the HSI. Deflects to left or right to show the amount of deviation from the course.
- Course heading display showing the current course as a numeric compass heading.
- Range display showing the distance in kilometers to the next waypoint.
- Course Adjustment Knob to adjust the course indicator when not in GPS mode. Click and hold on the knob to move the indicator.
- Glideslope Indicator shows your vertical position relative to the glideslope. The glideslope indicator is usually hidden, but pops in from the sides when approach mode is activated.
3.7 Flying a Course
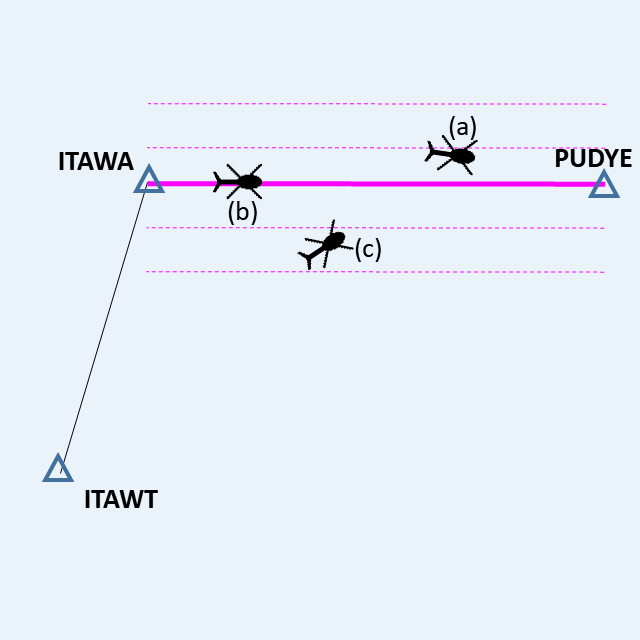
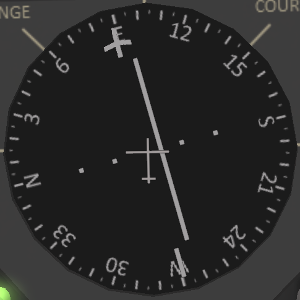
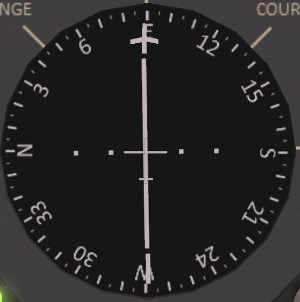
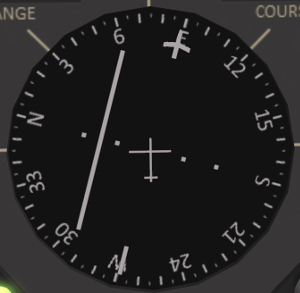
A route is a sequence of waypoints from a starting location to a destination. The lines between waypoints are segments, and the segment currently being flown is the current segment. Consider the example in with a route starting at ITAWT, passing through ITAWA, and ending at PUDYE. In this case, the segment between ITAWA and PUDYE is the current segment, or "track". The GPS system in the S-61R is designed for flying tracks. In the example above, the track from ITAWA to PUDYE is on a 89 degree heading, so the track indicator on the HSI shows (Figure 7) an approximately East heading. Note that the track indicator shows an 89 degree course independent of the actual heading of the aircraft (shown by the reference mark at the top of the HSI).
|
|
|
| (a) Left Of Course | (b) On Course | (c) Right of Course |
Figure 8: Enroute CDI Indications
| ||
The CDI (Course Deviation Indicator), the white line in the center of the HSI, will deflect left or right to indicate the position of the aircraft relative to the current track. The CDI indication in Figure 8 a-c correspond to the aircraft positions (a), (b) and (c) in Figure 7. (a) is aircraft that is slightly right of course, turned toward the course to correct. (b) is an aircraft that is on the course and with the course heading. (c) is an aircraft that is significantly right of course, also turned to intercept the course.
When the HSI is in enroute mode, the amount of deflection corresponds to the distance from track. One dot on the CDI corresponds to 50m off course, with full deflection of two dots at 100m. These correspond to the dashed lines shown in Figure 7.
When correcting for a course deviation, you should turn the aircraft toward the CDI with the amount of correction corresponding to the amount of deflection. As you converge on the track, the CDI will move to the center and you should gradually decrease the amount of correction. In general, your correction should not be more than 30 degrees to avoid overshooting the track.
In some cases, when you are significantly off course, it may be desirable to reset the "start" coordinate of track. You can do this by pressing the ![]() button on the GPS. This will reset the current track to start at the current location and center the CDI.
button on the GPS. This will reset the current track to start at the current location and center the CDI.
3.8 Waypoint Passage
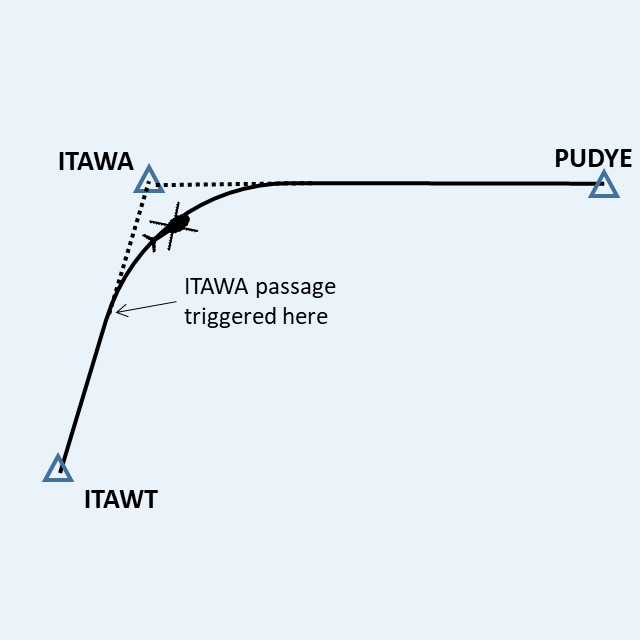
While flying a multi-waypoint path, the GPS uses a set of rules to determine when you have "passed" a waypoint and it is time to turn to the next waypoint. In general, the GPS will attempt to "lead" turns, triggering passage before arriving at the waypoint as shown in Figure 9. Once waypoint passage has been triggered, the HSI will how the heading and CDI indication for the next leg. The distance by a which a turn is lead is based on your current airspeed and the angle of the turn. The lead distance is chosen so that a 20 degree banked turn will approximately roll out on the next leg.
There are a few exceptions to the general rule of leading turns. These are:
- The turn is less than 30 degrees, or more than 150 degrees.
- The next leg is too short to complete the turn before the following waypoint.
If either of these conditions are met, waypoint passing will instead be triggered when passing through a plane perpendicular to the line from the previous waypoint to the next waypoint.
3.9 GPS Approaches
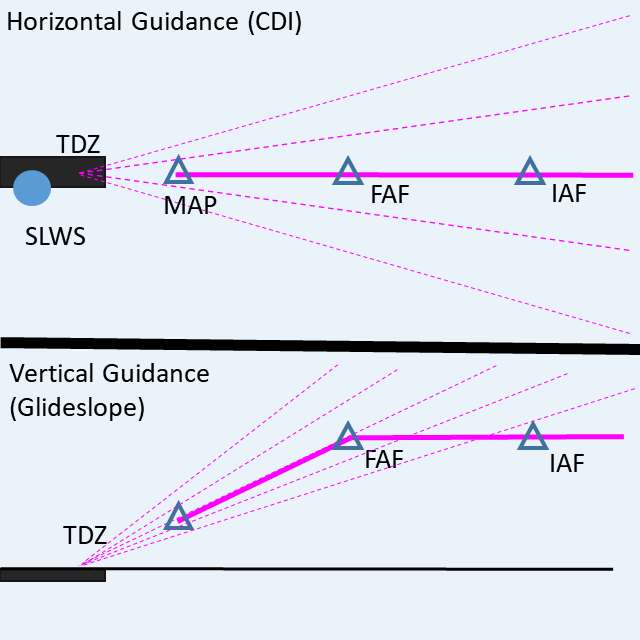
An approach is a procedure for transitioning by use of instruments between the enroute component of flight to a position from which a landing can be made. The Pelican supports ILS approaches with both horizontal and vertical guidance with a recommended approach speed of 60 knots. shows a typical ILS approach in the Shergood navigation system. The top part of the figure shows the horizontal component (called the localizer), while the lower portion shows the vertical component (called the glideslope). An standard approach is comprised of the following four fixes:
- IAF (Initial Approach Fix) - This is the entry point to the approach. Between this point and the FAF, the primary task is to get the aircraft established horizontally on the inbound course. The IAF should be entered at a target altitude as published on the approach plate (see Approach Plates) for the approach.
- FAF (Final Approach Fix) - This is the point at which the aircraft intercepts the glideslope and begins the descent. By this point, the aircraft should be established on the inbound course (localizer) and intercept the glideslope from below.
- MAP (Missed Approach Point) - This is the termination of the instrument portion of the approach. At this point the pilot should determine if a landing can safely be made, or if they should initiate a missed approach or go-around.
- TDZ (Touch Down Zone) - This is the projected point on runway where the aircraft should touch down if they followed localizer and glideslope all the way to the ground.
When shooting an approach, the CDI switches from being distance-based to angle-based. This switch occurs when the aircraft passes the IAF. During the approach, each dot on the CDI represents an angular deflection of 1.75 degrees as shown by the dotted lines in the upper half of Figure 11. The key effect of this is that the CDI becomes progressively more sensitive as the pilot approaches the MAP. Course corrections should be minimal during the later portion of the approach.
Approach mode is indicated by the appearance of the glideslope indicators on the sides of the HSI as shown in . Like the CDI, the the glideslope has a center position and up to two dots of deflection representing the number of degrees above or below the glideslope. Also like the CDI, the glideslope also becomes progressively more sensitive toward the end of the approach.
At the IAF, the glideslope will typically be fully deflected up and gradually come down to the center as the aircraft approachs the FAF. shows the HSI at the FAF at the point of glideslope intercept (slightly high).
3.9.1 Marker Beacon
A marker beacon light (see Figure 12) is mounted on the pilot and copilot sides of the main panel. This light will flash coupled by an audio alert when the aircraft passes the outer, middle and inner markers of an approach. The outer marker tone is an slow, low-pitch intermittent tone; the middle marker tone is a medium pitch tone of alternating dots and dashes; and the inner marker tone is a rapid high-pitched intermittent tone. The outer, middle and inner markers will be triggered at the FAF, MAP and TDZ, respectively. A switch labeled MKR BCN on the main panel controls the sensitivity of the marker beacon receiver. In HIGH mode the detection radius for the marker is increased by 50% compared to LOW mode.
3.9.2 Procedure Turns
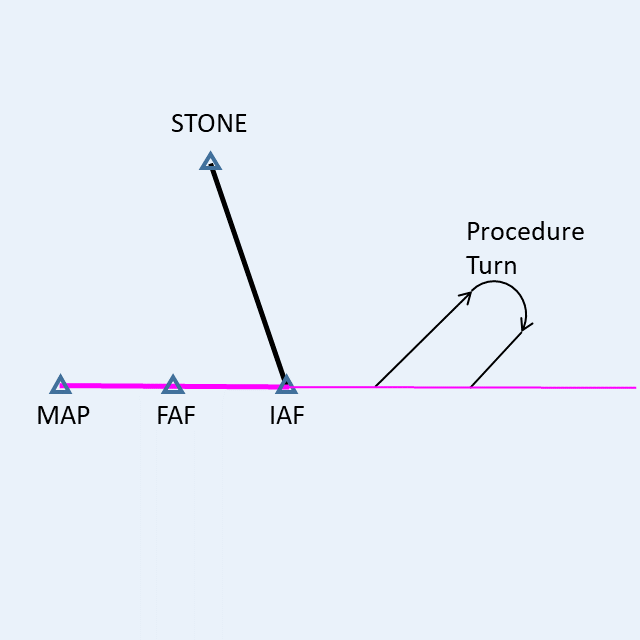
Sometimes, a pilot may elect to fly a procedure turn when entering an approach to get better oriented for it. This may be preferable to attempting to make a sharp turn the IAF. For example, consider the situation shown in Figure 13 where a pilot is approaching the IAF from STONE. This would require a greater than 90 degree turn to the localizer inbound course. It may be difficult to get established on the localizer before reaching the FAF in such cases.
The alternative to the sharp turn is to conduct a procedure turn. A procedure turn is comprised of the following steps:
- Instead of making an inbound turn at the IAF, make an outbound turn flying the opposite direction of the localizer. The heading bug will be at the bottom of the HSI, but the CDI may be interpreted normally while the pilot gets established on the localizer outbound.
- Once established outbound, make a 30 degree left turn.
- Hold the 30 degree heading for approximately 30 seconds.
- Make a 180 degree right turn
- Re-intercept the localizer inbound, then fly the approach normally.
3.9.3 Approach Plates
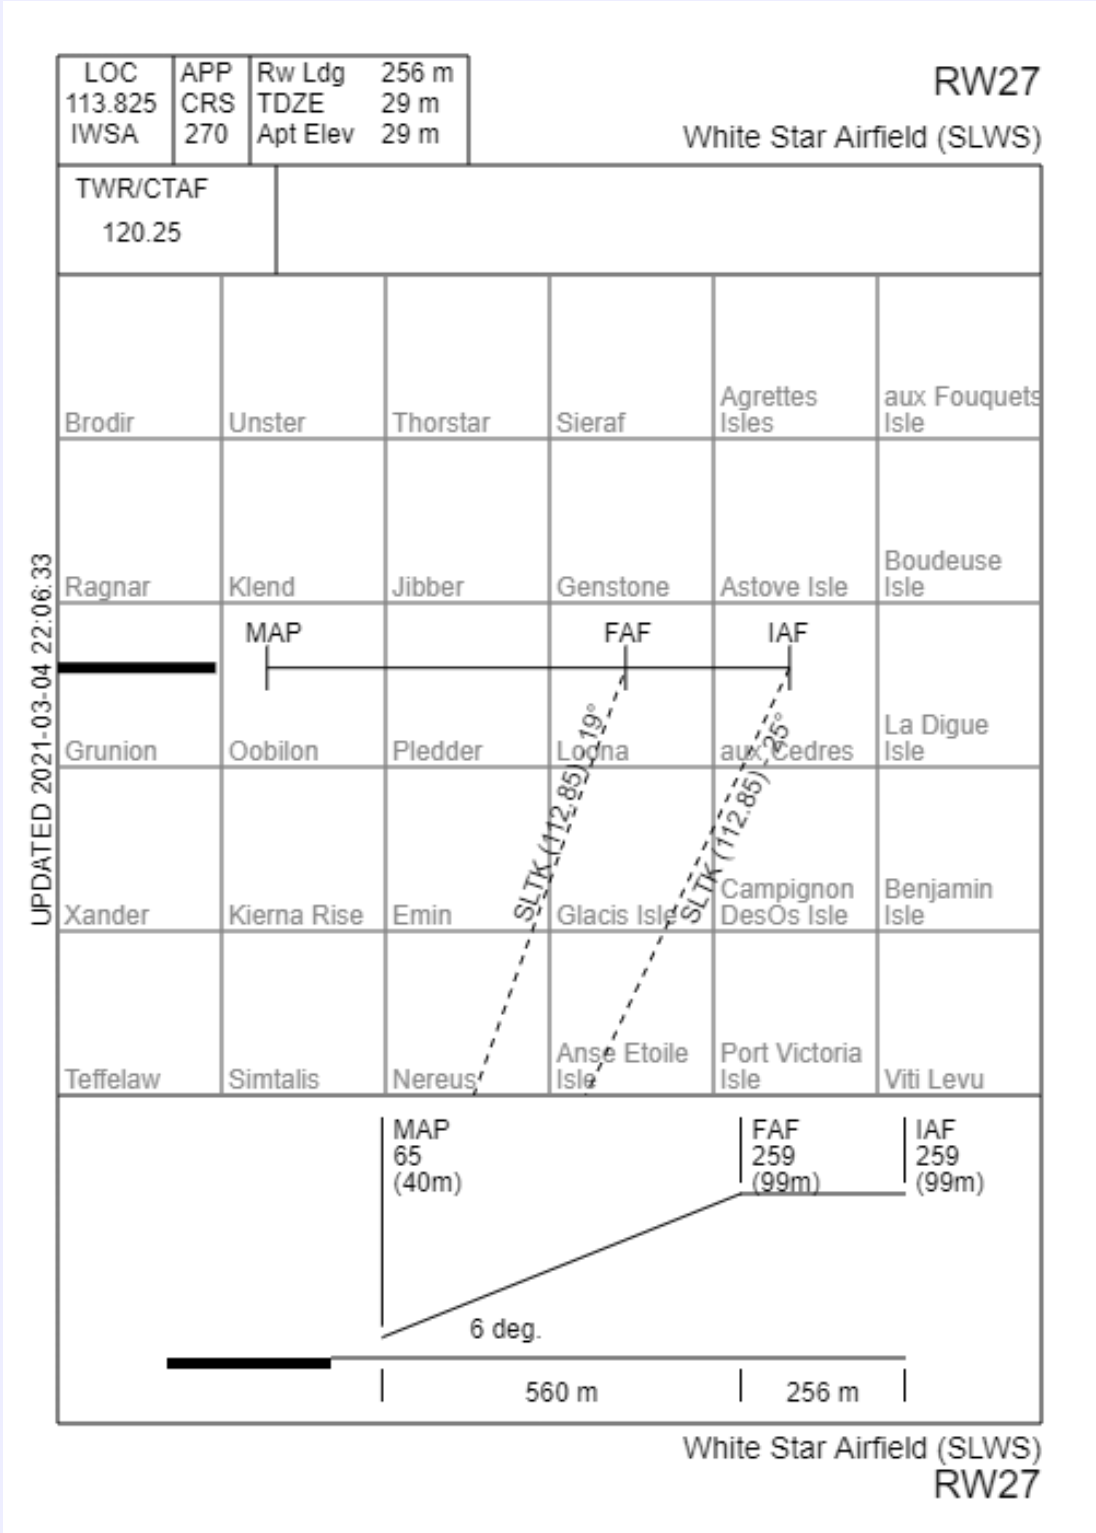
Approach plates are one page summaries of the approach procedures for a particular airport and runway. shows an example of an approach plate for the RW27 approach at White Star Airport (SLWS). An approach plate is divided into the following three sections:
- Data Section - The data section, located in the top part of the approach plate, lists the name of the airport and approach, the inbound course heading, the runway length, elevations of the airport and the touch down zone for the runway, and the tower and/or CTAF frequency for the airport.
- Plan View - The plan view is the main part of the approach plate, showing an overhead view of the approach. The plan view shows the runway, the inbound course, and the location of the key waypoints of the approach (IAF, FAF and MAP). The approach course is overlaid in the sim names in a 6x5 grid of sims.
- Profile View - The profile view is essentially a side view of the approach showing the descent to the missed approach point. The same three approach waypoints of the plan view are shown from the side. In the profile view, the target altitude of those points are shown in both feet above SL sea level and in SL meters. Note that since SL sea level is generally at 20m, the height in feet does not directly correspond to the height in meters shown on the plate.
Referring to the RW27 approach of , the procedure would be to fly to the IAF, establishing an entry altitude of 410 feet (145m). At the IAF, the pilot would then either turn to the inbound course, or use a procedure turn to get established on inbound with a heading of 270. The pilot should expect to intercept the glideslope at the FAF 256m past the IAF and begin a descent to 91 feet (41m). Upon reaching the MAP, the pilot can either choose to land, or to go around to attempt the approach again if they are not in a good position to land. Shergood aviation provides a complete set of approach plates for most SL airports in the Shergood Approach Plate Repository.
The navigation system can be used in conjunction with the AFCS to perform coupled navigation and approaches. In order to fly a coupled approach, you must have HDG, IAS, and BARO ALT hold modes active. You must also have the HSI in NAV mode.
The following procedure can be used to perform a coupled flight from the ground at the originating airport to a destination airport:
- Set the navigation controller to GPS mode
- Enter route including approach in the GPS
- Activate hover mode on the AFCS
- Type "ap alt 800" (or other cruise altitude)
- When aircraft picks off ground enable NAV mode on HSI
- Type "ap ias 100" (or other speed) to set cruise speed of 100 knots.
- About 1km before IAF at destination:
- Type "ap ias 60" to reduce to approach speed
- Type "ap alt N" where N is the approach entry altitude from the approach plate.
- The approach and landing will proceed automatically terminating in a hover over the runway.
NOTE: The autopilot will attempt to fly the route exactly as you have entered it with straight lines between segments. It is the pilot's responsibility to consider sim crossings, ban lines, obstacles, other aircraft and missing sims when entering a route. As always, the pilot may momentarily override the the AFCS to avoid problematic locations along the route or adjust for a sim crossing.
3.10.1 Approach Entry for Coupled Approaches
When entering an approach using coupled navigation, some special rules apply to how the GPS will fly the approach. If the entry angle is less then 30 degrees, the GPS will simply fly directly through the IAF. For entry angles between 30 and 90 degrees, the GPS will lead a turn onto the approach path. For approach angles between 90 ad 150, the GPS will lead a turn onto the "back course" initially flying in the opposite direction to the course until it is far enough out (based on speed) to make a 180 degree reversal and rejoin the approach path. Finally for approach angles greater than 150 degrees, the GPS will fly the aircraft through the IAF, join the back course, then do a course reversal.
4.1 Introduction
In addition to the GPS system, the S-61R also supports VOR (Very High Frequency Omni-Directional Range) navigation. VOR navigation is a ground-based navigation system in which a VOR station transmits a signal that is picked up by a NAV radio (see Figure 15) in the aircraft. The VOR transmits two types of signals, an omni-directional pulse, and a rotating directional pulse. The omni-directional pulse is synchronized to occur when the directional pulse is at magnetic north. By measuring the time between the two pulses, the receiver can determine its relative direction, called a radial, from the VOR station. For SL purposes, a virtual VOR station is "placed" at every airport in the[Shergood Airport Map at the location of the airport marker on the map. See Wikipedia: VOR Omnidirectional range for more details on VOR operation.
4.2 NAV Radios
Each VOR station has an associated frequency between 108.0 and 117.95 MHz that is used to select it. The frequency for the VOR at a particular airport can be found on the Shergood Airport Map by clicking on the airport symbol to bring up the data box for that airport. The S-61R is equipped with two NAV radios (see Figure 15) on the lower panel that can be used for VOR-based navigation. The top radio is NAV1 and the bottom radio is NAV2. To enter the frequency for a radio, you can touch the frequency adjustment knobs, or use a chat command. For example, to set the frequency for NAV1 to 117.30, you can use the chat command:
nav nav1 117.30
VOR stations have limited range, typically about 12 SL regions, and stations that are greater than 30 sims apart can share the same frequency. For this reason, it is important that you identify the station that you have selected. To identify a NAV radio, ensure that audio from it is enabled for the appropriate #Audio Panel, then press the IDENT button on the NAV radio. This will produce a chat message of the form:
[10:06:15] SA - S61R v1.0 (N61KS): You hear .... -... --. .-. (HBGR)
with the Morse code for the station, and the station identifier.
4.3 Radials
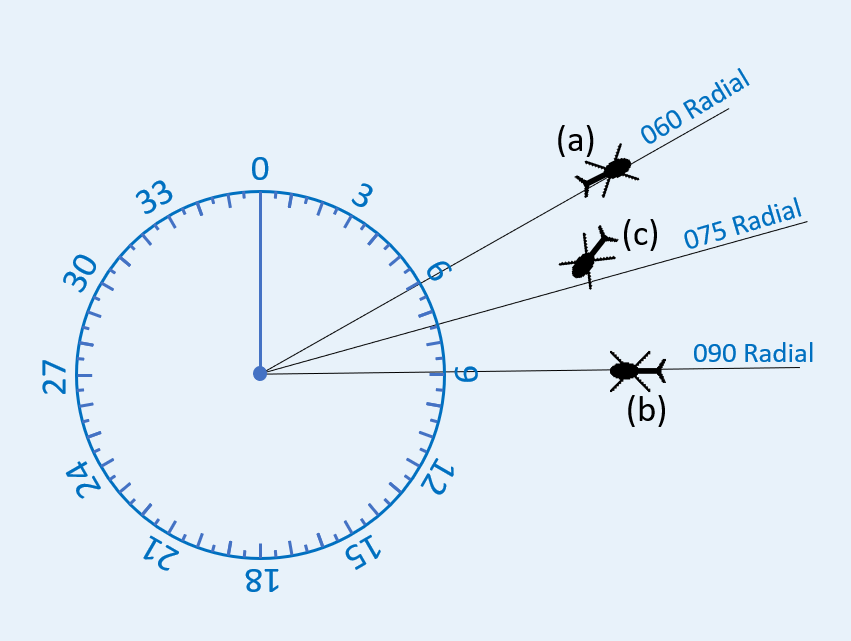
VOR navigation is based on radials. A radial is line of position from the station location, and radiating out on one of 360 directions. Each of these lines of position is called a radial. The radials correspond to the magnetic direction from the station with radial 0 corresponding to North, radial 90 to East, radial 180 to South and radial 270 to West. Figure 16 shows an example of the radials around a station. The aircraft at position (a) is on the 060 radial, the aircraft at position (b) is on the 090 radial, and the aircraft at position (c) is right of course for an inbound approach on radial 075.
After selecting a frequency, the pilot must also select the radial to be used. This is done with the CRS knob on the HSI. You can also set the active radial with a chat command. For example:
nav crs 60
will select the 060 radial from the VOR station. A radial can be selected as either the radial "FROM" the station, or a radial "TO" the station. The TO radials are 180 degrees from the FROM radials.
4.4 VOR Tracking a Course
Once established on a radial, VOR tracking is flown similarly to GPS tracking with the exception that the CDI shows deflection based on angle from the selected radial, instead of distance from the track. The CDI will be centered when you are on course, and when it is deflected you should turn toward the needle to fly back to the course. Like with the GPS, the CDI indication does not depend on your actual heading.
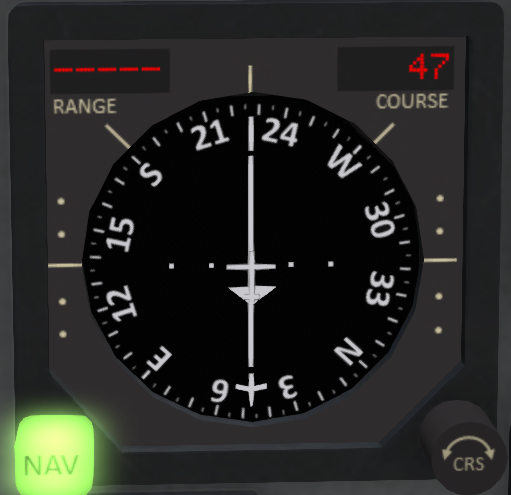
Figure 17 shows an example of an HSI for an aircraft flying a 047 heading inbound on the 047 radial to a VOR. The selected radial is shown in the "COURSE" window. No range information is available for VORs. You can also see the the needle is centered indicating that you are exactly on the radial. Finally, the triangle above the aircraft symbol indicates that you are flying TO the station since it is in the direction of the selected radial.
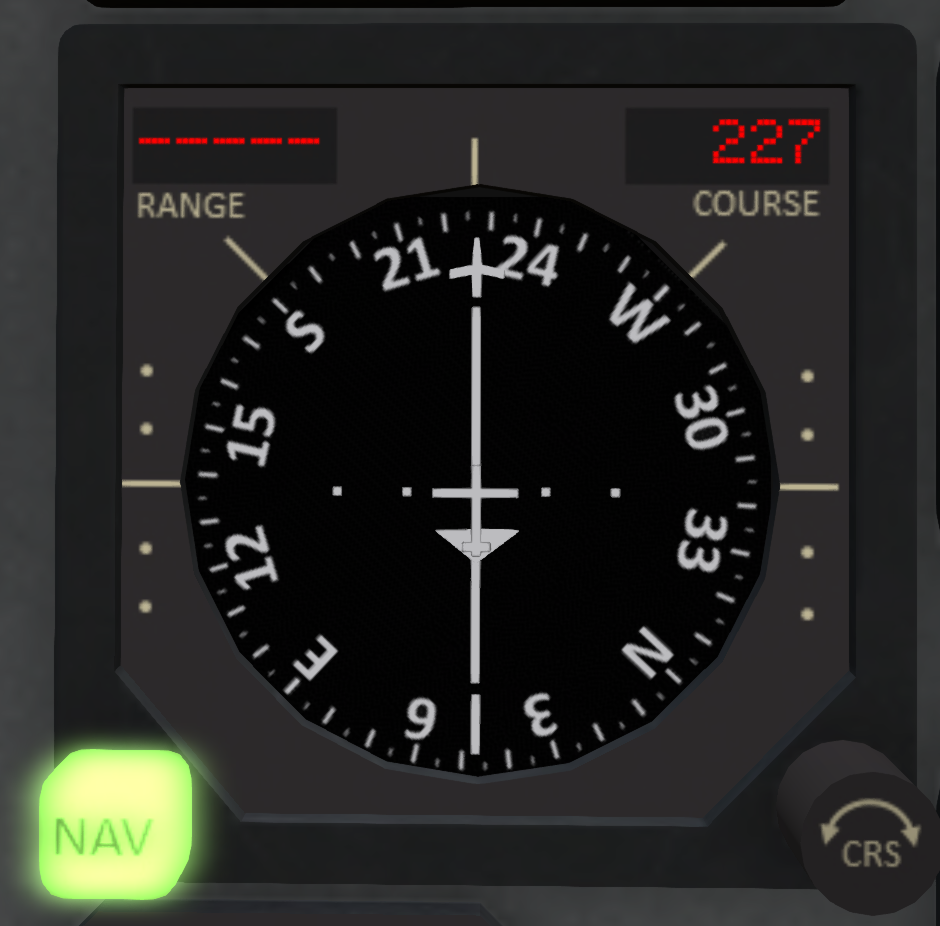
Figure 18 shows an example of an HSI for an aircraft flying a 227 radial FROM the VOR on a 227 heading. In this case, the triangle is point away from the selected course indicating that is a FROM course. Note that the 227 FROM radial and the 047 TO radial refer to the same line-of-position, just in different directions.
4.5 VOR Zone of Confusion
Since the CDI shows angle of deviation from the selected radial, the CDI will get more and more sensitive as your approach the VOR. At some point the CDI will become too sensitive to be useful. This is area is called the Zone of Confusion. This usually occurs when flying directly over, or nearly directly over a VOR station. When in the Zone of Confusion, the best practice is not to chase the needle, but to simply maintain your current heading until you are far enough from the station to obtain useful navigation readings. The indication that you have passed a station is signified by the TO/FROM arrow on the HSI flipping from TO to FROM.
4.6 Flying to a VOR Station
If you wish to fly TO a specific VOR, you can first select its frequency, identify it, then turn the CRS knob on the HSI until the CDI is centered with a TO indication. You can the simply turn to the selected radial and fly to the VOR with normal tracking procedures.
4.7 Reverse Sensing
Reverse sensing occurs when you are flying a course opposite to the one you have entered in the CRS selector (see Figure 19). You can see that the heading bug is pointing opposite to the direction of flight. However, the CDI will continue to deflect in the expected direction such that turning toward the deflection will bring the aircraft back onto the course. This is one of the advantages of an HSI vs. a traditional VOR indicator. Nevertheless, flying with reverse sensing is considered bad practice and problems may arise when trying to fly coupled with the AFCS.
4.8 Intercepting a VOR Radial
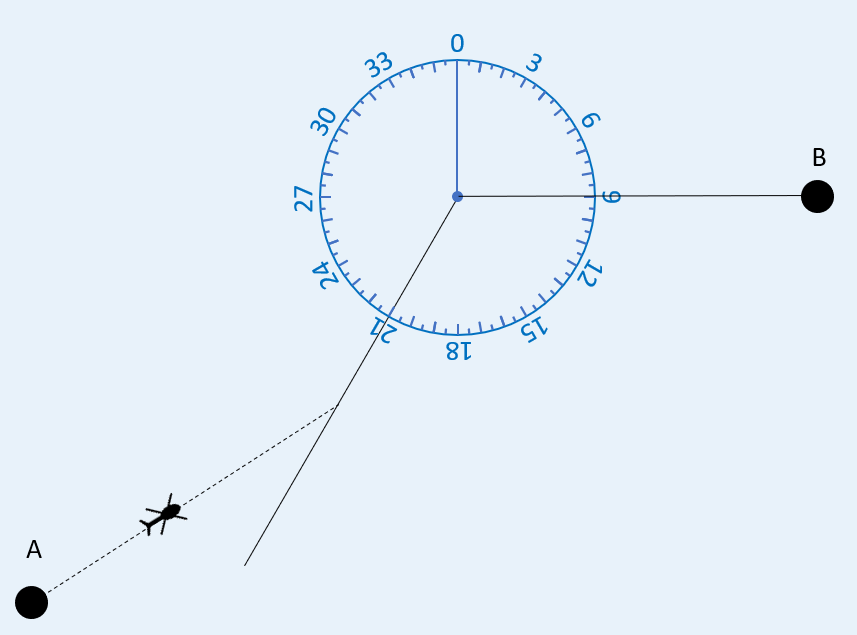
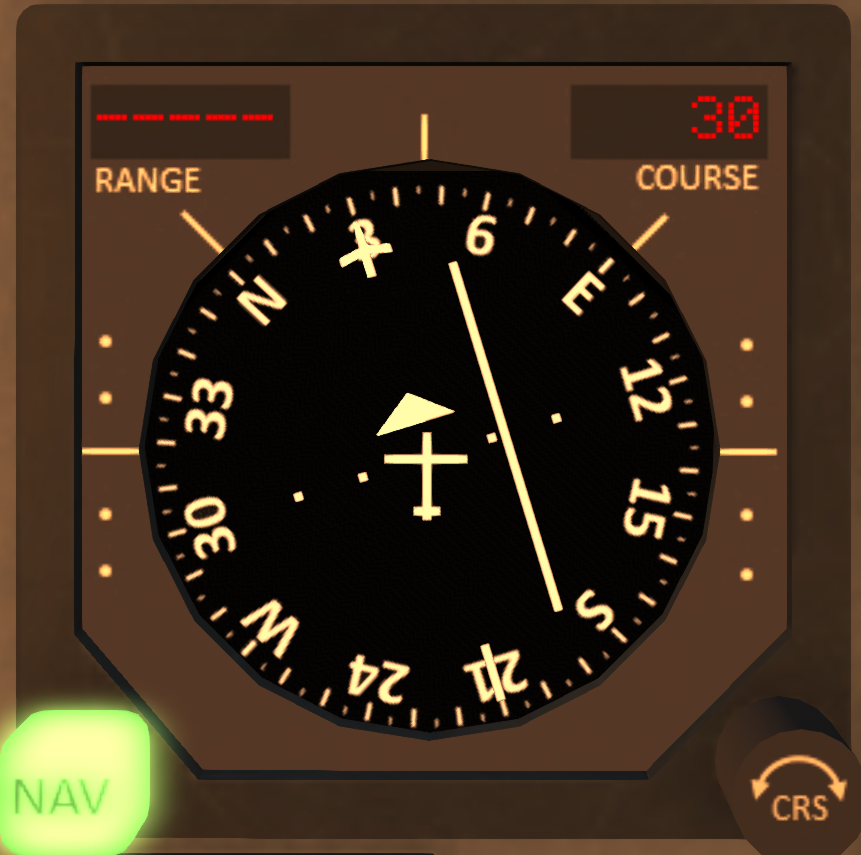
It is sometimes useful to intercept a specific VOR radial. For example, suppose you wished to fly from Point A to Point B in Figure 20 via the selected VOR and approaching that VOR via the 030 inbound radial to avoid a bad sim, orb or other obstruction in the direct path to the VOR. You could do this by selecting 030 as the inbound radial on the CRS knob, then fly a 060 heading until intercepting that radial. As you approached the radial, the CDI would begin to center. You should begin your turn toward the radial course so that the needle is centered at the time you established the inbound course on the radial. Figure 21 shows the indication you might have on your HSI as you approached the inbound course.
In the example here, you would turn toward 030 as the needle center, then fly toward the VOR. When the TO/FROM indicator switches from TO to FROM, you would then change to the outbound course, changing the CRS setting to 090, then tracking out on that radial as usual.
4.9 ILS Approaches
An ILS approach is similar to a GPS approach (see GPS Approaches), but uses radio navigation for both the horizontal and vertical guidance. The horizontal guidance part is referred to as the localizer, while the vertical guidance part is referred to as the glideslope. To configure for an ILS approach, the pilot should ensure the selector on the Navigation Control Panel is set to NAV1, and the appropriate frequency for the ILS is entered into the NAV1 radio. This frequency can be found in the upper left corner of the approach plate labeled LOC. For example, the localizer/ILS frequency for the White Star Runway 27 approach (shown in Figure 14) is 113.825. When entering the frequency for an ILS, the OBS course on the CDI will be automatically set to the inbound course for the approach. This is also shown on the approach plate labeled APP CRS.
NOTE: When using coupled navigation, the afcs must be disconnected at the MAP and the aircraft flown manually to touchdown.
5 Search Patterns
A search pattern is a prescribed sequence of straight legs and turns design to search an area for a vehicle or person in distress. The S-61R supports three types of search patterns which are selected with the mode switch on the Navigation Console. The patterns use either one or two leg lengths denoted LEG1 and LEG2 as parameters which are entered into the Navigation Controller. The leg lengths represent a length in meters. The length can be set with the knobs next to the leg values, or with a chat command. For example, the command:
nav legs 60 70
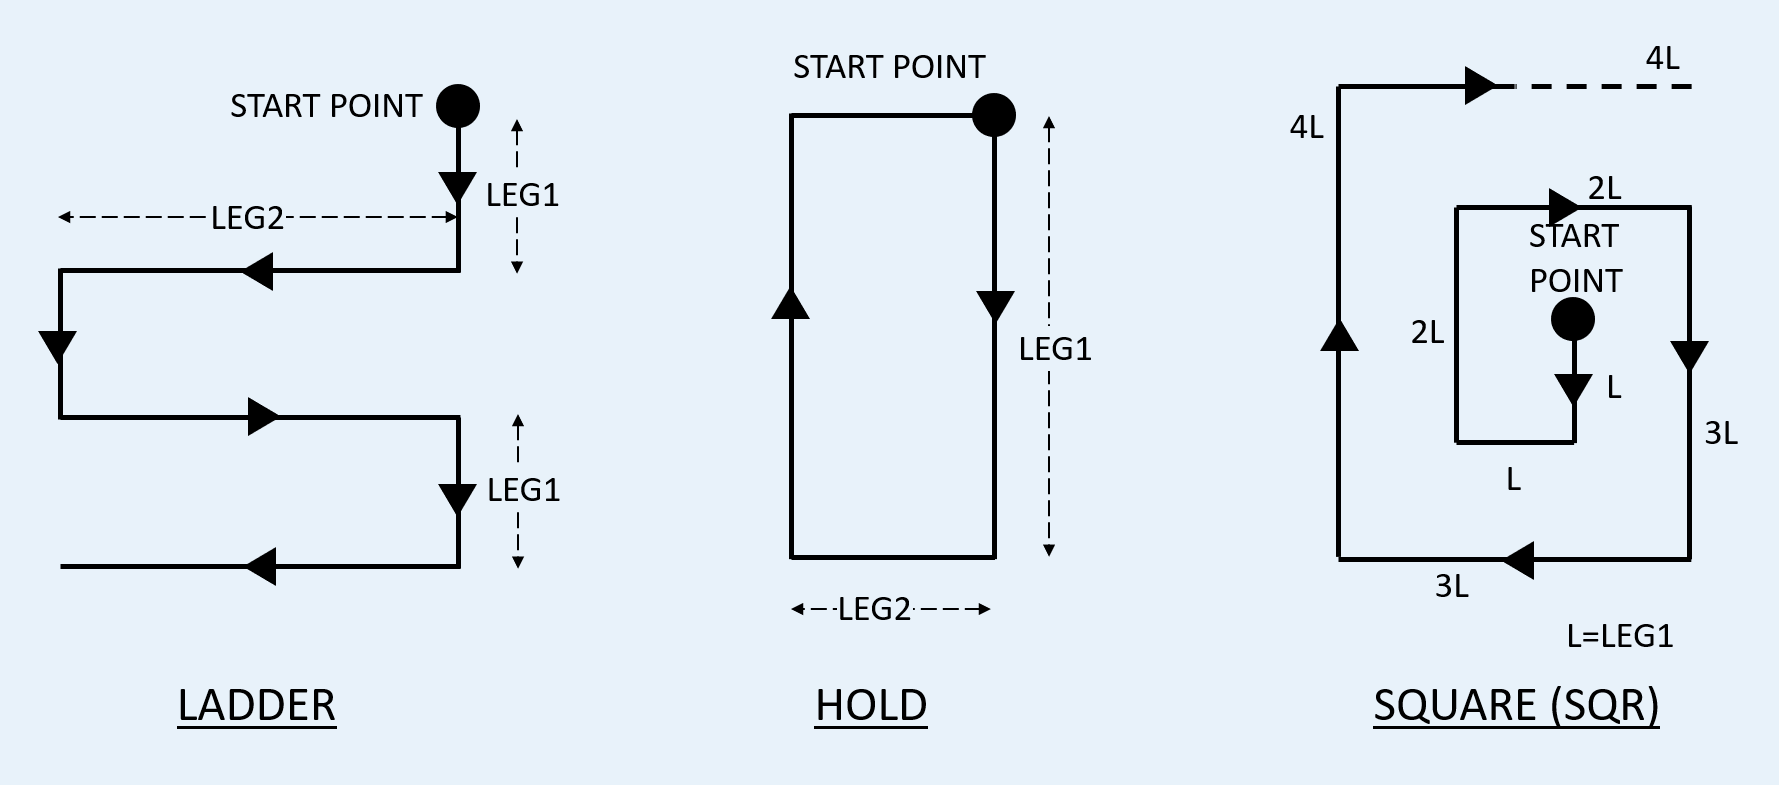
would set LEG1 to 60m and LEG2 to 70m. The following three search patterns are supported (see Figure 22):
| Pattern | Description |
|---|---|
| HOLD | Flys a rectangular course with right-hand turns. The initial leg has length LEG1, then segments are flown with alternating legs of LEG2 and LEG1. |
| SQR | Flys a "Square" or "Spiral" course. Only the LEG1 value is used. All turns are made to the right with the first two turns of length LEG1. Subsequent straight segments are increased in length by LEG1 every two turns. |
| LADDER | Flys a "Ladder" course. The initial segment is of length LEG1 followed by a right turn. Straight segments after that alternate between length LEG2 and LEG1 with two left turns followed by two right turns then repeating that pattern. |
Once selecting the search pattern type, press the START button on the console to begin flying the pattern. The green light above the START button will illuminate to indicate that the search pattern is active. The heading of the helicopter when pressing the START button will determine the orientation of the search pattern. The START button can be pressed again to restart the search pattern at any time.
The search pattern will give navigation guidance on the HSI necessary to fly the pattern. Do not forget to enable NAV mode on the HSI. You may also couple the HSI with the AFCS to automatically fly the pattern.
6 Radar Altimeter
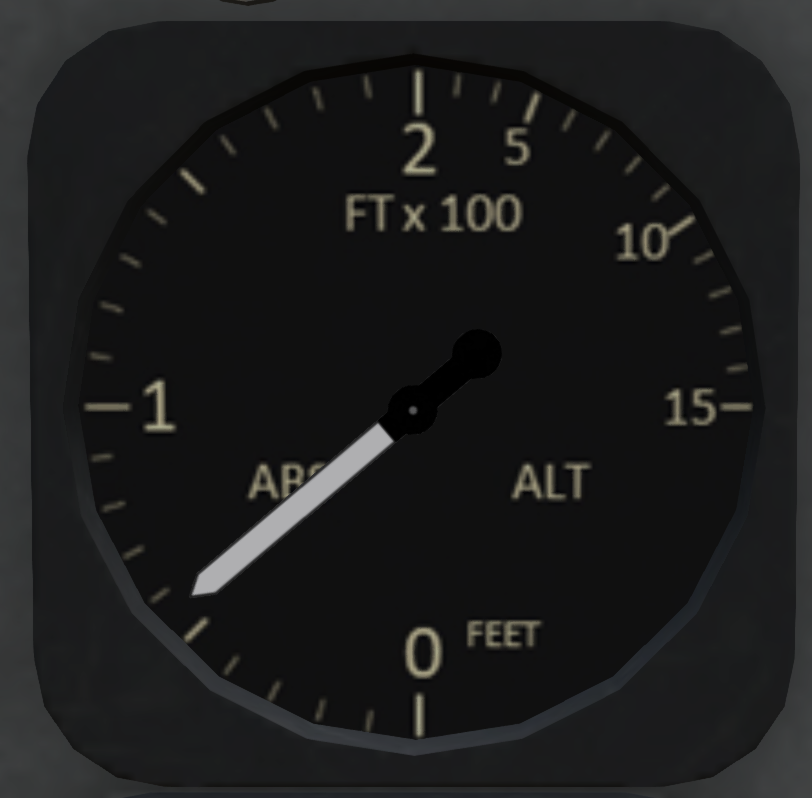
A radar altimeter (see Figure 23), mounted on the pilot and co-pilot sides, show the height in feet above the actual ground. The instrument is designed to show a high fidelity measurement between 0 and 200 feet, then lower fidelity up to 1500 feet. The radar altimeter operates off the #1 AC bus.
6.1 Radar Altimeter Warning System (RAWS)
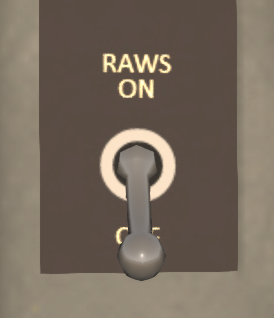
The Radar Altimeter System also includes a Radar Altimeter Warning System (RAWS). The RAWS system provides an audio alert when the aircraft as reaches specific points during the landing and a approach. RAWS is enabled through a switch on the main console (see Figure 24). A warning light labeled "RAWS" will illuminate on the Caution/Alert panel when the RAWS system is turned off. When RAWS is enabled and the helicopter is descending, at approximately 175 feet a 1000 Hz tone is switched on for three seconds and is pulsed at a rate of two pulses per second. At 40 feet, this tone is again switched on for three seconds but is pulsed at a rate of four pulses per second. The RAWS system is armed once the helicopter ascends past 200 feet AGL. Once the RAWS has triggered at the 175 and 40 foot levels, the helicopter must ascend above 200 feet again for the alerts to trigger again.
7 IFF Transponder
7.1 Introduction
The AN/APX-112(KS) IFF (Identify Friend or Foe) transponder provides automatic identification in the Shergood Radar System. The unit is suitable for both civilian and military use. Aircraft using this transponder will show up on the Shergood map. The system receives, decodes and replies to interrogations in Modes 1, 2, 3/A, 4, 5 and C. Each mode can be individually enabled or disabled by the pilot. The modes that are enabled control what information is sent and to who it is distributed. Power to the unit is supplied by the #2 DC Bus.
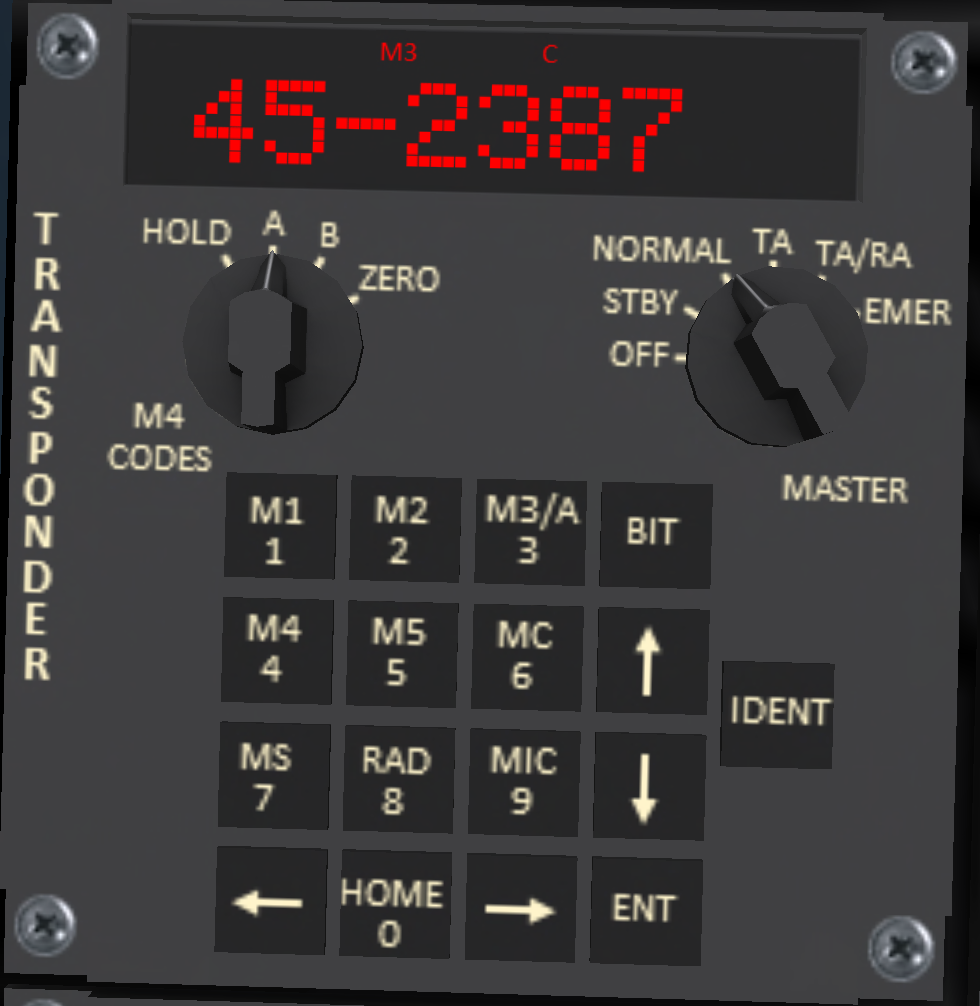
The main panel of the transponder is shown in the Figure 25. A display at the top of the unit shows the active modes and the current transponder reply code. Below the display are knobs and buttons to control the operation of the unit. These will be described in the following sections.
7.2 Interrogation Modes
Transponders reply to interrogations in one or more modes. The transponder can be configured to reply to any one or all of these modes at the same time. This unit supports the following modes:
- Mode 1 - This is a two-digit "mission code". It is displayed as the two digit number prefix. When Mode 1 is active, the two digit code will be shown as part of the squawk code on the radar map.
- Mode 2 - Replies with the four digit reply code shown after the "-" on the display. This mode is for military use.
- Mode 3/A - Mode 3 is equivalent to the Mode A reply from a standard civilian transponder. It replies with the four digit code shown after the "-".
- Mode 4 - Replies with the four digit reply code only to users with the correct IFF COD (Code of the Day). The COD is an 8 digit number entered into the unit and agreed upon among friendly forces.
- Mode S - Replies with additional aircraft-specific information beyond the squawk code, including aircraft type and tail number. (civilian and military use)
- Mode 5 - Encrypted version of Mode S for military use. Uses the same COD entered for Mode 5.
- Mode C - Used in conjunction with the other modes to include altitude data.
Modes are enabled or disabled by pressing the BIT button followed by one of the main keypad buttons. The mode shown on the upper part of the button will be enabled or disabled. Note that the RAD, MIC and HOME functions are not active on this unit.
7.3 Master Control Switch
The Master Control Switch is located below the display on the right-hand side. It has the following settings.
- OFF - Unit is powered down and no reply is sent. All information is reset to defaults when the unit is turned off.
- STBY - Unit is placed in stand-by mode. When in stand-by mode, the unit may be configured with a reply code and/or a COD, but not replies will be sent and the aircraft will not be displayed on the map.
- NORMAL - This is the normal operating mode for the transponder. Replies will be sent as configured.
- TA and TA/RA - These settings are reserved for use with TCAS units and are not implemented in this unit. Setting the device to these codes will operate the same as NORMAL.
- EMER - Indicate an emergency condition. Replies are sent in all modes, and the emergency transponder reply code of 7700 is used. This mode should only be used in the event of an emergency that threatens the safety of the aircraft
7.4 Entering a Reply Code
The reply code is entered by simply pressing the number keys to set the desired code. You may enter either four digits followed by ENT to set the four digit reply, or six digits to enter both the two-digit Mode 1 value and the four digit code used by Modes 2,3 and 4. The back arrow key on the bottom row can be used to delete the last entered value. Pressing the backarrow after all digits have been entered will reset the display to the current code.
7.5 Entering the COD
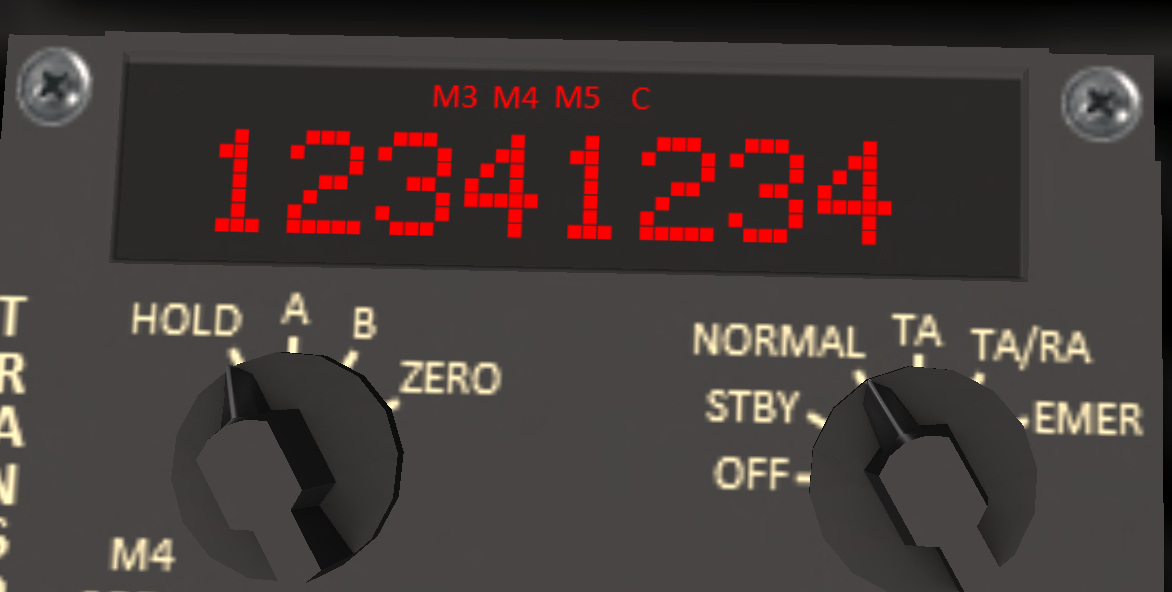
The COD (Code of the Day) is entered by setting the M4 Codes selector below the display on the left-hand side to the HOLD position (see Figure 26). The COD is number that is shared among friendly forces to identify friendly aircraft, and hide radar replies from enemy aircraft. After entering the code, set the selector to either A or B. All friend forces should use the same A/B setting as well. Turning the M4 Codes selector to ZERO will erase the entered COD and make it all zeros. The COD will also be erased when the unit is powered off. When viewing the Shergood Radar Map page, aircraft with a COD entered that matches the code entered for the IFF code on the web page will show up in green to indicate they are friendly forces.
7.6 Fully Coded Transponder Usage
For fully coded transponder use, modes other than 4, 5 and C should be disabled. This will result in your aircraft being visible on the map only to those users who know the COD entered into your transponder.
7.7 Transponder Chat Commands
Chat commands are available as listed below for the various transponder functions described in this section:
| Command | Description |
|---|---|
| x[nn-]nnnn | Enter four or six-digit transponder code. |
| x + [modes...] | Turn on one or more modes. |
| x - [modes...] | Turn off one or more modes. |
| x = [modes...] | Set the active modes. |
| x / [modes...] | Toggle one or more modes. |
| x cod nnnnnnnn | Set the COD for encrypted modes. |
| x hold | Set M4 knob to 'hold'. |
| x hold/a/b/zero | Set M4 knob to specific position. |
| x off/stby/normal/ta/tara/emer | Set master knob to specified position. |
