H-34 Choctaw/Systems
SECTION 2. SYSTEMS
Contents
- 1 Helicopter
- 2 Rotor and Power Train System
- 3 Landing Gear System
- 4 Engines and Related Systems
- 5 Fuel System
- 6 Electrical System
- 7 Flight Controls and Automatic Stabilization Equipment
- 8 Lighting
1 Helicopter
1.1 General
The Shergood H-34/S-58 is a piston engine helicopter designed for transportation of cargo and for search-and-rescue operations in day, night, visual and instrument conditions. The helicopter is powered by a 1,525 hp Wright R-1820-84 Cyclone rotary engine mounted in the nose of the aircraft. A drive shaft from the engine feeds diagonally up to the main transmission mounted under the main rotors. Fuel is carried by three cells on the belly of the aircraft. An entrance door is located on the forward right side of the main cabin with a hydraulic winch mounted over the door.
1.2 Gross Weight
The maximum gross weight is 13,300 pounds.
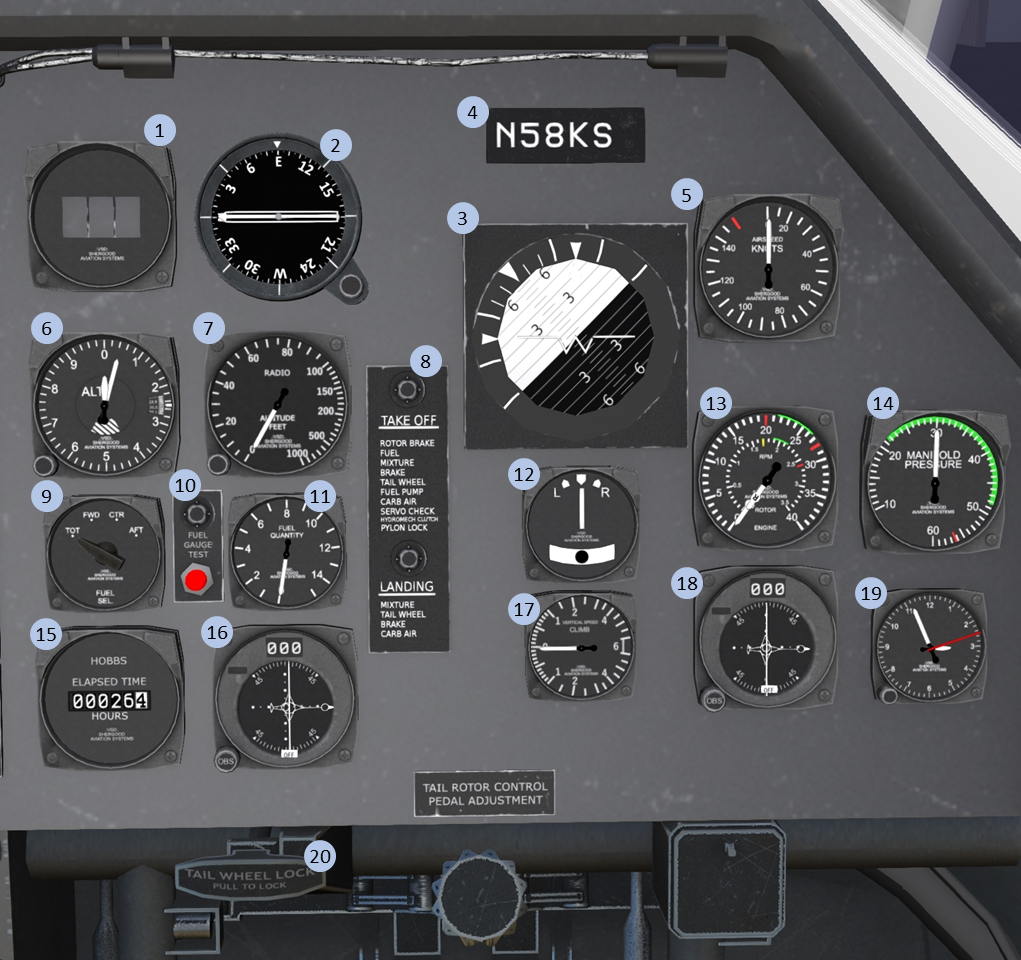
1.3 Pilot-Side Instrument Panel
| 1. DME | 2. RMI | 3. Attitude Indicator | 4. Tail-Number plate |
| 5. Airspeed Indicator | 6. Altimeter | 7. Radio Altimeter | 8. Checklist |
| 9. Fuel Indicator Selector | 10. Fuel Indicator Test | 11. Fuel Indicator | 12. Turn/Slip Indicator |
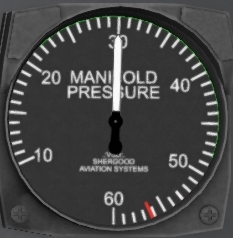
| 13. RPM Indicator | 14. Manifold Pressure | 15. HOBBS Time | 16. #2 VOR |
| 17. VSI | 18. #1 VOR | 19. 8-Day Clock | 20. Tail Wheel Lock |
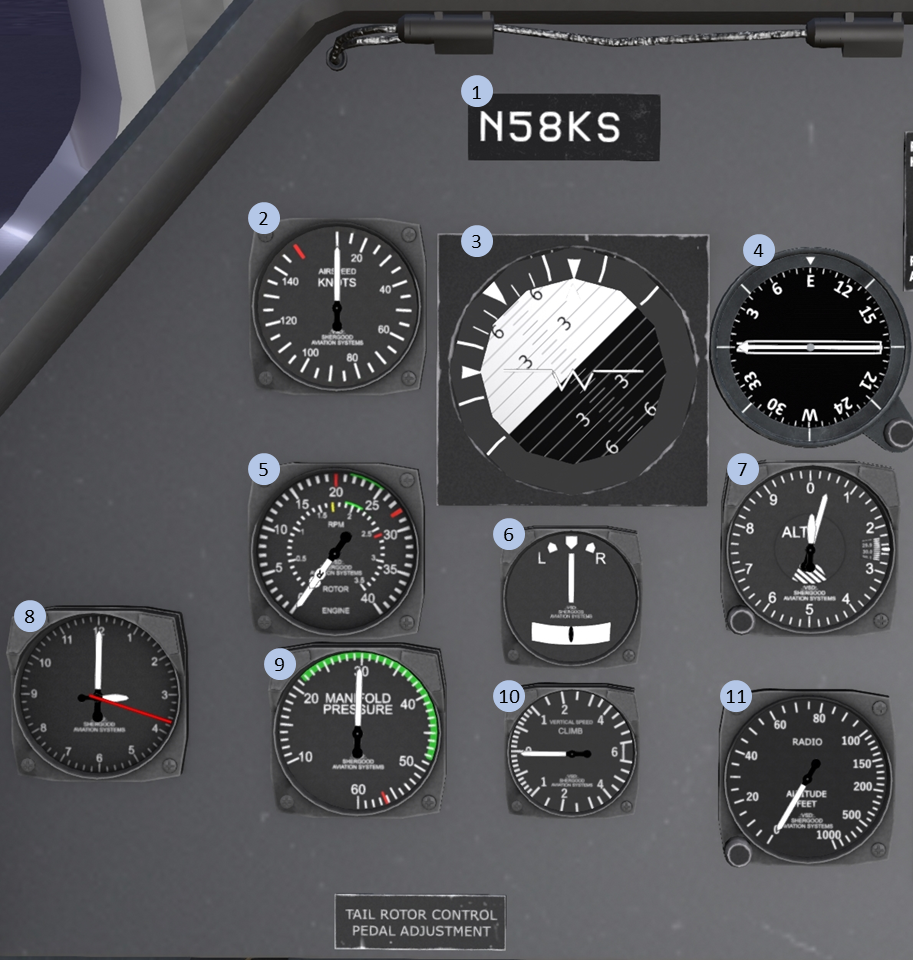
1.4 Copilot-Side Instrument Panel
| 1. Tail-Number plate | 2. Airspeed Indicator | 3. Attitude Indicator | 4. RMI |
| 5. Airspeed Indicator | 6. Turn/Slip Indicator | 7. Altimeter | 8. 8-Day Clock |
| 9.Manifold Pressure | 10. VSI | 11. Radio Altimeter |
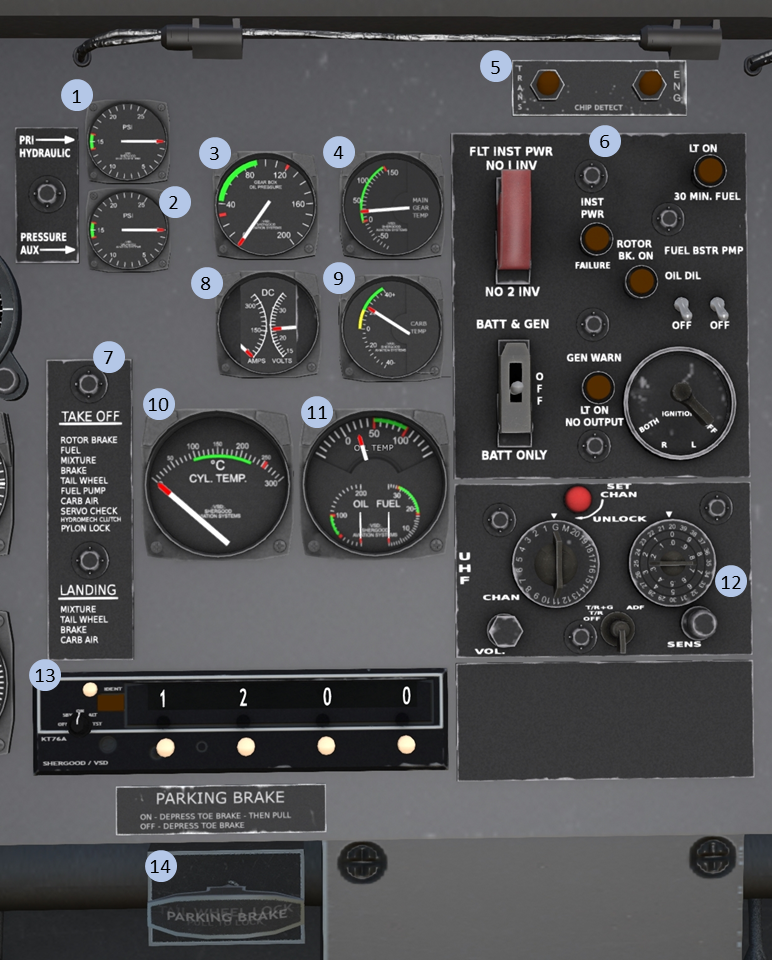
1.5 Center Instrument Panel
| 1. Pri. Hyd. Press | 2. Aux. Hyd. Press | 3. Main Trans. Oil Press | 4. Main Trans. Oil Press |
| 5. Chip Indicator | 6. Main Switch Panel | 7. Checklist | 8. DC Volts/Amps |
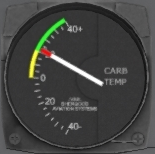
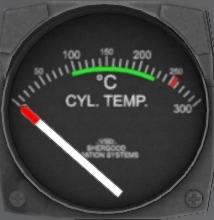
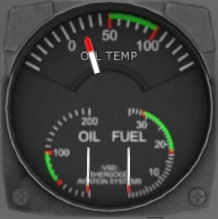
| 9. Carburetor Temp. | 10. Cylinder Temp. | 11. Oil Temp/Press, Fuel Press | 12. UHF Radio |
| 13. Transponder | 14. Parking Brake |
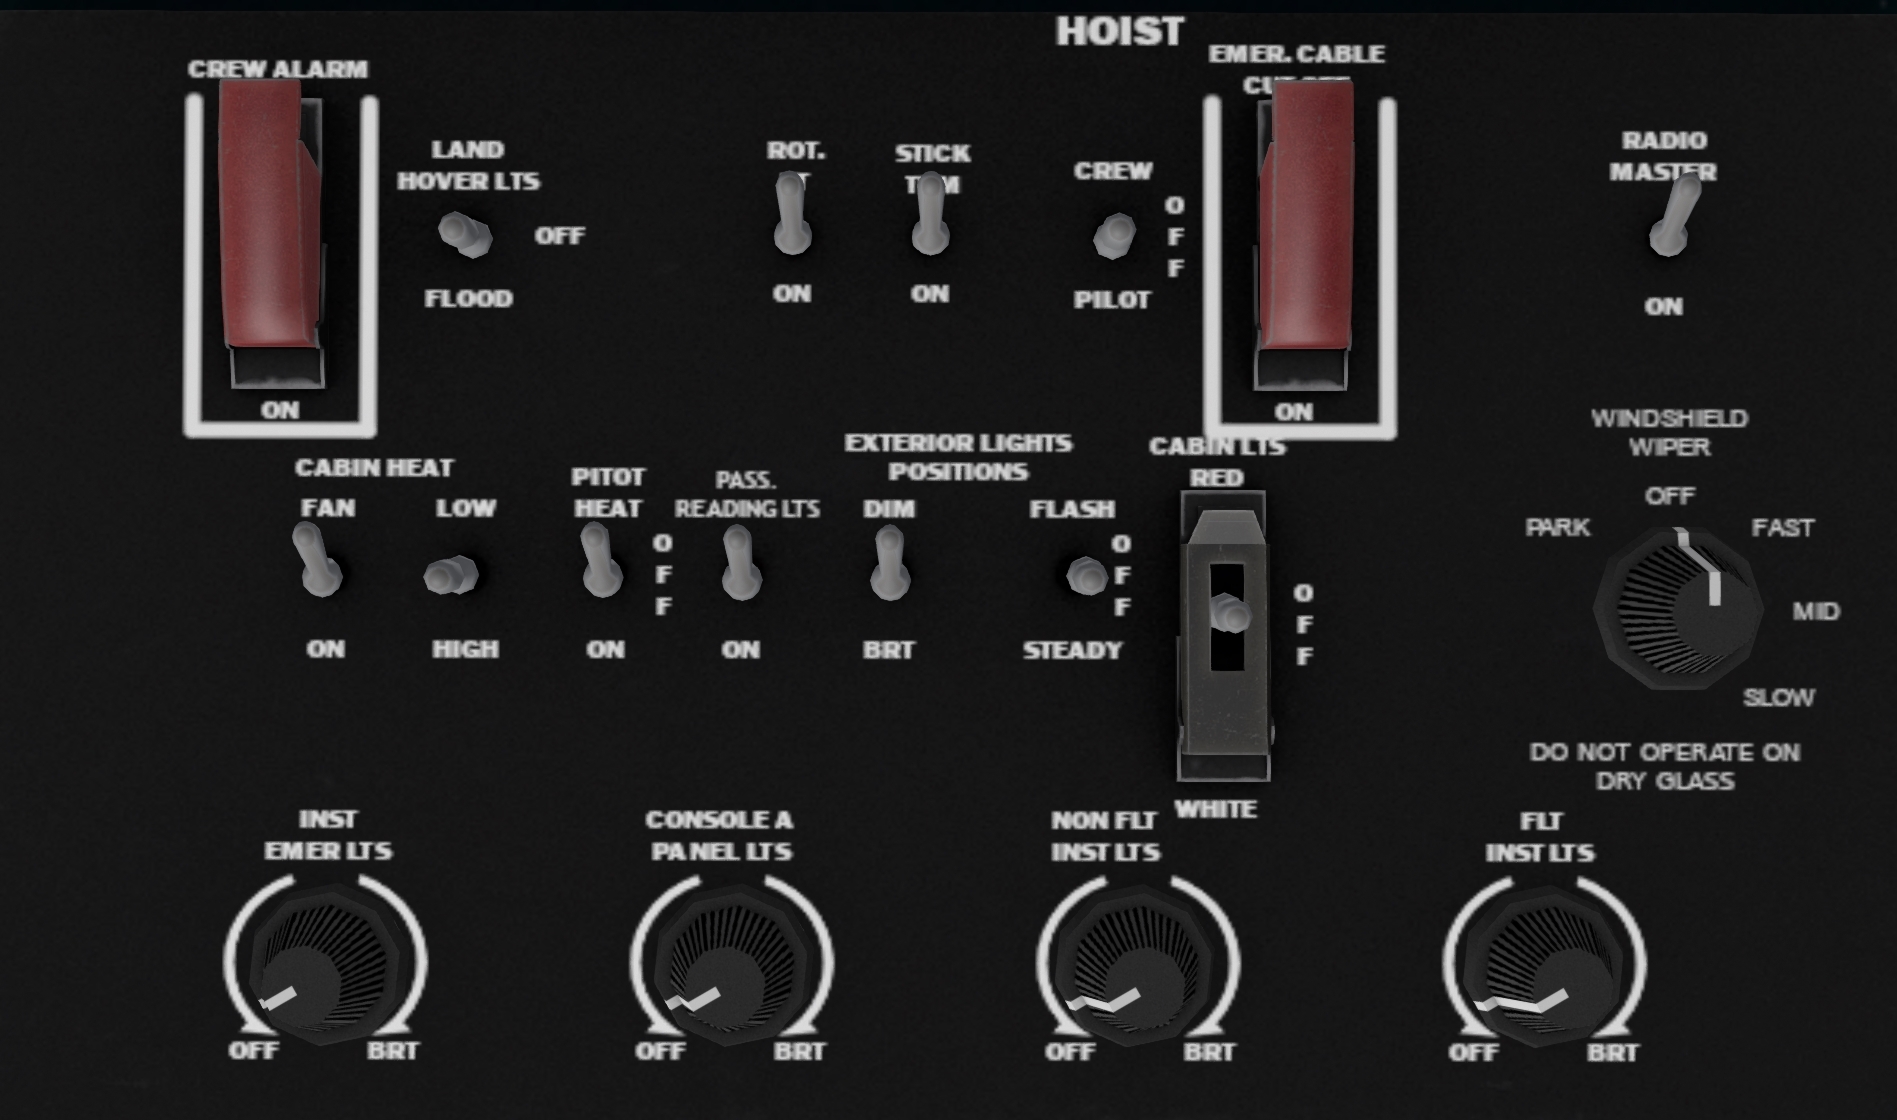
1.6 Overhead Panel
The overhead panel includes various miscellaneous switches including most of the lighting controls, and controls for the hoist and heating systems.
1.7 Altimeter Settings
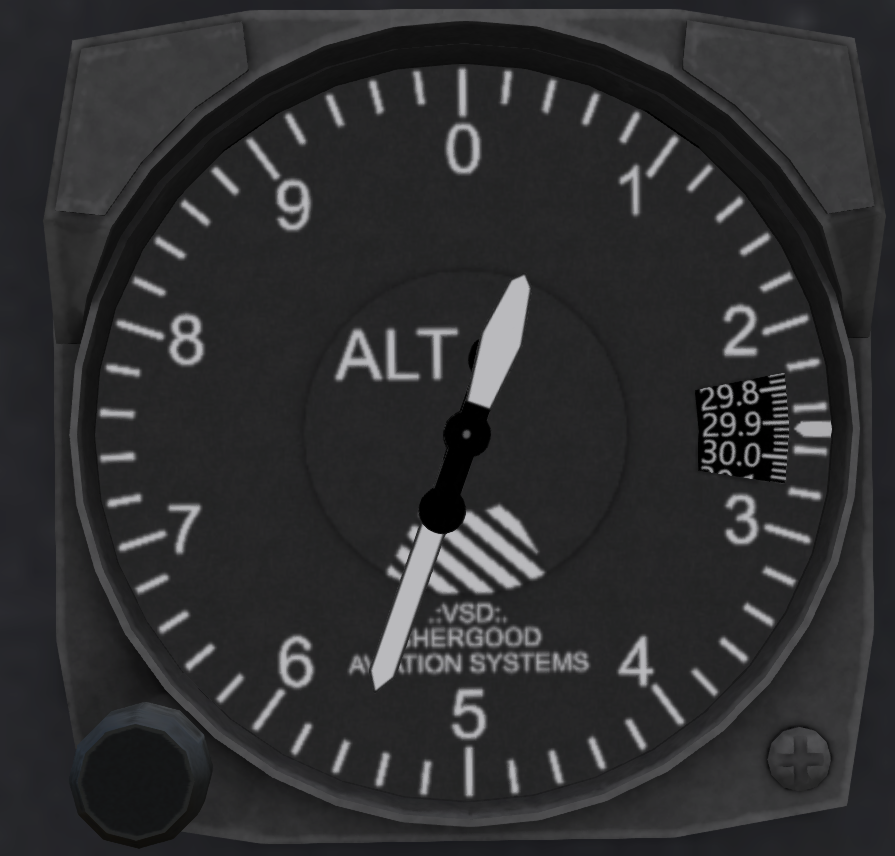
When advanced weather is enabled (see Section 11. Advanced Weather), local barometric pressure will affect the altimeter and must be adjusted for. This is done through the Kollsman window, a small window on the right edge of the altimeter showing the current barometric at sea level for the current location in inches of mercury. The value can range between 28.00 and 31.00, with 29.92 being "standard pressure". To adjust the altimeter to a specific value, press and hold the mouse on the left (decreasing) or right (increasing) side of the adjustment knob in the lower left corner of the altimeter. Alternatively, you can use the chat command:
alt 30.24
to set the altimeter directly. The current altimeter setting can be obtained by querying the METAR (https://www.shergoodaviation.com/weather.php) for the current location, or using the radios to get the current ATIS information (SL Helicopter Flying Handbook - Weather).
When advanced weather is disabled, the altimeter will revert the standard pressure value of 29.92, and manual adjustment of the altimeter will not be necessary.
2 Rotor and Power Train System
The rotor configuration of this helicopter consists of a single main lifting rotor system and an anti-torque tail rotor system. Both systems are driven by the engine through the transmission system and are controlled by the flight control system.
2.1 Main Rotor System
The main rotor system consists of the main rotor hub and four main rotor blades. Each should be inspected separately during the pre-flight inspection. The main rotor is controlled through a swash plate and control linkages connected to the collective and cyclic controls in the cockpit.
2.2 Tail Rotor System
The tail rotor is mounted on the left side of the vertical stabilizer. It acts to counteract torque from the main rotor and provide yaw control of the aircraft in a hover, and coordination for turns at cruise speed. The tail rotor is controlled through anti-torque pedals in the cockpit that alter the pitch of the blades thus increasing or decreasing the tail-rotor thrust.
2.3 Transmission System
The transmission system consists of a hydro-mechanical clutch, shafting, and three gear boxes that transmit engine power from the transmission system to the main and tail rotors. The clutch isolates the engine from the rest of the transmission system allowing the engine to be started an operated independently of the transmission and rotor systems. A freewheeling unit in the clutch allows the rotors to autorotate without drag from the engine in the event of an engine failure.
2.3.1 Gearboxes
2.3.1.1 Main Gearbox
The main gearbox is mounted above the main cabin and directly below the main rotor. It can be accessed through doors on each side of the aircraft above the main cabin. A shaft from the engine leads back and up from the clutch. The gearbox includes a gear system that reduces the engine rpm at an approximately 11.3 to 1 ratio for the main rotor. An additional shaft leads to the intermediate gear box to drive the tail rotor system. An accessory section is also mounted on the rear of the main gearbox to drive the generator, the primary hydraulic pump and a utility hydraulic pump for the hoist. The accessory section is driven anytime the main rotor is turning even if there is no input from the engine. This allows the generator and hydraulic pumps to remain active in the event of an autorotation.
The main gearbox is serviced with oil through a filler cap on the right-hand side of the aircraft. A sightglass can be used to visually determine when the gearbox needs oil.
2.3.1.2 Intermediate Gearbox
The intermediate gearbox is located at the base of the vertical stabilizer. It can be serviced by clicking a filler cap behind the access door. A sightglass can be used to visually determine when the gearbox needs oil.
2.3.1.3 Tail-Rotor Gearbox
The tail-rotor gearbox is located at the top of the vertical stabilizer. It can be serviced by clicking a filler cap inside an access hole. A sightglass can be used to visually determine when the gearbox needs oil.
2.3.2 Hydro-Mechanical Clutch
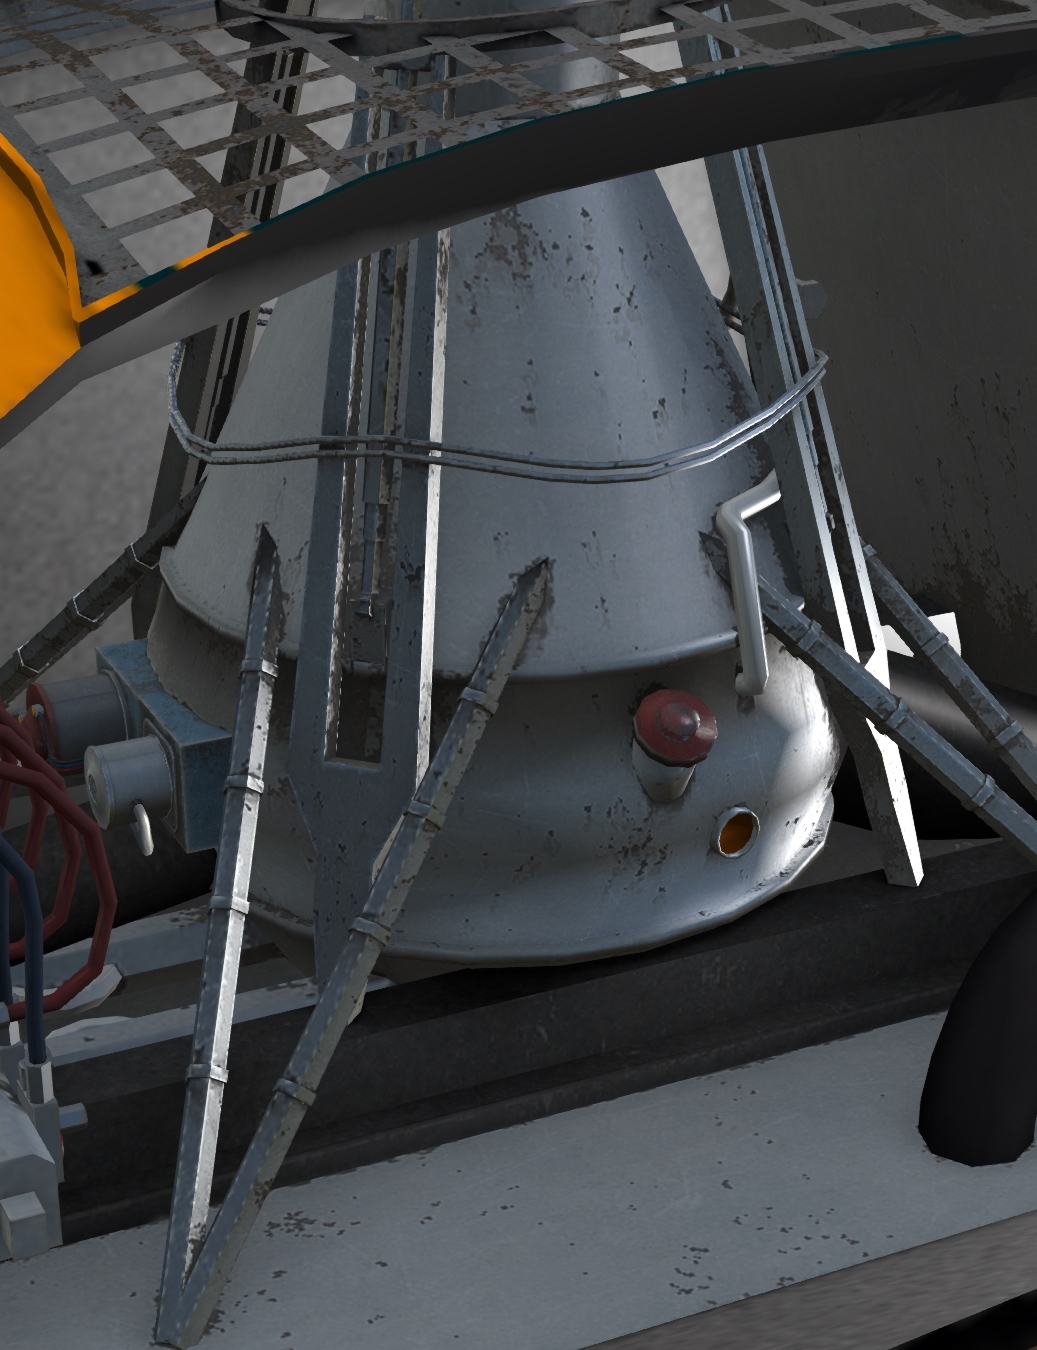
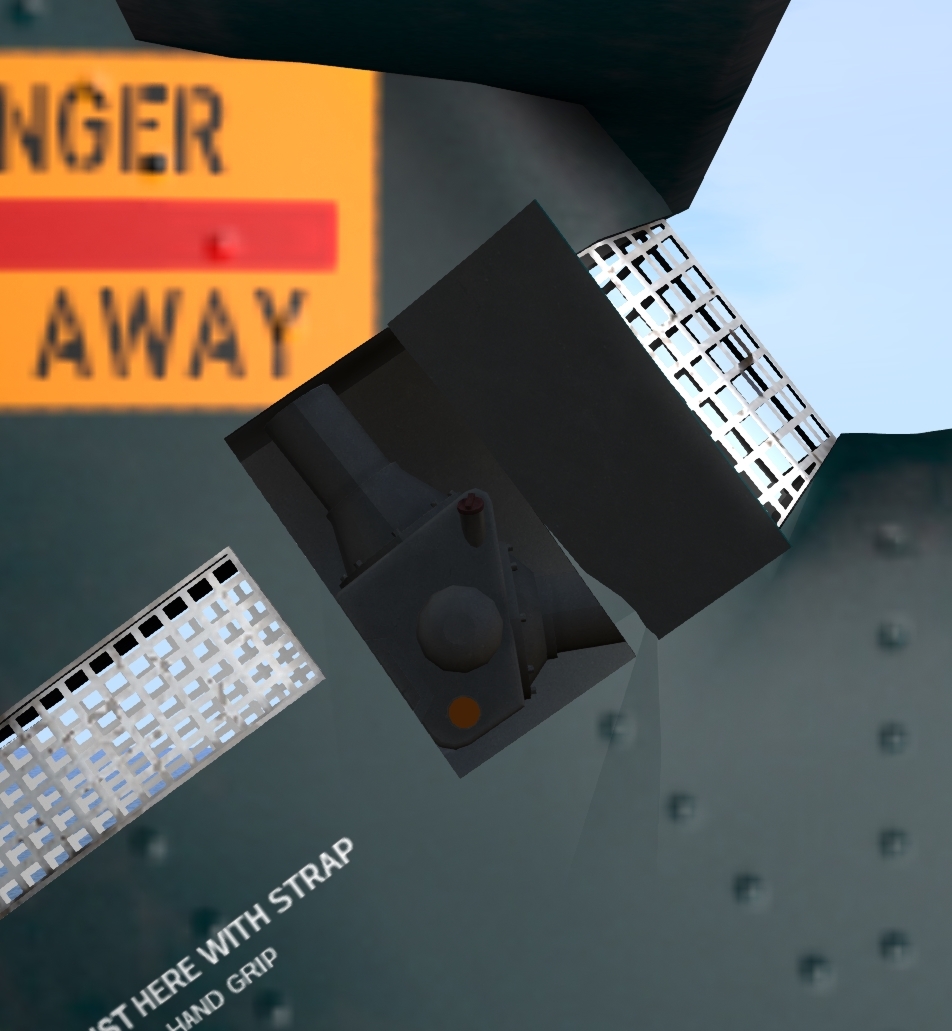
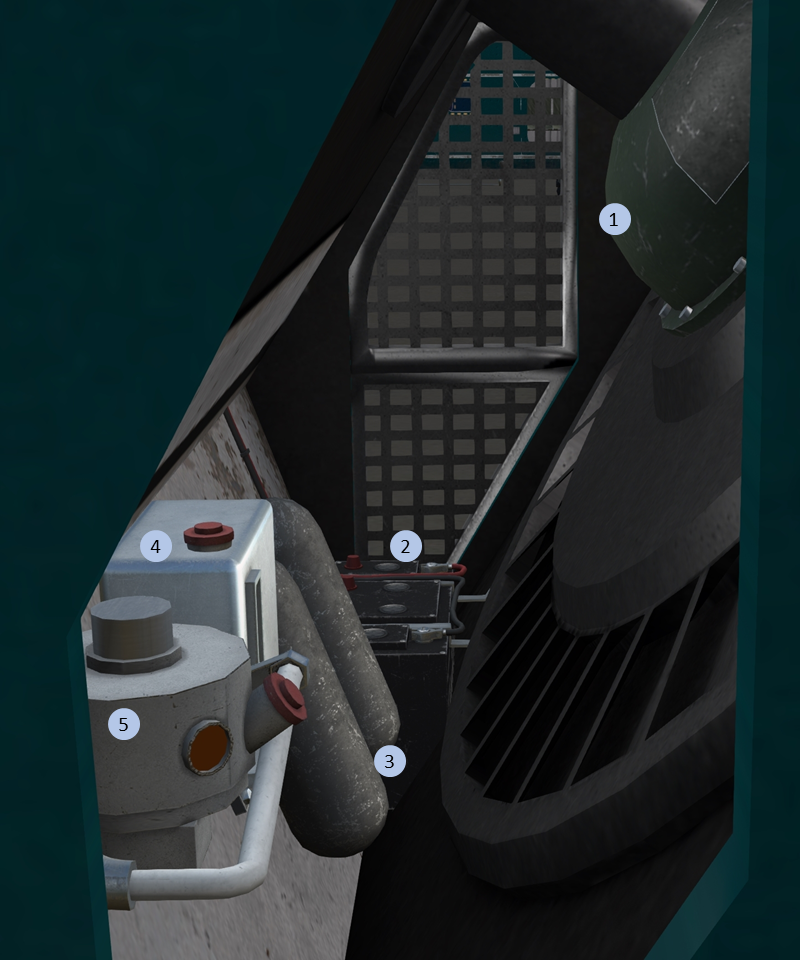
The hydro-mechanical clutch (#1) is located between the engine and the main transmission drive shaft in the clutch compartment (Figure 9). Access is through two grated doors on the sides of the aircraft nose behind the engine compartment. The clutch is composed of a fluid coupling, a mechanical coupling and a freewheeling unit. The function of the fluid coupling is to allow the engine to be started and operated at any speed while completely disengaged from the transmission and to provide smooth acceleration of the transmission and rotor systems. The mechanical coupling provides a direct coupling between the engine and transmission after the fluid coupling has brought the system has been brought to engaging speed by the fluid coupling. The freewheeling unit prevents drag from the engine in the event of an autorotation by automatically disengaging the engine from the transmission if the engine speed drops below the transmission speed.
The fluid coupling is actuated through a pump powered by the primary bus and controlled through a switch in the pilot's compartment. The pump uses fluid from a reservoir to gradually engage the coupling between the engine and the transmission. Once the engine and transmission speeds match, a mechanical coupling engages and the fluid coupling is no longer needed. The mechanical coupling will remain engaged as long as the engine RPM is maintained above 2000 RPM.
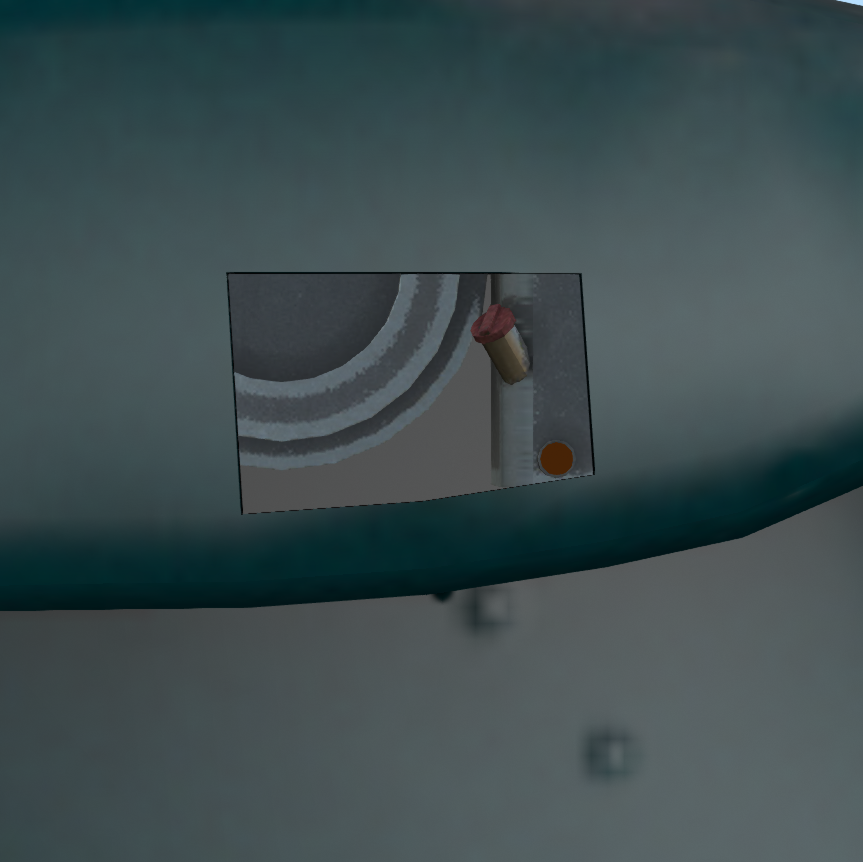
The fluid reservoir (#4) for the clutch is mounted on the aft wall in the clutch compartment. It is serviced with 7.4 quarts of hydraulic fluids through a filler cap on the reservoir. A sightglass can be used to see the current fluid level.
2.3.3 Clutch Pump Switch and Warning Light
The clutch pump is actuated though a switch on the pilot's side of the middle console in the cockpit (see Figure 10). The switch has two positions marked OFF and CLUTCH. A warning light above the switch is illuminated whenever the switch is in the CLUTCH position. The warning light can also be tested by pressing it.
2.3.4 Rotor Brake and Clutch Interlock
A rotor brake lever is mounted on the right side of the upper console (Figure 11). The rotor brake is active when the handle is in the down position. When primary power is active, a warning light labeled ROTOR BK. ON will illuminate. In addition to applying the brake, when the rotor break handle is in the down position an interlock will activate to prevent the clutch from being engaged with the rotor brake on.
In routine use, the rotor brake should not be used below 150 RPM. However, in emergency situations the rotor brake can be applied at full RPM after the throttle has been closed.
3 Landing Gear System
The S-58 has a fixed landing gear system with two main wheels in the front and a tail wheel in the rear.
3.1 Parking Brake
A parking brake is located in front of the co-pilot seat under the center console (Item #14 in Figure 3). Activating the parking brake will increase resistance to ground movement. Click the handle to toggle its position, or use the chat command:
s brake
to toggle it.
3.2 Tailwheel Lock
A tailwheel lock is located on the pilot side below the pilot console. Click the handle to toggle its position, or use the chat command:
s taillock
to toggle it. The tailwheel lock should be used during rotor engagement to prevent the helicopter from turning on the ground during the high-torque stages of engagement.
4 Engines and Related Systems
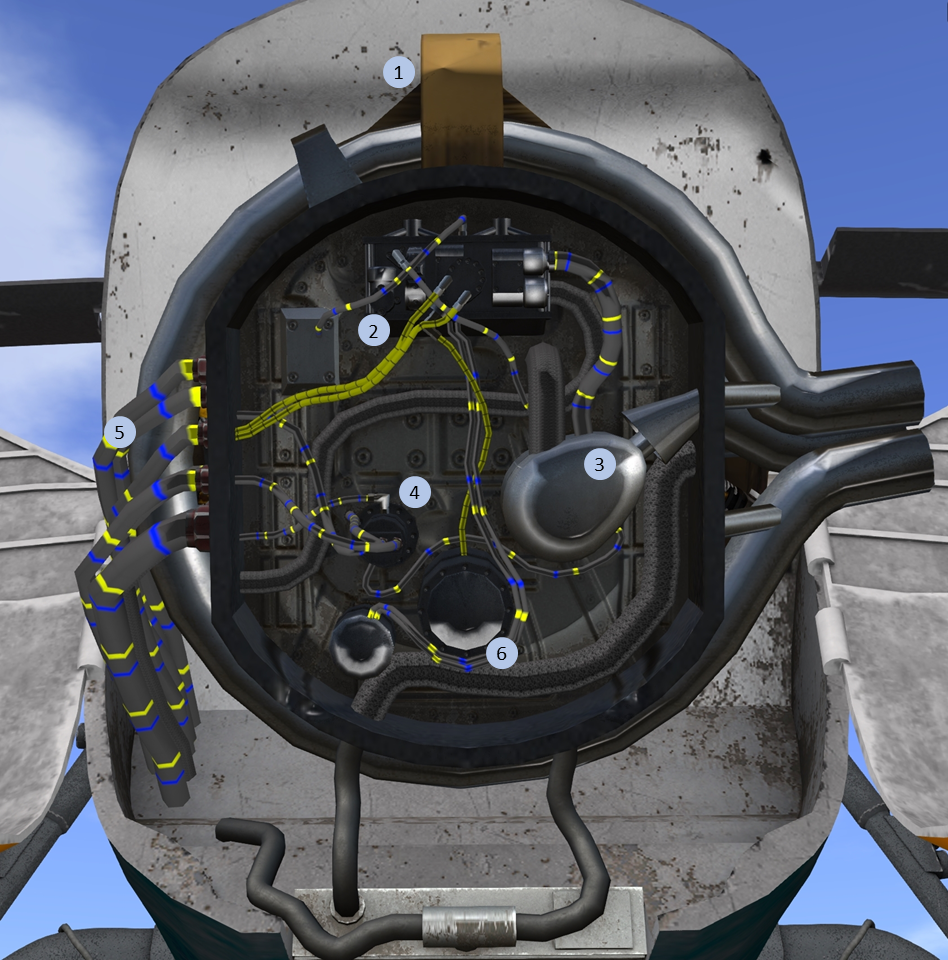
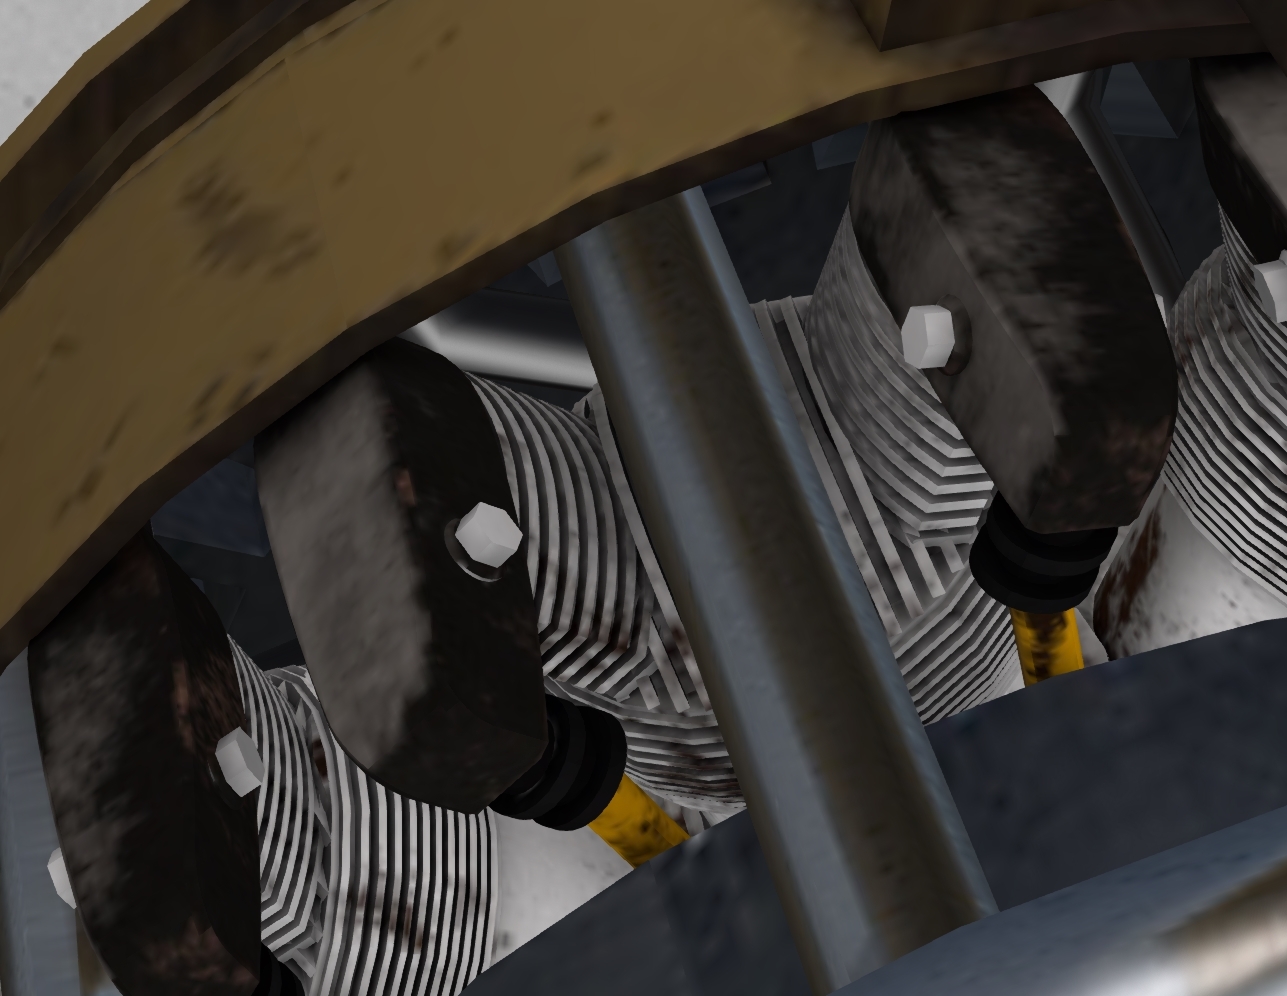
The S-58 is powered by a 1,525 hp Wright R-1820-84 Cyclone, a 9-cylinder radial engine mounted in the nose of the aircraft (see Figure 12). A drive shaft oriented at 45 degrees passes through he main cabin up to the main transmission. The cylinders (see Figure 13) are arranged around the drive shaft of the engines at 40 degree intervals. Each cylinder has two spark plugs, each powered by a different engine driven magneto.
The engine compartment is accessed by two large doors at the nose of the aircraft. Engine accessories including the carburetor, dual magnetos, starter, and auxiliary hydraulic pump are mounted on the front of the engine.
4.1 Carburetor
A double-barrel, downdraft, injection-type carburetor is mounted at the entrance to the supercharger inlet.
4.2 Throttle
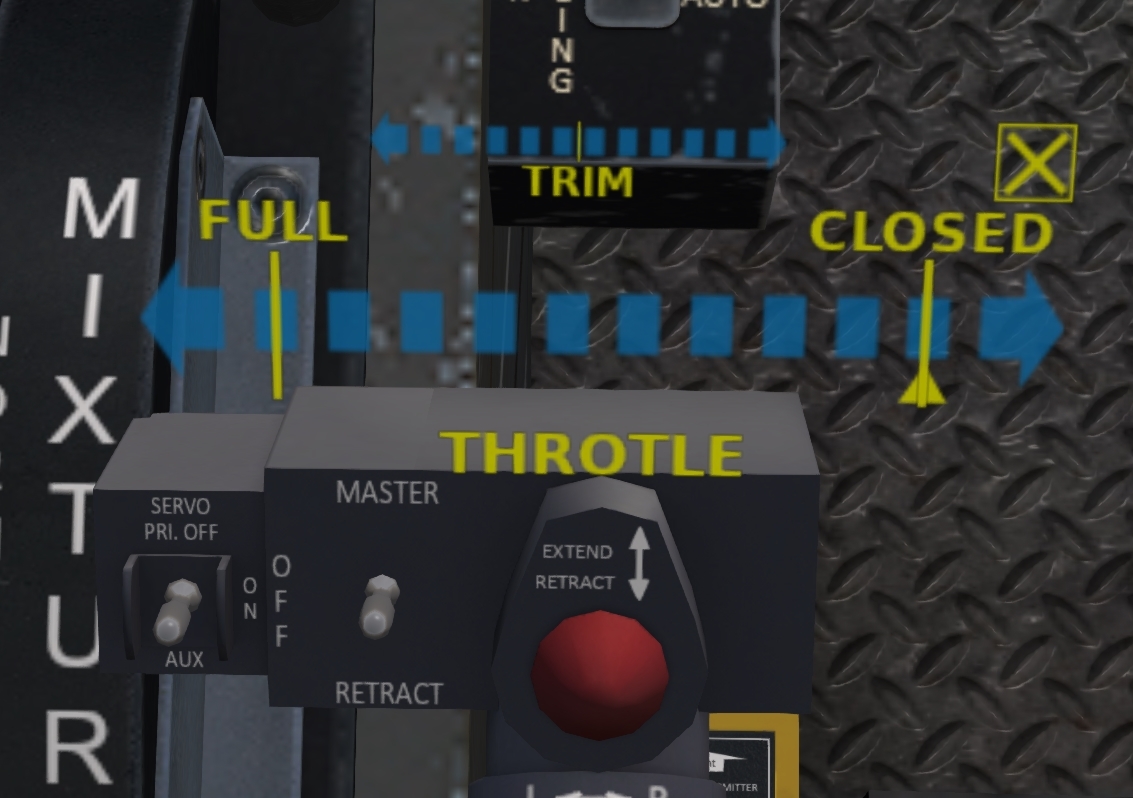
The throttle is controlled by a twist grip on the end of the pilot and copilot's collective. Clicking on the grip area of the collective will bring up a transparent overlay through which you can control the throttle (see Figure 14). The overlay has a large scale marked FULL and one end and CLOSED at the other. Clicking on this scale will move the throttle to that position. A small yellow triangle under the scale shows the current throttle position.
A smaller scale marked "TRIM" above the throttle scale can be used to make small throttle adjustments. Clicking left of the centerline will increase the throttle by an amount proportional to the distance from the centerline, while clicking to the right of the centerline will decrease the throttle by a proportional amount.
The gesture pack included with the aircraft also includes the following three gestures for controlling the throttle:
| Gesture | Description |
|---|---|
| r | Increase throttle |
| v | Decrease throttle |
| 0 | Close throttle |
The throttle is partially linked to the collective by a correlator which will increase throttle as the collective is pulled, and decrease throttle as the collective is lowered. In addition a throttle governor will engage above 2100 RPM to keep the engine, initially, at approximately 2500 RPM. Once the governor control is established, the pilot may change the governor setpoint by manually changing the throttle between 2100 and 2800 RPM. After a manual throttle change, the governor will reengage at the new RPM. To disengage the governor, roll the throttle below 2100 RPM.
4.3 Mixture Control Lever
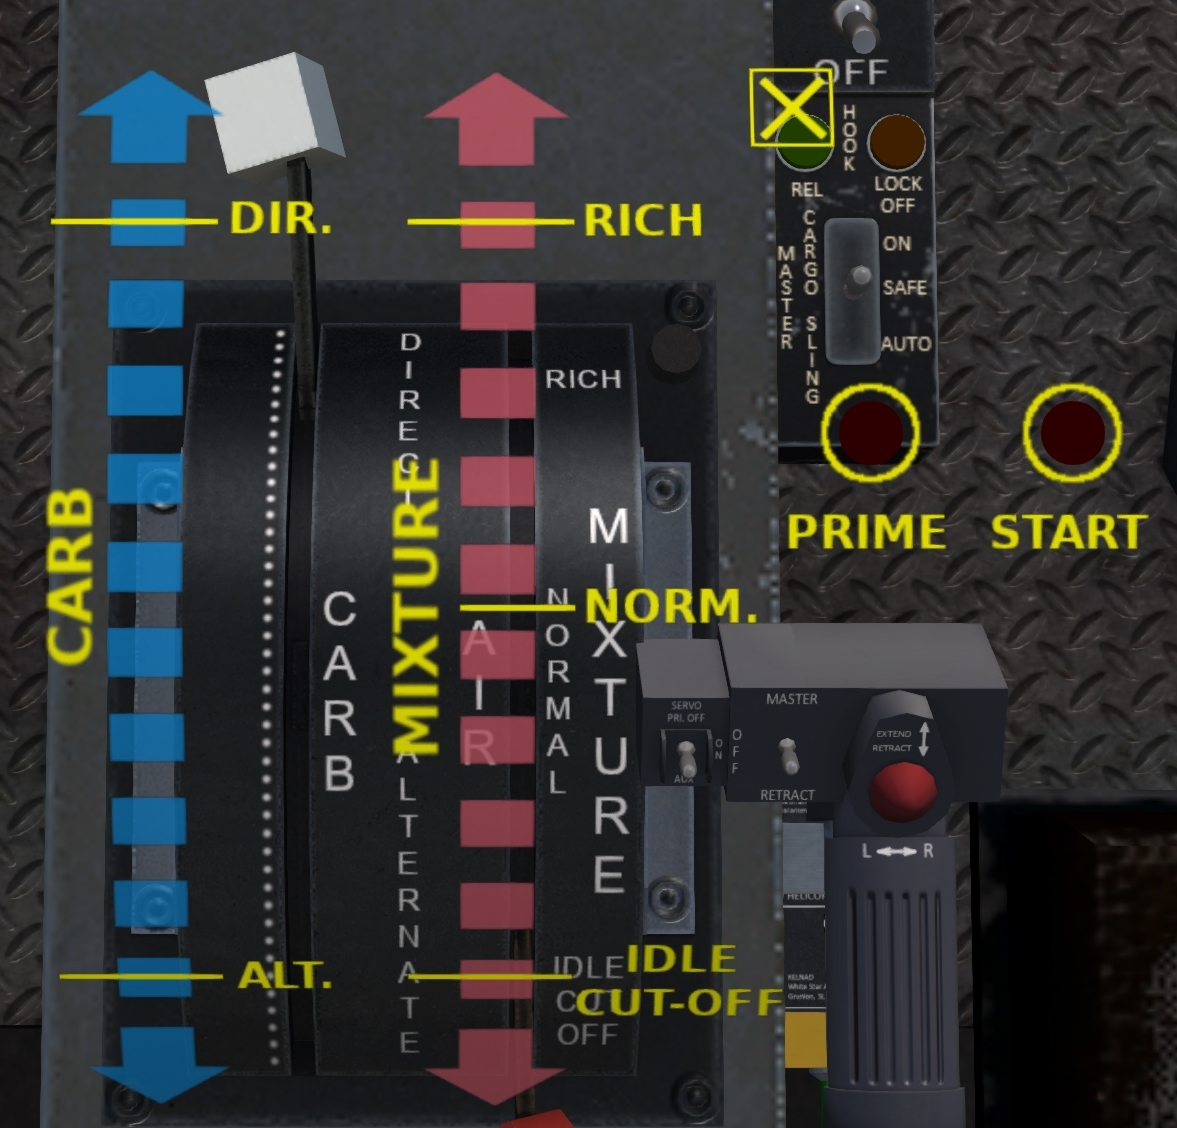
The mixture control lever (see Figure 15) is located on the right side of an engine control quadrant mounted on a console between the pilot and copilot seats. The lever has a red handle on the end and is marked MIXTURE next to the lever. It has three positions marked IDLE CUT-OFF, NORM and RICH. The RICH position is used for ground operations and take-off and landing, and any operations requiring more than 47.5" MP. The NORM position should be used while in cruise flight. The IDLE CUT-OFF position will cut fuel to the engine for shutdown and securing. Operation between detents is not permitted and may damage the aircraft.
Clicking on the engine quadrant will bring up an overlay with scales for the mixture, carburetor heat and the starter and primer buttons. Mixture is controlled through the red scale on the overlay. Click on the X in the upper right corner to hide the overlay.
4.4 Carburetor Air Lever
The carburetor air lever (see Figure 15) is located on the left side of an engine control quadrant mounted on a console between the pilot and copilot seats. The lever has a white handle on the end and is marked CARBURETOR next to the lever. It is marked DIRECT at the forward end, and ALTERNATE at the aft end of the scale. The lever is used to provide heated air to the carburetor to prevent icing. In the DIRECT position, air is drawn directly through the air intake. As the lever is moved toward the ALTERNATE position, part of the intake air is redirected through a duct heated by the engine exhaust manifold. When the carburetor temperature is between 0C and 20C (yellow arc), carburetor heat should be applied to prevent icing. Use of carburetor heat may require increased throttle due to the lower density of the warm air entering the engine.
Clicking on the engine quadrant will bring up an overlay with scales for the mixture, carburetor heat and the starter and primer buttons. Carburetor air is controlled through the blue scale on the overlay.
4.5 Ignition Systems
The ignition system consists of a dual magneto, an ignition harness carrying current to the spark plug on each cylinder, an induction vibrator, and an ignition switch. When the starter switch is depressed, and the ignition switch is in the R or BOTH position, the induction vibrator supplies current to the spark plugs for starting. Once the engine has started, current for the spark plugs is supplied by the engine-driven magnetos.
4.5.1 Ignition Switch
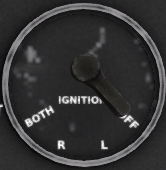
The ignition switch (see Figure 16) is located in the pilot's compartment on the main switch panel. Marked positions of the switch are: OFF, L, R and BOTH. The switch position may be selected by clicking on the marked position around the switch. When the switch is in the L position, the rear spark plugs of each cylinder are firing. When the switch is in the R position, the front spark plugs are firing, and when the switch is in the BOTH position, all spark plugs are firing.
4.6 Engine Priming System
The engine priming system is incorporated into the carburetor and consists of a two-point priming system controlled by a solenoid valve and an engine prime button. The priming system operates on DC current form the secondary bus. Fuel pressure for priming is supplied by the fuel boost pump.
4.7 Starter
The starter system consists of the starter motor, starter relay, throttle limit switch and starter button. Pressing the starter button closes a relay permitting the starter to be energized by the secondary DC Bus. The limit switch disables the starter if the collective is not full down, and the throttle is not full closed (or slightly cracked).
Normal starts are performed using an external power source. To start without external power, the guard on the DC master switch must be opened and the switch placed in the BATT ONLY position. The starter button also energizes the vibrator in the ignition system when the ignition switch is in the BOTH or R positions. This provides an initial spark on the spark plugs for starting.
4.8 Engine Chip Detector Warning Light
A chip detector warning light is located on a small panel above the main switch panel (Item #5, Figure 3). When the light is illuminated, it indicates that metal fragments have been detected circulating in the engine oil system. This indicates the presents of excessive engine wear and high probability of an impending engine failure.
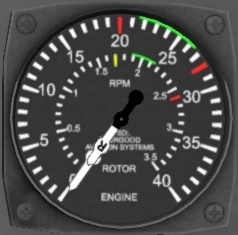
4.9 Primary Engine Instruments
4.10 Secondary Engine Instruments
5 Fuel System
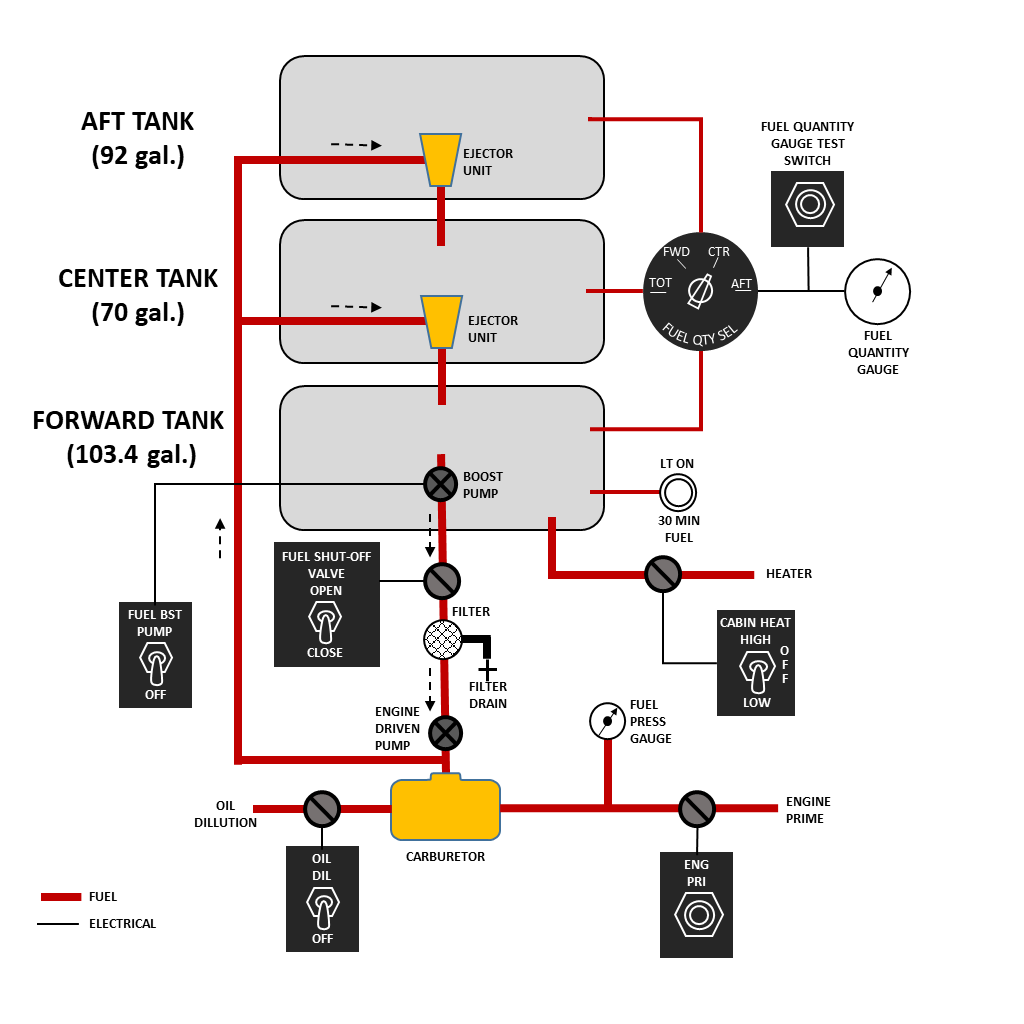
A summary of the aircraft fuel system is shown in Figure 17.
5.1 Fuel Tanks
The aircraft has three fuel tanks: forward, center and aft. Fuel for the engine is drawn from the forward tank. Ejector units transfer fuel from the aft to the center, and from the center to the forward tanks automatically anytime there is pressure from either the boost pump or engine-driven pump.
Gravity refueling ports for each tank are located on the right side of the aircraft. A drainport for each tank is located on the underside of the aircraft. Fuel from each tank should be drained before the first flight of each day and after refueling to check for water, dirt or fuel contamination.
5.2 Fuel Tank Capacities
The fuel tank capacities are as follows:
| Tank | Gallons | Pounds |
|---|---|---|
| Forward | 103.4 | 599.5 |
| Center | 70.0 | 406.0 |
| Aft | 92.0 | 534.0 |
| TOTAL | 265.4 | 1539.5 |
5.3 Fuel Shut-Off Valve Switch
A fuel shut-off switch is located behind the engine quadrant between the pilot and copilot seats. When this switch is in the CLOSE position, a valve between the fuel tanks and the carburetor is closed and no fuel is supplied to the engine. The switch should be left in the CLOSE position while parked and in the event of an engine fire. In the OPEN position, fuel is allowed to flow to the engine.
5.4 Fuel Booster Pump Switch
A fuel booster pump switch is located on the main switch panel. The fuel booster pump is located in the sump of the forward fuel tank, and operates off the primary DC bus. It supplements the fuel pressure provided by the engine-driven pump. The fuel boost pump should be used during start, ground operation, and flight bellow 2000 feet and above 8000 feet. Either pump alone can supply sufficient pressure to operate the engine should either pump fail. The boost pump is also activated anytime the OIL DIL switch is on.
5.5 Fuel Primer Switch
A fuel primer switch is located on the upper right corner of the engine quadrant located between the pilot and copilot seats. It is normally activated through the transparent overlay that comes up for the engine quadrant when clicking that area. As the primer switch merely activates a valve, the fuel boost pump must also be on in order to supply pressure for priming the engine for start.
5.6 Fuel Quantity Gauge and Test Switch
A fuel quantity gauge is mounted on the pilot side of the main console (#11 in <xrid="fig:pilotPanel" />). A selector knob to the left of the gauge (#9) indicates what quantity is shown on the gauge, one of FWD, CTR or AFT for the forward, center and aft tanks; or TOT for the total fuel quantity. The gauge shows the amount of fuel in pounds. The fuel gauge operates off the No 1 AC bus. A test button (#10) can be pressed to test the fuel gauge. While the button is pressed, the fuel amount will be pulled down to zero.
5.7 30-Minute Fuel Warning Light
A 30-minute fuel warning light, marked LT ON 30 MIN FUEL, is located in the upper right corner of the main switch panel. The light is connected through a control unit to a sensing element which is part of the tank unit. The light will go on during flight at normal attitude when there are 37 gallons (215 pounds) of fuel remaining in the forward tank. This amount of fuel is normally sufficient for about 30 minutes of flight. This system is powered by the DC primary bus.
6 Electrical System
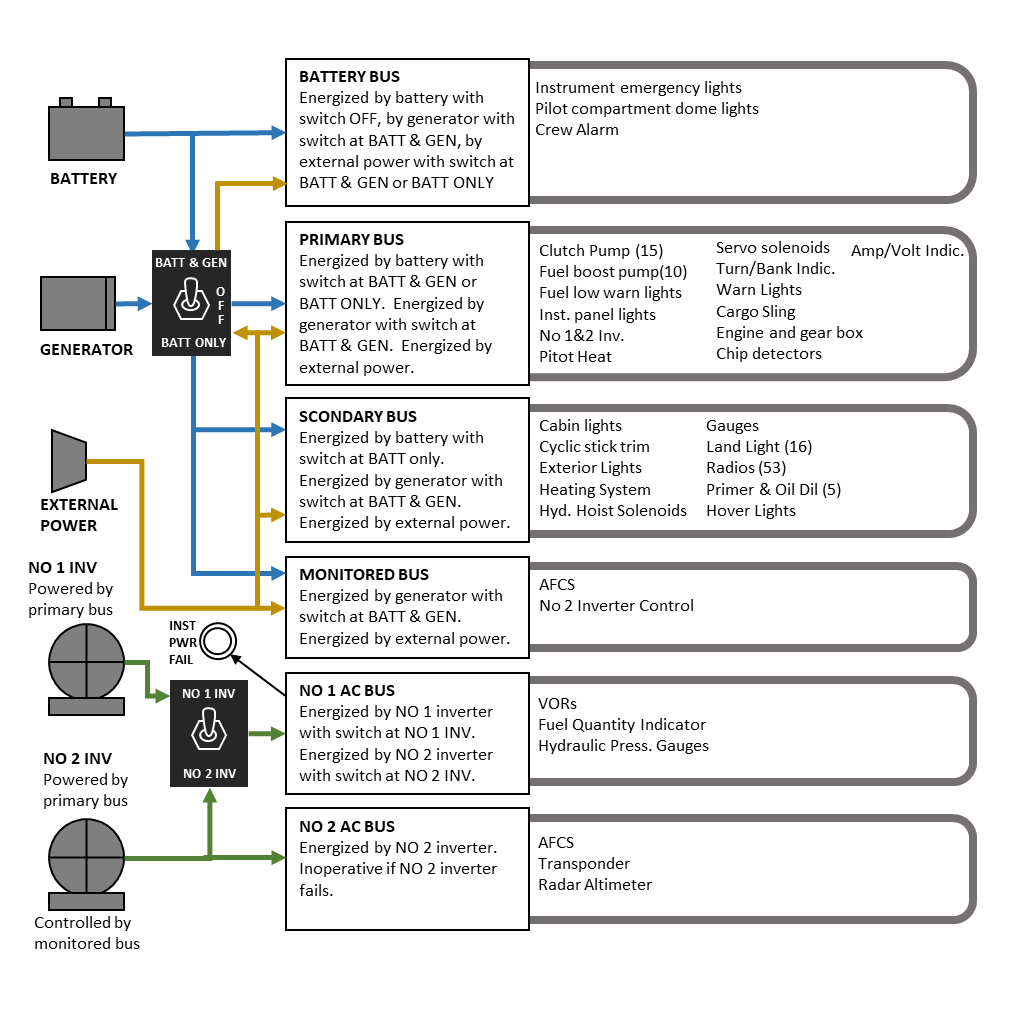
Electrical power is supplied by two basic systems: a 28-vold direct current system and a 115-volt alternating current system. Equipment operating from each system is shown in Figure 18.
6.1 Direct Current Power Supply System
Power for the operation of dc equipment is supplied by three sources: the battery, the generator and an external power supply system. Power is distributed through four buses: primary, secondary, monitored and a battery bus. A network of breakers and relays separate the buses.
6.1.1 Direct Current Power Sources
6.1.1.1 Battery
The 24-volt, 24-amp-hour battery is located on the left side of the clutch compartment behind the engine. It is accessed through a side panel behind the engine compartment. Battery power can be used for limited ground operation, including engine start when external power is not available. It is also used as an emergency power source in the event of an in-flight generator failure.
6.1.1.2 Generator
A 30-volt, 400-amp generator is located on the aft side of the main transmission and is driven by the accessory section of the transmission. The generator is the main source of power for the helicopter once the clutch has been engaged and the rotor is at normal operating RPM. The generator, being power by the main gear box, will continue to provide power during autorotation.
6.1.1.3 External Power Receptacle
The 28-volt external power receptacle is located on the right-hand side of the fuselage, forward of the cabin door. External power should be used for all ground operation until after clutch engagement to prevent unnecessary discharging of the battery.
6.1.2 Direct Current Distribution
Power for the operation of DC equipment is distributed through the following four buses.
6.1.2.1 Primary Bus
The primary bus supplies power for the DC flight instruments and all equipment necessary for the safety of flight. The primary bus may be energized from all three power sources. When external power is connected, it connects directly to the primary bus. Battery power is connected to the primary bus whenever the battery-generator switch is in either the BATT & GEN or the BATT ONLY positions. Generator power is supplied to the primary bus whenever the battery-generator switch is in the BATT & GEN position. In the event of a generator failure, battery power will be automatically connected to the primary bus.
6.1.2.2 Secondary Bus
The secondary bus supplies power for the auxiliary equipment and equipment not necessary for the safety of flight. The secondary bus is energized by external power through a secondary bus relay that connects the primary and secondary buses when external power is attached. Generator power is supplied to the secondary bus through the same relay once the generator is producing power. In the event of a generator failure during flight with the battery-generator switch in the BATT & GEN position, the secondary bus relay will disconnect and all equipment on the secondary bus will be inoperative. This will minimize the load on the battery and conserve battery power for the essential equipment. If it is necessary to use equipment on the secondary bus after a generator failure, the battery-generator switch can be placed in the BATT ONLY position to close the secondary bus relay and energize the secondary bus from the battery.
6.1.2.3 Monitored Bus
The monitored bus supplies power to the control circuits for equipment that is not essential to the safety of flight, and which has power demands that are too heavy for operation by the battery. The monitored bus is powered by a relay that is closed only when external power is attached, or the generator is producing power.
6.1.2.4 Battery Bus
The battery bus supplies power to the pilot's dome light, the instrument emergency lights and the crew alarm switch. The battery bus is continuously energized by the battery, regardless of the position of the battery-generator switch.
6.1.3 Battery-Generator Switch
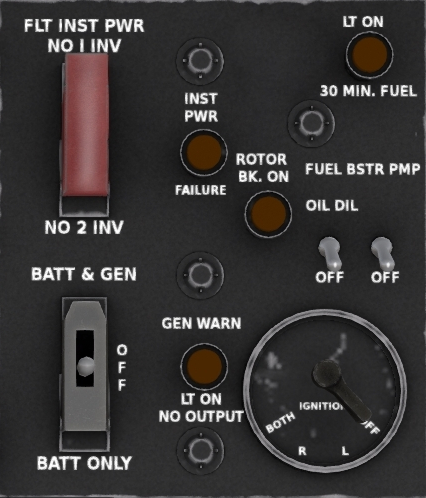
The battery-generator switch, covered by a switch guard, is located on the main switch panel (Figure 19). The switch has three positions marked: BATT & GEN, OFF and BATT ONLY. The switch, in conjunction with the generator-actuated relays, controls the distribution of power to the various DC busses as follows:
- BATT & GEN - When external power is not connected, battery power is supplied to the primary and battery busses only. When external power is connected, or the generator is producing power, all DC busses are energized and the battery will charge.
- BATT ONLY - When external power is not connected, battery power is supplied the the primary, secondary and battery buses only. When external power is connected, power is supplied to all DC busses and the battery will charge.
- OFF - When external power is not connected, only the battery bus is energized. When external power is connected, the primary, secondary and monitored buses will be powered by the external source, but the battery will not charge.
6.1.4 Generator Warning Light
The generator warning light is located on the main switch panel. The light is on whenever the primary bus is energized by other than generator power. In normal flight operations with the battery-generator switch in the BATT & GEN positions, the warning light will come on when generator power falls below a threshold indicating a partial or total generator failure. In this condition, power is lost to the secondary and monitor buses. Power may be restored to the secondary bus by moving the battery-generator switch to the BATT-ONLY position. The warning light is of the push-to-test type.
6.1.5 Volt-Ammeter
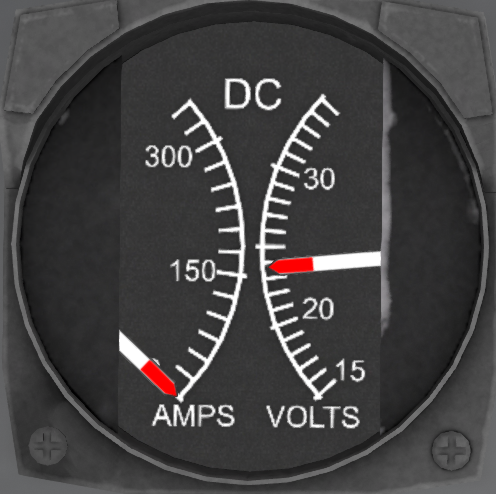
The volt-ammeter consists of a combined volt-meter and ammeter mounted in a single case on the instrument panel (Figure 20). The voltmeter indicates the voltage on the primary bus. The voltage should be between 22 and 24 volts when operating off the battery and 28 volts when the generator or external power is being used. The ammeter indicates the load being placed on the generator or battery by all equipment being used in the helicopter.
6.2 Alternating Current Power Supply System
Power for the AC system is provided by two 115-volt inverters and distributed through two AC buses. Both inverters are powered by the primary DC bus, but the No 2 inverter is controlled by the monitored bus and requires it to function. The inverters are located in the left-hand side of the clutch compartment just aft of the engine compartment. The No 1 Inverter supplies 250 VA while the No 2 inverter supplies 2500 VA. The No 1 Inverter supplies power for items essential for safe flight, while the No 2 Inverter supplies power for non-essential equipment such as the AFCS. In normal operation, the No 1 Inverter powers the No 1 AC bus and the No 2 Inverter powers the No 2 AC bus. A guarded switch on the main switch panel labeled FLT INST PWR can be used to power the No 1 AC bus from the No 2 inverter in the event that the No 1 inverter fails. This switch is normally left in the NO 1 INV position. When it is placed in the No 2 INV position, the No 2 Inverter supplies both AC busses.
An instrument power failure light labeled INST PWR FAILURE is located to the right of the switch. This light will illuminate when there is power supplied to the primary DC bus and there is no power supplied to the No 1 AC bus.
7 Flight Controls and Automatic Stabilization Equipment
The flight control system is divided into three subsystems as follows: the main rotor flight control system, the tail rotor flight control system, and the flight control servo system. In addition an automatic stabilization system is also installed which provides limited automatic control of the helicopter. See section H-34_Choctaw/General for details on the key commands for controlling the flight controls.
7.1 Main Rotor Flight Control System
The main rotor flight system provides both vertical control and directional control. Vertical control is accomplished by changing the collective pitch in the main rotor blades to increase or decrease the angle of attack, and consequentially the lift developed by the blades. Directional control is accomplished by changing the pitch of each blade individually as it rotates. The change of pitch through the 360 degree rotation causes the blade tip-path to tilt, this resulting in a horizontal component of thrust in addition to the vertical component.
7.1.1 Collective Pitch Sticks
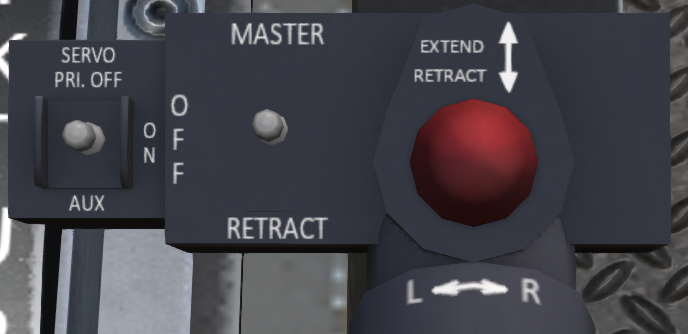
The collective pitch of the rotor blades is controlled by a collective lever to the left of the pilot and copilot seats. Both controls act simultaneously. Pulling the lever up increases blade pitch and thus total thrust, while lowering the lever decreases blade pitch and thus decreases total lift. A twist grip on the collective controls the the throttle. The throttle can be accessed by clicking on the collective grip to bring up the throttle control overlay as described in Section 4.1.1 Throttle. The pilot-side collective also has a switchbox on the end as shown in Figure 21. This switchbox contains switches for the flight servos and the spotlight which are described in subsequent sections.
7.1.2 Cyclic Control Sticks
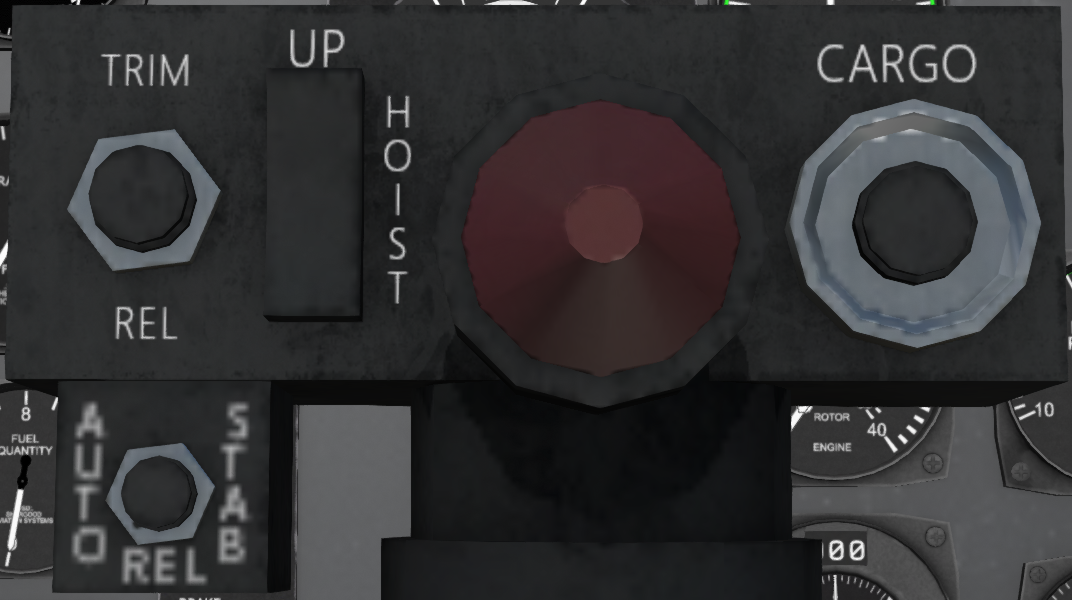
Each pilot seat has a cyclic control stick in front of it. Both cyclic sticks are rigged to move together. The cyclic controls the cyclic pitch of the blades causing the blade tip path to lower in the direction the cyclic is pushed. This will result in a horizontal component of lift in that direction thus moving the helicopter in that direction. Each cyclic has a switchbox on top of it with some additional controls (Figure 22). The button labeled TRIM REL on the left hand side will disengage the AFCS when active. A rocker switch labeled HOIST with UP and DN positions will move the rescue hoist up or down when pressed if the hoist master on the upper panel is in the PILOT position. A red had switch serves as cyclic trim, though is non-function in this SL version. Finally, a button labeled CARGO will open the cargo hooks as long as the cargo master switch (Figure 9) is not in the SAFE position.
7.2 Tail Rotor Flight Control System
The tail rotor control pedals, one set each for the pilot and copilot, change the pitch and thus thrust from the tail rotor. Pressing the left pedal increases pitch and thus thrust causing the helicopter to yaw to the left. Pressing the right pedal decreases thrust, allowing torque from the helicopter cause the helicopter to yaw to the right.
7.3 Flight Servo System
The flight servos are hydraulically activated systems that serve to boost the pilot control inputs and reduce input forces. The system is driven by two independent hydraulic systems, the primary and the auxiliary. The primary hydraulic pump and reservoir are located in the main gearbox compartment and driven by the main gearbox. The auxiliary pump is driven by the engine with a reservoir in the clutch compartment.
The left-most switch on the collective control panel (Figure 21) controls the flight servos and is labeled SERVO. It has three positions labeled PRI OFF, ON and AUX OFF. In normal operation the switch should be in the ON position meaning both the primary and auxiliary servos are active. Moving the switch to one of the other positions will turn off the indicated servo.
7.4 Automatic Stabilization Equipment (ASE)
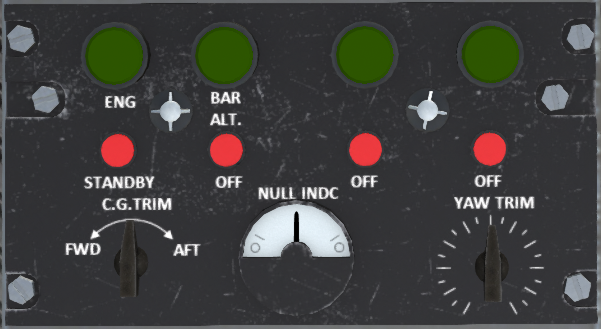
The Automatic Stabilization Equipment (ASE) provides limited automatic control of the aircraft, similar to, but more primitive than, an AFCS (Automatic Flight Control System). The control panel for the ASE is located on the middle console between the pilot seats (see Figure 23). The panel has an array of 4 pressable green lights and 4 red buttons arranged in pairs. Pressing a green button engages a channel causing the green light to illuminate, and pressing the red button disengages a channel.
In the installed version, only the two channels are used, while the second two channels and their associated lights and buttons are non-functional. The first channel as marked ENG and serves to hold whatever heading and airspeed as being maintained at the time the button as pressed.. The second channel marked BAR ALT. will hold the current altitude. The altitude hold channel will only function with the main channel is also engaged.
The standard chat commands for the ASE are:
| Command | Description |
|---|---|
| ap eng | Hold the current airspeed and heading. |
| ap alt | Hold the current altitude. The ENG channel must already be engaged for altitude hold to be engaged. |
| ap dis | Disconnect the ASE. |
The ASE also includes two knobs, one labeled C.G. TRIM and the other labeled YAW TRIM. The C.G. TRIM knob can be used to adjust the zero point for longitudinal cyclic control by a small amount, while the YAW TRIM knob can be used to adjust the zero point of the pedals.
7.4.1 Heading Changes
When the ASE is enabled and a heading is held, the established heading can be changed be making turns with the pedals. When a pedal is pressed by the pilot, the heading lock feature of the ASE is disabled for 2 seconds, then relocks on the new heading. To make a turn, simply use the pedals to make a slow turn, then release the pedal once established on the desired heading.
7.4.2 Extended Commands
The ASE in the S-58 is intended to be much more primitive than in modern aircraft. As such, additional autopilot functionality is disabled by default. By going into the @Realism menu and disabling "Basic AFCS", additional autopilot functionality can be enabled through chat commands.
| Command | Description |
|---|---|
| ap hdg n | Turn to heading n. |
| ap r n | Turn right by n degrees. |
| ap l n | Turn left by n degrees. |
| ap u n | Move up n feet. |
| ap d n | Move down n feet. |
| ap hvr | Enter autohover mode. |
| ap to | Take off to a hover. |
| ap land | Autoland the aircraft. |
8 Lighting
All aircraft lights operate on DC power. Most lights operate on the secondary DC bus, though pilot's compartment dome light operates off the battery bus and can be operated at any time.
8.1 External
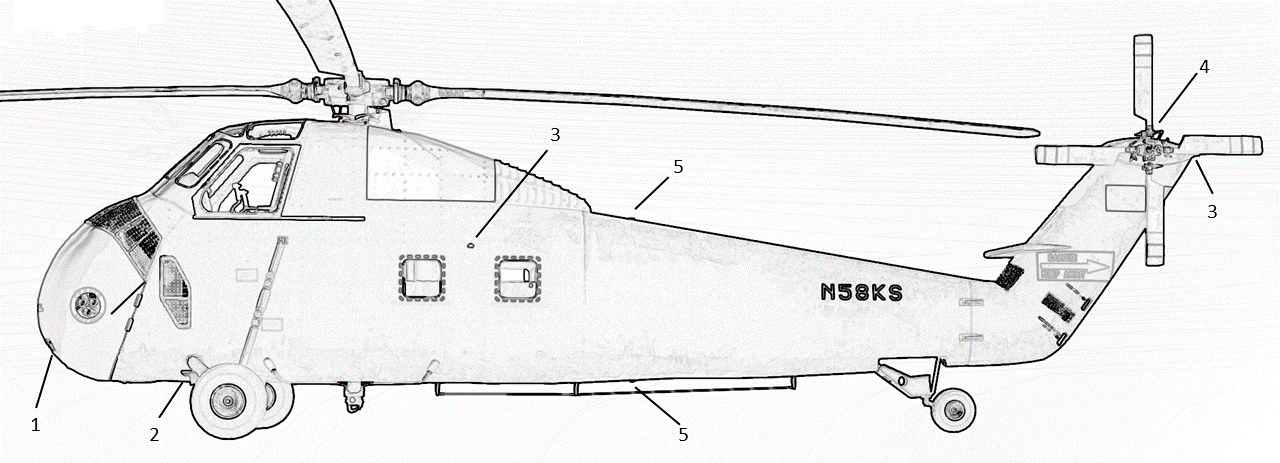
A summary of the exterior light placement is shown in Figure 24.
8.1.1 Anti Collision Light
A red flashing anti-collision light is mounted on the top of the vertical stabilizer. It is powered by the secondary DC bus and controlled through a switch marked ROT LT on the overhead panel.
8.1.2 Position Lights
The aircraft is equipped with three position lights, two on each side, and one on the back of the tail. The left-hand side light is red, the right-hand side light is green, and the tail mounted light is white. All three lights are powered by the secondary DC bus. The lights are controlled by two switches under the heading EXTERIOR LIGHTS POSITIONS. The left switch has two positions DIM and BRT for dim and bright. The right switch has three positions marked FLASH, OFF and STEADY.
8.1.3 Fuselage Lights
The fuselage lights are white, one located aft of the main gearbox, one on the bottom of the fuselage, and one on top of the pilot's compartment. The fuselage lights are controlled by the same switch as the position lights.
8.1.4 Flood/Hover Lights
The flood and hover lights are mounted on the front gear struts. Two forward pointing flood lights are mounted one on each strut and are illuminated when the LAND HOVER LTS switch is in the HOVER LTS or FLOOD position. A third downward pointing hover light is illuminates only then the LAND HOVER LTS switch is in the HOVER LTS position.
8.1.5 Landing Light
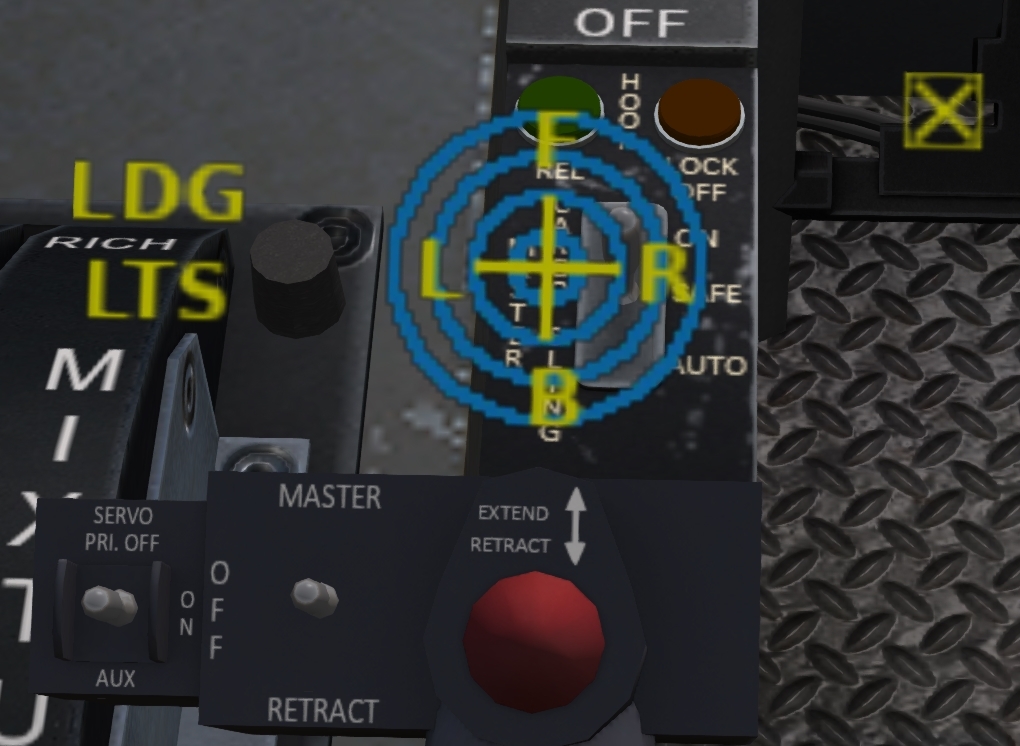
A steerable landing light is mounted in the nose of the aircraft. The light is powered by the secondary DC bus, and controlled through a three-position switch and hat switch on the collective (see Figure 25). The switch positions are labeled MASTER, OFF and RETRACT. In the MASTER position, the light illuminates and swings down from its stowed position. In the OFF position, the light is extinguished, but remains in the current position. In the RETRACT position, the light will extinguish and be retracted into the stowed position.
The light can be steered by pressing the red hat switch on the collective to activate the control transparency, and then pressing on the L, R, F and B areas to steer the light left, right, forward and back, respectively.
8.2 Internal
8.2.1 Cockpit Dome Light
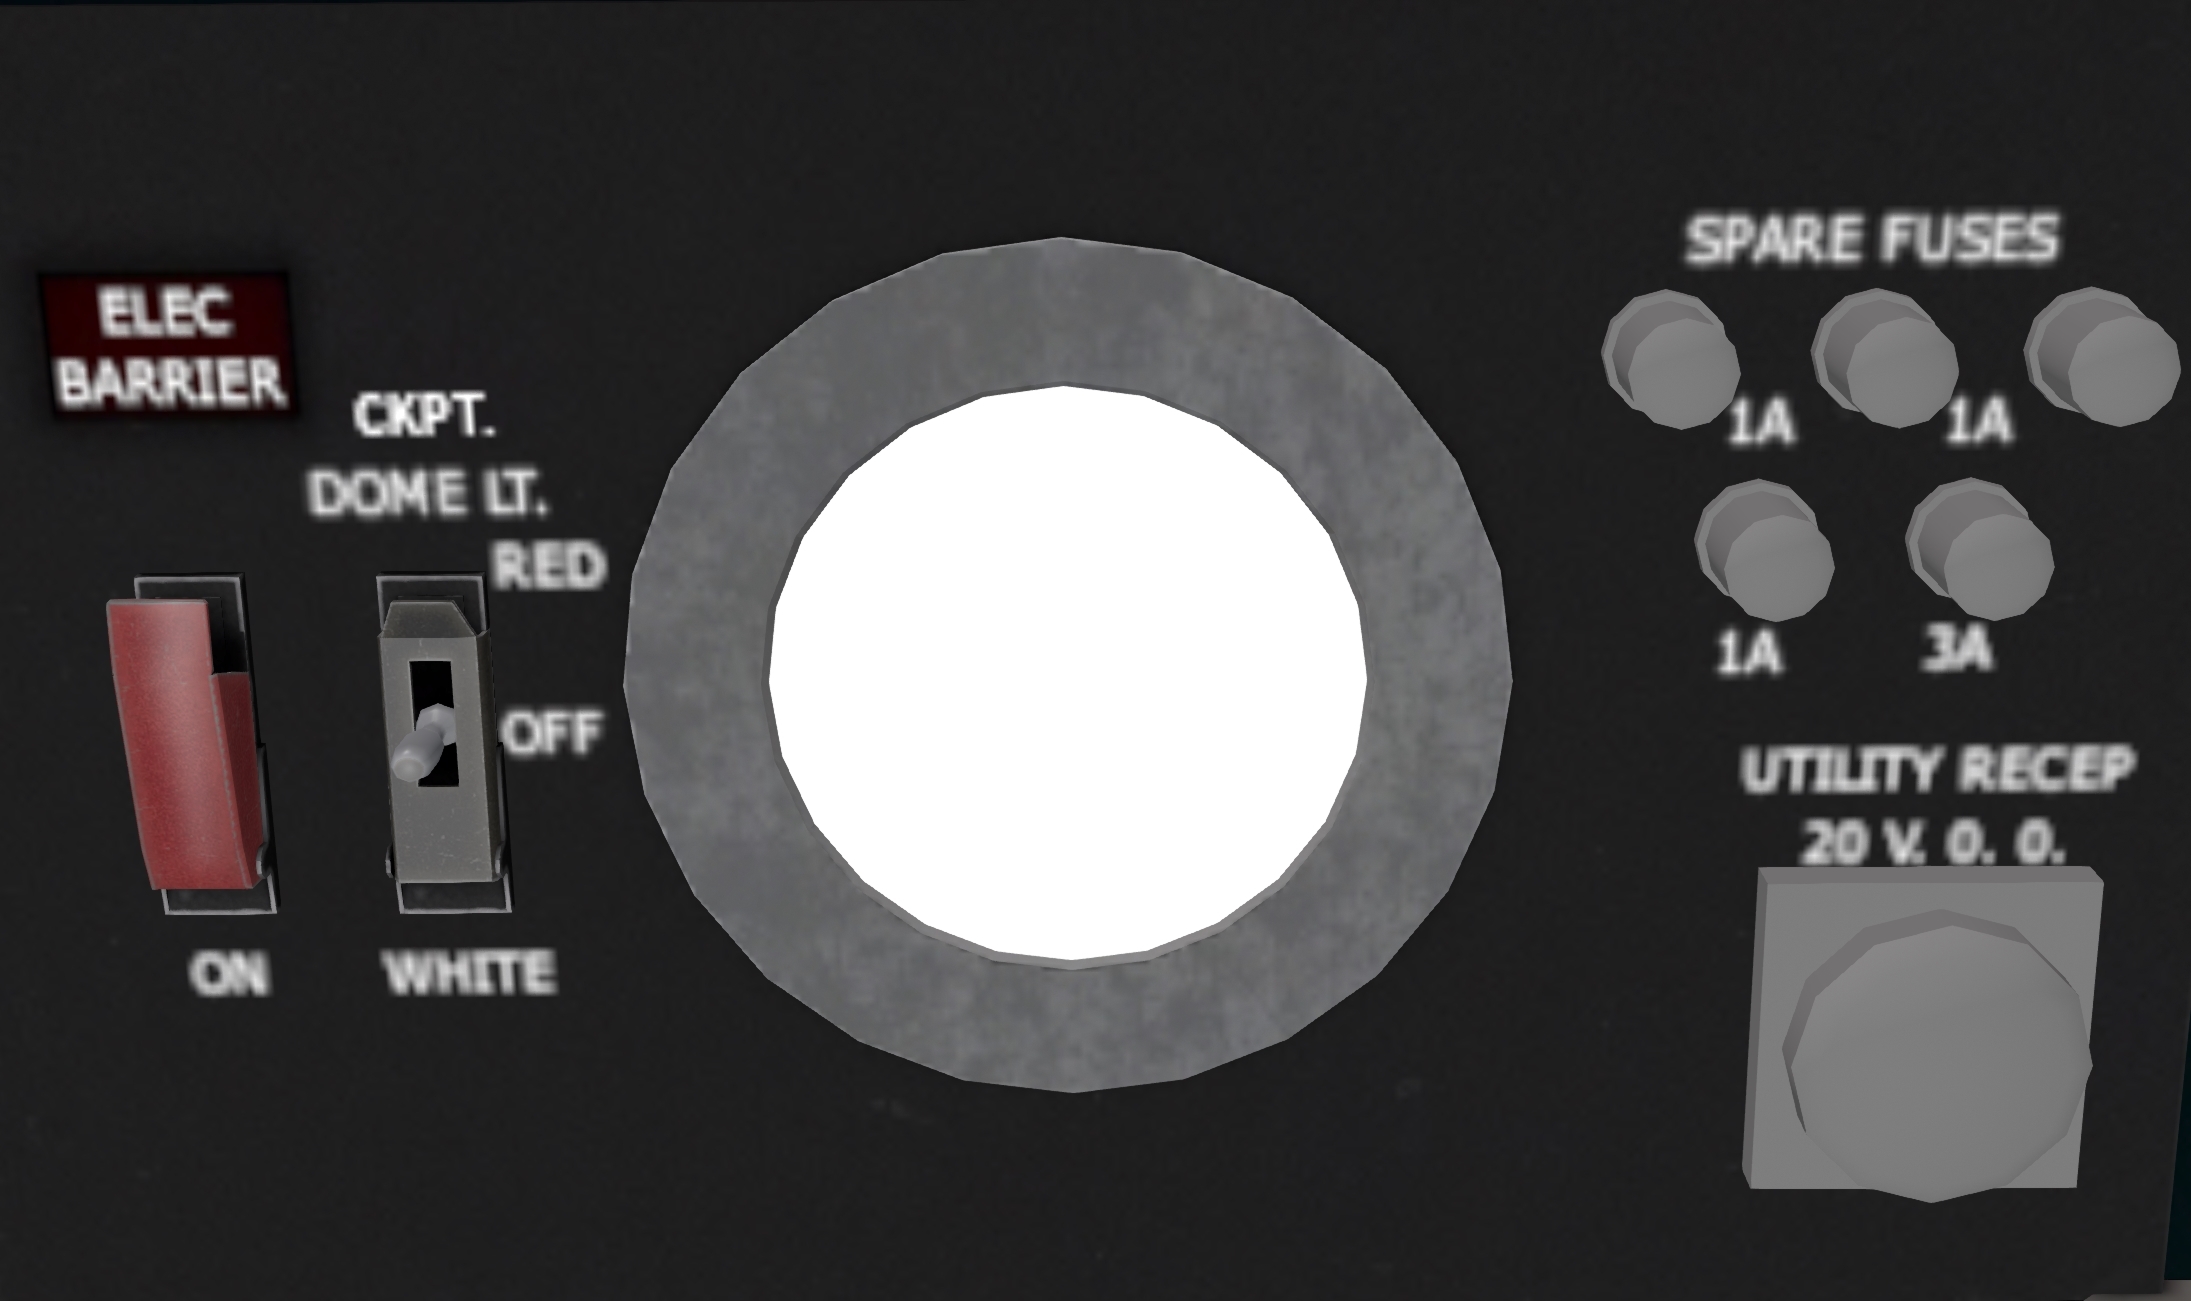
The cockpit dome light is located overhead at the back side of the cockpit (Figure 26). The light is in the center of the panel with a guarded three position switch next to it. The switch has positions OFF, RED and WHITE. The white position is guarded so as to not accidently destroy night acclimation during night flight.
8.2.2 Instrument Lights
The instrument lights are controlled through a set of four variable knobs at the bottom of the overhead panel (Figure 4). The first knob is labeled INST EMER LTS and controls the emergency instrument lights. The emergency instruments light switch is an alternate switch for the cockpit dome red light with variable intensity. It is powered by the battery bus, and thus can be illuminated even when the main power is off. This switch should be left in the OFF position when the helicopter is parked for long periods of time to avoid draining the battery.
The remainder of the instrument lights are powered by the secondary DC bus. Each knob controls a different part of the instrument panel with switches for the copilot, center and pilot sections labeled CONSOLE A PANEL LTS, NON FLT INST LTS and FLT INST LTS, respectively.
8.2.3 Cabin Lights
The cabin lights are controlled through two switches on the overhead panel in the cockpit. The lights are powered by the secondary DC bus. A guarded three-position light labeled CABIN LTS controls the main overhead lights. It has positions RED, OFF and WHITE with the WHITE position only accessible with the guard open. A second switch labeled PASS READING LTS controls smaller lights on the sides of the cabin.
