H-160/EMS Supplement
EMS SUPPLEMENT
1 GENERAL
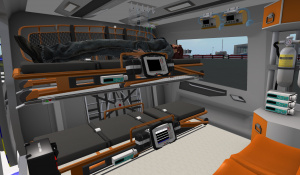
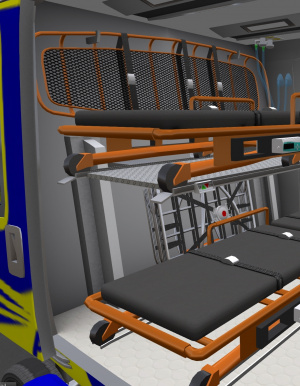
The EMS version of the H-160 is equipped with dual stretchers to transport two patients and carry three medical personnel. The patient bays are stacked with a lift system to move the top stretcher up/down. Each stretcher is equipped with a dedicated heart monitor/defibrillator and perfusor. Additional medical equipment include dual oxygen systems, ventilators and IVs. In additional to the base medical systems, this helicopter is also equipped with a 30m rescue winch. A rescue basket, stokes basket, and harness are stored in the helicopter for use with the winch system.
2 MEDICAL SYSTEMS
Each patient bay (upper and lower) is equipped with its own set of equipment. The following sections describe each piece of equipment.
2.1 Heart Monitor and Defibrillator
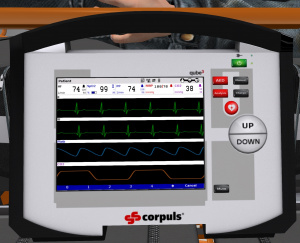
A heart monitor with defibrillator is attached to each stretcher. The monitors are powered by Kelly-Tech infinite Watt-Hour batteries which never need replacement and do not depend on helicopter electrical power. The green button in the upper right corner of the device turns power on and off.
2.1.1 Heart Monitor
The heart monitoring data will be displayed when the patient is laying in the stretcher and the monitor is turned on. Basic data is displayed on the top part of the display including heart rate, blood oxygen level, blood pressure and CO2 level. Below the data bar are four bar graphics showing: heart rate (II & III), a pulse oximeter graph and CO2 graph. The heart rate is also indicated with a pulsing tone. The tone can be silenced by pressing the MUTE button.
2.1.2 Defibrillator
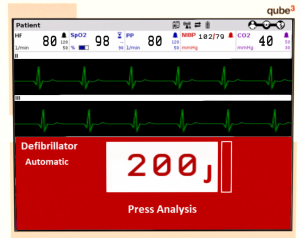
The defibrillator can be used in either Automatic/AED (Automatic External Defibrillator) mode or manual mode. To use automatic mode, press the AED button on the monitor, and to use manual mode press the Manual button. Press the button for the current mode again to exit defibrillator mode. While the defibrillator is active, the lower portion of the screen will be shown in red as show in Figure 3. Mode text in the upper left corner will indicate if automatic or manual mode is active. A status message below the energy level indicates device status and gives directions to the users.
2.1.2.1 Defibrillator (AED)
In AED mode, the device will automatically analyze the cardiac signature and determine if a shock is needed and at what energy level. Use the following procedure:
- Press the AED button. The mode text will display "Automatic" and the status message "Press Analysis" will be displayed under the energy setting.
- Press the Analysis button. The status text "Analyzing..." will appear for several seconds followed by either "Shock Advised - Charging" or "No Shock Advised".
- If a shock was advised, the unit automatically charges and displays the status message "Press to Deliver Shock" when fully charged. Press the round shock button to deliver the charge.
- If the shock did not have the desired effect, repeat from Step 2.
2.1.2.2 Defibrillator (Manual)
In manual mode, the user is responsible for selecting the energy level, and determining if a shock is required. Use the following procedure for manual mode:
- Press the Manual button. The mode text "Manual" will be shown in the upper left and the status message "Select Energy" will be shown below the current energy level.
- Use the Up/Down button to adjust the energy level.
- Press the Charge button. The status message "Charging..." will be displayed for several seconds followed by "Press to Deliver Shock".
- Press the round shock button to deliver the charge.
- If the shock did not have the desired effect, repeat from Step 2.
2.2 Patient Health
The cardiac health of each patient can be controlled through the stretcher menu. Click on a stretcher to bring up the stretcher menu. Click on the "Health" button to select the current patient health which is reflected through the behavior of the cardiac monitor. The possible health states are:
- Normal - A normal heart rhythm will show on the monitor. Applying a shock runs a risk of stopping the heart.
- Stressed - An irregular heart rhythm will show on the monitor. Applying a shock runs a risk of stopping the heart.
- Fibrillation - A fibrillation heart rhythm will show on the monitor. Applying a shock may return the heart rhythm to normal.
- Dead - The monitor will display a "flatline". A shock will have no effect.
2.3 Oxygen
Figure 4: Medical Equipment
| |
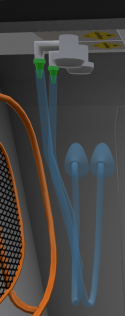
Two oxygen ports are provided overhead in the left aft corner of the main cabin (see Figure a). Left left-hand supply is used for the upper patint bay, while the right-hand supply is used for the patient in the lower bay. Click on the valve to deploy or stow the mask. A mask will deploy only if a patient is in the corresponding bay, and will auto-hide if a patient stands from the bay.
2.4 Ventilator
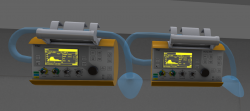
Two ventilators are mounted above the left-hand side main cabin door (see Figure b). The unit on the left is for the patient in the upper bay while the unit on the right is for the patient in the lower bay. Power to the units is supplied from the helicopter's main electrical system. Ventilator masks will deploy only when a patient is in the corresponding bay, and will auto-hide if a patient stands from the bay. Use of oxygen and ventilator masks are mutually exclusive.
2.5 Perfuser
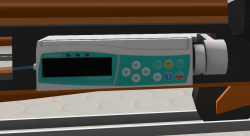
A perfuser (see Figure c) is attached to each stretcher. Clicking on a perfuser will toggle the tube from the unit to the patient.
3 STRETCHER SYSTEM
The H160 is equipped with a dual linked stretcher system. Each stretcher may be independently loaded, unloaded and pushed. However, all loads and unloads must be made from the bottom position. In order to unload the upper stretcher it is necessary to first unload the lower stretcher, then use the patient lift to lower the stretcher to the lower position. Click on the lift to lower or raise it. Stretchers are linked to the aircraft and may be pushed up to about 50m away (up to SL link limits). Ground detect technology lets you push it over obstacles and up or down ramps.
3.1 Stretcher Menus
The stretchers are controlled through menus accessed by clicking them. When a stretcher is stowed, the stretcher menus are accessible to the owner, any pilots registered with the aircraft and anyone sitting in the aircraft. When the stretcher is unloaded, the stretcher menus are open to anyone. The following stretcher menu options are available (options shown depend on context):
| Button | Description | Condition |
|---|---|---|
| Unload Left | Take stretcher out of helicopter on left side. | Left doors open and aircraft parked. |
| Unload Right | Take stretcher out of helicopter on right side. | Right doors open and aircraft parked. |
| Load | Load stretcher into helicopter. | Rear doors open. |
| Backboard | Use backboard | n/a |
| Blocks | Use blocks | Backboard in use |
| Lower | Put stretcher into lowered state | stretcher out of aircraft |
| Raise | Put stretcher into raised state | stretcher out of aircraft |
| Push | Push the stretcher | stretcher out of aircraft |
| Let Go | Stop pushing the stretcher | stretcher out of aircraft |
| Transfer | Transfer patient to/from a rescue or stokes basket | stretcher is stowed |
| Health | Set health of patient | Patient is in the stretcher |
4 WINCH SYSTEM
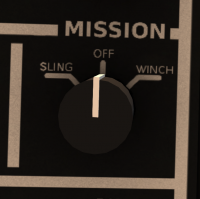
The EMS H160 is equipped with an eclectically operated rescue winch mounted over the right main cabin door. To use the system, first ensure that primary electric power is on, then set the MISSION switch (Figure 5) to the WINCH position. For best results, it is recommended that you keep the MISSION switch in the OFF position except when actively using the winch. Turn the winch off disabled the winch script which improves region crossing and reduces script load. When the winch is turned on, the winch systems will take a few moments to power on followed by the winch arm extending. Once the arm is fully extended, the system is ready for use. Turning the system off will cause the arm to retract.
4.1 Deploying/Stowing Equipment
The following rescue equipment is provided with this aircraft:
- Rescue Basket - Foldable metal frame basket used for uninjured victims.
- Stokes Basket - Basket used for injured patients keeping them in a horizontal position.
- Harness - For use by rescue personnel to be hoisted back into aircraft.
- Rope - For use by rescue personnel to quickly rappel to the surface.
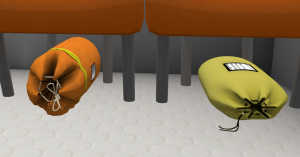
To use a piece of rescue equipment with the winch, click on the item stowed in the cabin. The rescue basket and stokes basket are stored behind the stretchers on the bottom and top, respectively (Figure 6). The rope bag (orange) and harness bag (yellow) are located under the EMS crew seats (Figure 7). Clicking on one items will replace the item currently in use with the exception that the harness and stokes basket may be used together. To stow all rescue equipment, click on the winch hook. Rescue equipment can only be deployed or stowed when the winch has been lower no more than 1.5m.
4.2 Loading Patients on Equipment
Patients can sit on a piece of rescue equipment by right clicking and sitting. Because of SL limitations, the first patient that sits on a basket will be considered the avi that is sitting on that prim. To mitigate this limitation, sits on any seat other than pilot seat will be redirected to a basket whenever a basket is deployed and empty.
4.3 Transferring Patients to/from Stretchers
Patients may be transferred from a basket (rescue or stokes) by clicking on a stretcher and selecting "Transfer" from the menu. If the stretcher is vacant, the patient will be moved from the basket to the stretcher. If the basket is empty, a patient will be transferred from the stretcher to the basket. Any occupant in the rear area of the aircraft may also click on a basket or harness to transfer to it.
4.4 Using the Rappelling Rope
Unlike the baskets and harness, the rope attaches to a ring on the winch arm. The rope can be used to quickly egress from the helicopter in a high hover to the surface. Click on the orange rope bag under the main cabin seats to deploy the rope. Any passenger in the main cabin may use the rope by clicking on the rope, the winch body or the winch arm. This will position the user at the top of the rope in a rappelling pose. Use the down arrow to control descent. Once at the bottom, the user will automatically unsit from the rope and aircraft.
4.5 Controlling the Winch
The winch can be controlled from the cockpit, from the winch operator controls, by using the winch HUD (included in the box, or from the @Get menu in the helicopter main menus), or by using chat commands.
4.6 Cockpit Panel
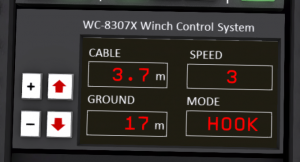
The cockpit winch controls are located between the seats on the horizontal panel behind the autopilot (see Figure 8). The display shows:
- CABLE - Amount of cable that has been played out (up to 32m)
- SPEED - Current speed setting between 1 and 5
- GROUND - Current height above ground in meters.
- MODE - Current load type in use.
Up and Down arrows on the panel raise and lower the cable. "+" and "-" buttons change the speed of the winch.
An additional emergency CABLE CUT button is located on the collective covered by a guard. To cut the cable, click to open the guard, then press the button. Pilots are advised that cutting the cable while someone is in a basket or harness is just plain mean.
4.7 Winch Operator
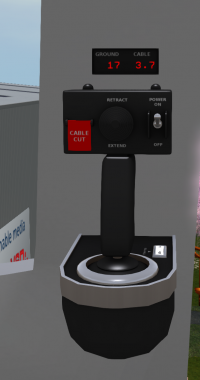
The winch may also be operated from the winch operator station. The winch operator kneels in the right-hand main cabin doorway using the winch joystick mounted forward of the door. Sit on the winch joystick, or click on it while sitting on one of the other main cabin seats to transfer to it.
Controls on the winch operator station (see Figure 9) are enabled by turning on the switch on the joystick (the pilot must also have turned on the winch system from the cockpit). Once on, a display behind the joystick will show the current cable length and ground height.
The cable is moved up/down by clicking on the hat switch. Push the top half of the switch to retract cable, and the bottom half to extend cable. The cable speed can be controlled by a speed setting at the base of the joystick. The winch operator also has a cable cut button protected by a guard.
4.8 Winch Operator Key Controls
The winch operator can also control the winch through the PgUp and PgDn keys. In addition, the winch operator can control the hover position of the aircraft via the autopilot. To use this feature, the pilot must establish the aircraft in a hover and engage the autopilot in hover mode; and the winch system must be on. The winch operator can then use the arrow keys to make fine adjustments in the hover position.
4.9 Winch HUD
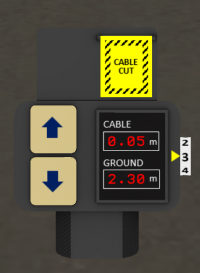
The winch HUD (see Figure 10) may be used by any occupant of the aircraft. It includes the same display as the winch operator controls and include an UP and DOWN button. A dial on the right hand side is used to control the speed, and a guarded cable cut button is located on the top right.
4.10 Winch Chat Commands
Occupants of the aircraft may also use chat commands to control the winch. The following commands are supported:
| Command | Description |
|---|---|
| w n | Adjust cable to exactly n meters |
| w u n | Move cable up n meters |
| w d n | Move cable down n meters |
| w x | Remove all loads |
| w b | Deploy rescue basket |
| w s | Deploy stokes basket |
| w h | Deploy harness |
| w sh | Deploy stokes basket and harness together |
| w r | Deploy the rope for rappelling |
| w cut | Cut the cable |
| w + | Increase the winch speed |
| w - | Decrease the winch speed |
