Paint Wizard
|
Paint Wizard |
The Paint Wizard can be used to paint any Shergood Aviation aircraft, and securely package paints from it for resale. The Paint Wizard kit includes the Paint Wizard itself, and a V3.0 Shergood Paint Bucket. Unlike the 2.0 paint kit system, no notecards or drop-in textures are used to configure it. It is programmed only from the Paint Wizard. Paints may be applied to an aircraft directly from the Paint Wizard, or through paint cans programmed by it.
1 Basic Operation
1.1 Selecting a Configuration
When you first rez the Paint Wizard, no active configuration is selected. The text "select configuration..." will be shown on the display bar. Click the display bar, to get a menu of possible configurations. A configuration is a combination of an aircraft, and a specific paint for that aircraft. The Paint Wizard comes with configurations for all SA aircraft at the time the kit was published. In addition, you may also add your own configurations. This will be described in Adding Configurations.
Use the "NEXT>>" and "<<PREV" buttons to page through the selections. Once you select a configuration, the Paint Wizard will load the configuration, and configure the wizard for editing that paint. Selecting the ":RESET:" option will reset the scripts and load any newly added configurations.
Once a configuration is loaded, information about the loaded configuration will be displayed on the display bar. The top line will show the aircraft id and the name of the paint. The bottom line will show the name of the paint creator.
You can exit a configuration and select a new one by clicking the base of the Wizard then selecting ":RESET:" from the main menu. This will purge the current paint, and bring up the menu of paint configurations to select from.
1.2 Editing a Paint
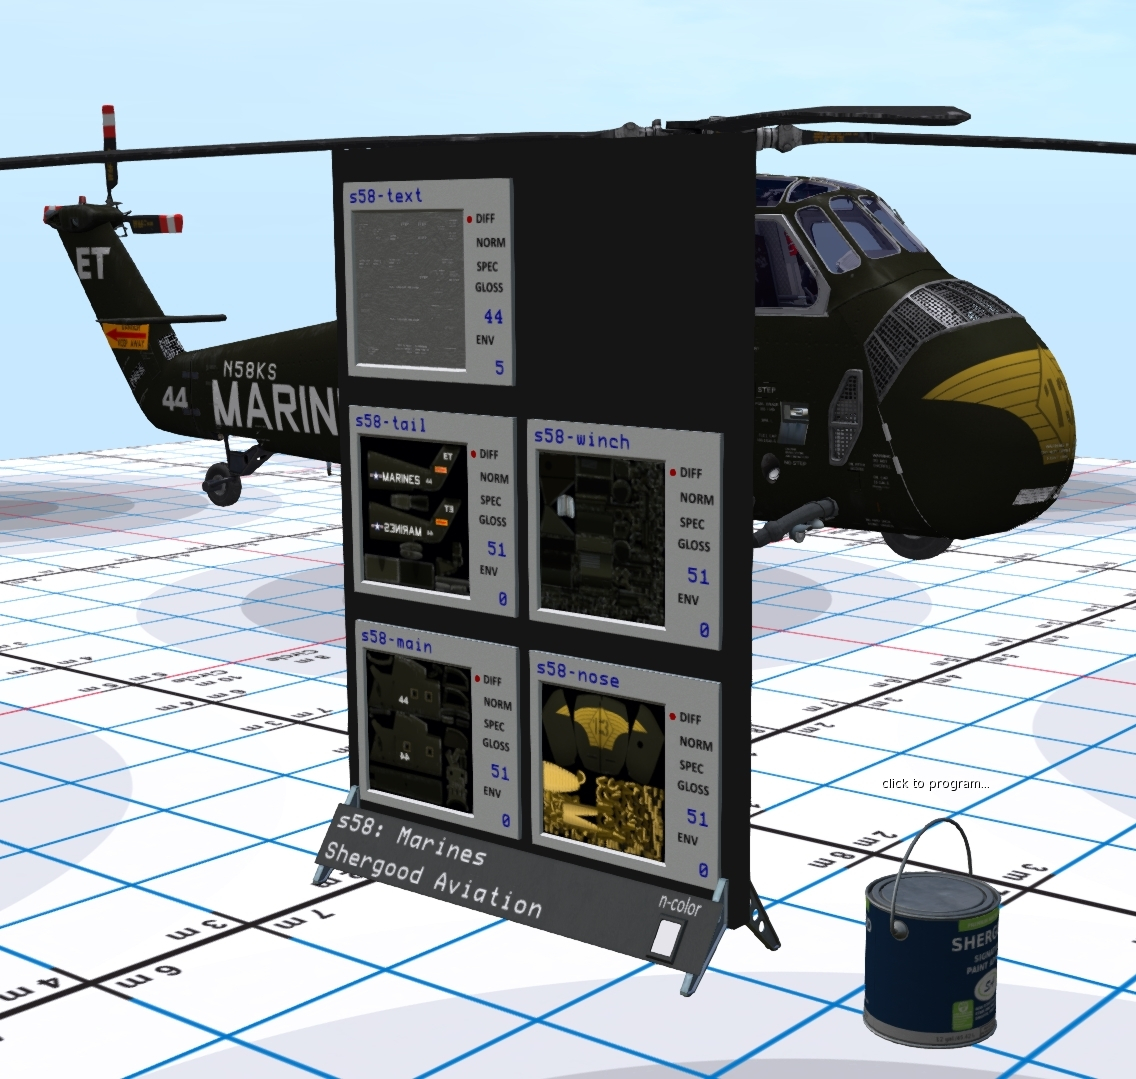
Once a configuration has been loaded, the backboard of the Wizard will be populated with tiles, one tile for each texture used in the paint (see Figure 1). Each tile has the following parts:
- Label - The name of the texture is shown in blue at the top of the tile.
- Texture Box - A large box using most of the tile space below the label shows the texture that is assigned to that name.
- Material Selector - A selector on the right side of the tile with settings DIFF, NORM and SPEC lets you select whether to view the diffuse layer, the normal layer or specular layer for a texture.
- Specular Parameters - Two numbers labeled GLOSS and ENV let you select the Glossiness and Environment values for the specular layer.
To edit a texture, simply edit the texture applied to the Texture Box with the normal SL edit tools. You can also select "blank" or "none" as a texture by clicking on the texture box and selecting the texture from the menu. The "none" texture will display as a large "X" in the box, and will result in no texture being applied for that material layer in that texture.
To select the material layer, click on DIFF, NORM or SPEC to select the layer.
A box at the bottom labeled "n-color" can be used to set the color applied to n-numbers on the aircraft.
1.2.1 Setting the Name/Creator
You can set the name and creator of a paint from the main menu by selecting "Set Name" or "Set Creator", respectively. This will bring up a text box in which you can enter the new name and/or creator. The new name/creator will be displayed on the Paint Wizard base, and be included in programmed paint cans and in notecards dumped from the Wizard.
1.2.2 Paint Resources
For most paints, you can get a link to the "paint resources" page for an aircraft by clicking on the base and selecting "Templates➚". This will bring up a dialog box directing you to a page where you can download the base textures and/or Gimp/Photoshop source files.
1.3 Saving/Adding Configurations
Configurations are saved in notecards in the contents of the Paint Wizard. There are two types of notecards, paint configurations and aircraft configurations. Aircraft configurations describe the names of the textures that are part of a paint for that aircraft type, while the paint configurations describe a specific paint for an aircraft. Typically, only paint configurations will ever need to be managed by end-users.
1.3.1 Paint Configurations
A paint configuration notecard starts with the "*config:" and has the name of the paint configuration appended to it. By convention, the configuration name should include the code for the aircraft type, a dash, and the paint name. For example paint called "marine" for the "s58" would use a configuration notecard named "*config:s58-marine".
Each line in the notecard consists of a key and a value, separated by a "=". Keys without a "@" at the beginning are "kit tags" that get special handling by the paint kit. Keys that begin with "@" are "paint tags" that are part of the visual appearance of a paint.
The following special keys must be defined in any configuration notecard:
| Name | Description |
|---|---|
| name | The name of the paint. This is used in hover text over any paint cans, and in the menu when choosing a paint to apply from the end-user's aircraft paint menu. |
| creator | The creator of the paint. This text is shown in hover text over paint cans. While the creator may simply be an avi name, it can also be a brand name. |
| aircraft | The aircraft for which this paint is designed. This will control which tiles are displayed in the wizard, and what aircraft can load the paint. It must be a valid aircraft type. |
| n-color | The color to apply to the tail number on the aircraft. It should consist of three comma-separated values between angle brackets for the red, green and blue values for the color. The values should be between 0 and 1. |
The following is an example of a minimum paint configuration:
name=Marines
creator=Shergood Aviation
aircraft=s58
n-color=<1,1,1>
Most paint tags begin with "@" followed by the name of the texture in that paint. A suffix beginning with "_" is applied to specify different material components of that texture. In additional, the special paint tag "@font" can be used to specify a "font" texture used to draw the numbers in the tail number.
If you have manually edited the NC for the current paint and you wish to reload it, click on the base of the Wizard and select "Reload" from the menu. This will reread the NC of the current paint, and apply it to the tiles in the Wizard.
1.3.1.1 Saving a Configuration
If you have made edits to a configuration through the Wizard, you can create a save of that configuration in a notecard by clicking the base and selecting "Dump NC". This will dump the current configuration, including any textures you have applied through the tiles, to local chat. Cut and paste the contents of chat between the line labeled "---copy lines below this point" and the line labeled "---copy lines above this point" into a new notecard, or into the notecard in the Wizard you wish to update. Delete any lines containing "-DELETE-THIS-LINE-".
1.3.2 Aircraft Configurations
Aircraft configuration notecards are named with the code for the aircraft preceded by a "_". The code must correspond to a specific Shergood aircraft. Aircraft configurations also consist of key=value pairs, but only support the tags "textures" and "link". The value of the "textures" tag is a space-separated list of texture names that are part of the paint for that aircraft.
For example, the s58 aircraft paint configuration is:
textures=s58-main s58-nose s58-tail s58-winch s58-text
The names on this line must correspond to names understood by the aircraft, though the names on the line may be reordered. The order on the line will control the order in which tiles appear in the Wizard.
The "link" tag in an aircraft configuration is optional and contains a URL to a page where the paint resources for that aircraft can be found. It is the link that is accessed from the main menu with the "Templates➚" button.
1.4 Applying to Aircraft
You can apply a paint to an aircraft directly from the Wizard by rezing the aircraft and Wizard within 10m of each other. You then apply the paint in the same way as you would a paint can.
- Ensure no avi are sitting in the aircraft.
- Click the front window on the aircraft to bring up the main menu.
- Select "@Admin".
- Select "@Paint".
- Select "*Custom".
- Select the name of the paint currently loaded in the Wizard.
1.5 Using Paint Cans
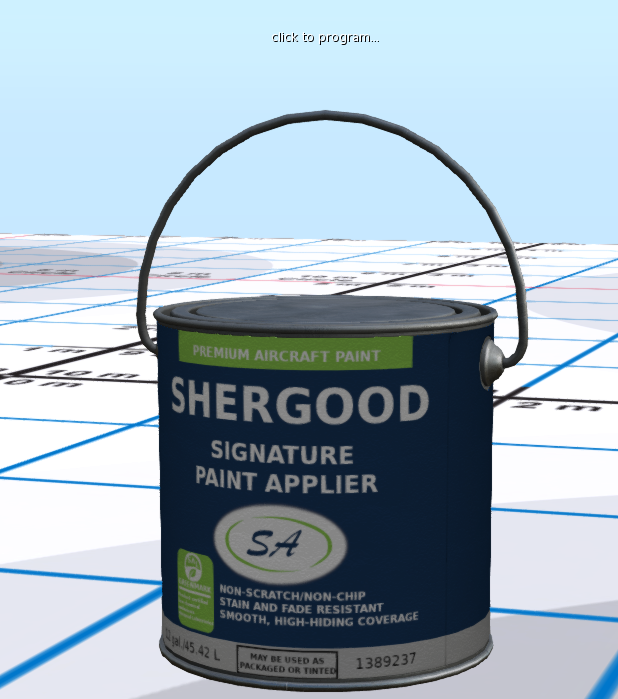
Paint cans can be used to share your paints with others, store them for personal use, or even package them for resale. The Paint Wizard is designed to work best with V3.0 paint cans (Figure 2). Unlike V2.0 paint cans, V3.0 paint cans are programmed directly from the Paint Wizard without need for notecards or drop-in textures. This improves security of the texture uuids and simplifies creating paint cans.
1.5.1 Programming a Paint Can
Use the following procedure to program a paint can:
- Edit the paint as desired in the Paint Wizard
- Rez an unprogrammed V3.0 paint can within 10m of the Paint Wizard. It should say "click to program..." in hover text.
- If the paint can is intended for resale, you should edit the can and set the object and script Next Owner permissions to No Transfer.
- Click the can. The hover text will change to "ready to program".
- Click the base of the Paint Wizard and select "Program" from the menu. The hover text will change to an identification of the paint included in the paint kit.
If "transfer" permissions are enabled during step 4 and 5, the text will be displayed in red with the message "(CHECK PERMS)" at the bottom to warn you that transfer permissions are enabled. This warning message is shown only for the creator of a paint, and will not be displayed by the text owner if you transfer the paint to someone.
Note: It is still possible to program the older V2.0 paint cans with the Paint Wizard by using the "Dump NC" option to dump a paint to a notecard, then inserting that notecard into the V2.0 paint can.
1.5.2 Paint Creator Options
If you are both the owner, and the programmer of a paint can, clicking it will being up a menu with the following options:
| Button | Description |
|---|---|
| (?) Perm-Warn | If permissions have not been set to no-transfer, this option can be used to suppress the warning in the hover text. |
| RESET | Resets the paint can, deleting any programmed paint. |
| DUMP | Dump the paint can contents as an owner message. |
| IDENT | Print the identification message as if clicked by someone other than the paint programmer. |
When the owner of a programmed paint can, that was not the creator of the paint clicks, a set of identification messages showing the paint can version, the paint name, the aircraft for which the paint was created, and the creator of the paint are shown. An example of this message is:
[18:32:12] SA - Paint Applier - v3.0: Shergood Aviation - Paintkit applier - v3.0
[18:32:12] SA - Paint Applier - v3.0: Paint kit [Marines] for aircraft [s58].
[18:32:12] SA - Paint Applier - v3.0: Created by: Shergood Aviation
[18:32:12] SA - Paint Applier - v3.0: Protocol version 8.
[18:32:12] SA - Paint Applier - v3.0: Select [@Admin] -> [@Paint] -> [*Custom] from aircraft menu then choose kit [Marines] to apply this paintkit.
1.5.3 Custom Labels
Since the paint can prim is full-perm, you have the option to create custom labels for your paint cans before distribution. To create a custom label, download the base files below and create your label in Photoshop, Gimp or any other image editing tool of your choice.
Paint can label base files:
- paint_can_label_diff.png - Blank label texture
- paint_can_label_uv.png - Label UV Map
2 Menu Summary
2.1 Main Menu
The main menu is accessed by clicking on the base of the Paint Wizard. The available options are:
| Button | Description |
|---|---|
| :RESET: | Resets the paint wizard and opens configuration selection menu. |
| CLEAR ALL | Clears all textures used by the paint and sets them to "none". |
| DUMP NC | Dump the current contents of the paint so that it can be cut/paste into a notecard. |
| Program➙ | Program any paint cans that are ready for programming and are within 10m. |
| ⟳Reload | Reload the current paint from its notecard. |
| Set Name | Set the paint name. |
| Set Creator | Set the paint creator. |
| Templates➚ | Open page with paint templates. |
2.2 Tile Menu
The tile menu is accessed by clicking on the texture box of a tile. The available options are:
| Button | Description |
|---|---|
| Blank | Sets the texture to the blank/white texture. |
| None | Sets the texture to none. |


