EC-135 Emergency Float Kit
|
EC-135 Emergency Float Kit |
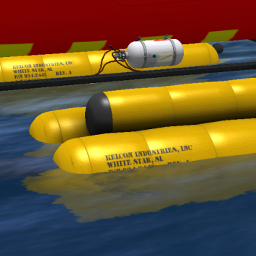
When flying extended distances over water, an emergency float system is a must. Primary features include:
- Fits all EC-135 aircraft including the EMS, VIP and police versions
- Easy to install
- Unique float compatable skids with float packages mounted on top
- Helium reservior tank mounted on right side of aircraft with hoses routed to each float package
- Pressure indicator shows reservoir tank capacity
- Displayed pressure changes with ambient temperature
- Reservoir tank looses pressure over time (in expert mode)
- Menu options to simulate lost tank pressure and underinflated floats
- Both internal and external saftey pins
- Manual activation lever on pilot-side cyclic
- Automatic activation system can be armed to inflate when aircraft touches water
- Floats can be damaged when maximum float inflated airspeed limitation is exceeded
- Novice mode to disable damage and loss of tank pressure
Note: This kit includes the floats only. You must own the helicopter in order to attach this float kit.
1 INTRODUCTION
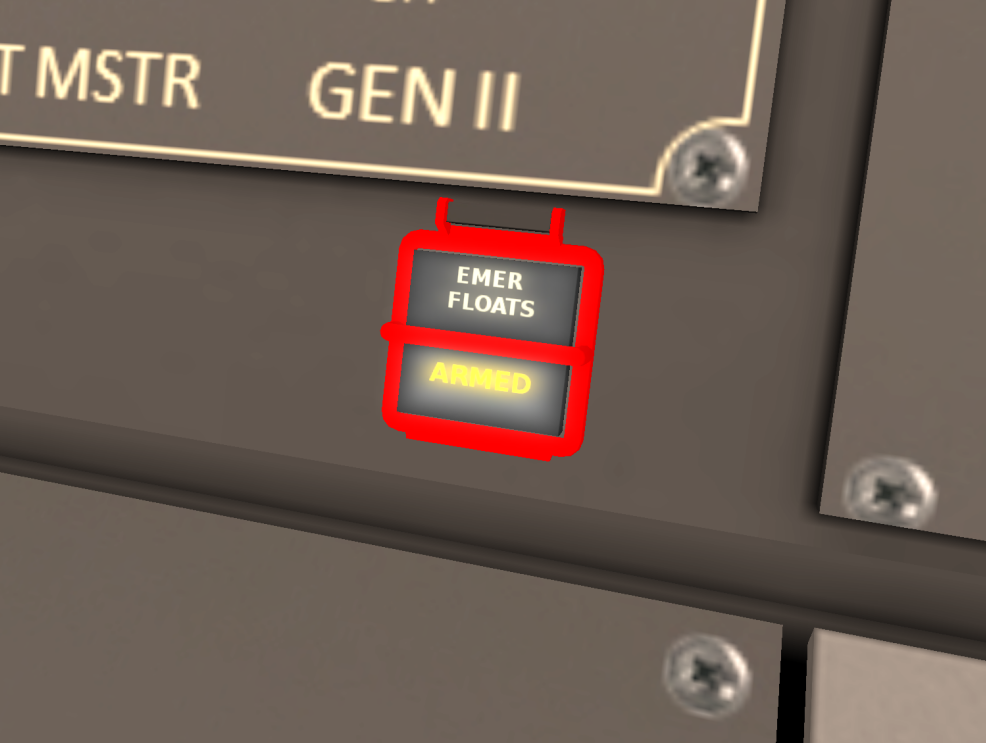
The EC-135 emergency flotation system is comprised of the following components: Float compatible skids with aft extension for rear floats Four float packages attached at the fore and aft of each skid Tri-bag floats packed in each float package High pressure helium tank Regulator and valve system with pressure gauge to show tank capacity All necessary hoses connecting tank to each float package Manual activation lever Push button switch labeled EMER FLOATS to arm the automatic activation system. The emergency float system allows the helicopter to land on water during an emergency. The floats can be activated manually or automatically through water sensors in the rear skid well (not externally visible). To use the automatic system, press the EMER FLOATS switch. An "ARMED" message indicates the system is armed and water detected on the lower part of the airframe will activate the floats.
2 INSTALLATION
To install your emergency float kit, use the following procedures:
- Rez your Shergood EC-135.
- Unpack your float kit. Copy the float kit and installer script to your inventory.
- Rez the float kit within 10m of the helicopter.
- Drag the installer script *sa-float-installer on to your aircraft.
- The script will ask for permission to change links. Click Yes.
- The rest of the installation will proceed automatically.
3 LIMITATIONS
Type of Operation The emergency floats are approved under FAR/CS 27 regulations for assistance in emergency landings. Takeoff after an emergency landing is prohibited (unless no one is looking). Airspeed Limitations Float Stored Same as published in POH Float Inflated Maximum airspeed for inflation is 80 KIAS Maximum airspeed while floats are inflated is 80 KIAS Accidental Inflation Following an accidental in-flight inflation without a water landing, the helicopter shall be flown a suitable landing site where repairs can be made as soon as practicable.
4 EMERGENCY PROCEDURES
4.1 Manual Deployment
In order to manually deploy floats, both safety pins must be removed. Manual deployment is performed by click on the cyclic mounted lever (or using the "s floats" chat command). Manual float activation is performed through a pull cable attached to a mechanical release lever and does not need electrical power to operate.
4.2 Automatic Deployment
To configure the float system for automatic deployment, first ensure that both cyclic and reservoir tank safety pins are removed. The automatic deployment systems uses an electric motor powered by the #2 primary bus that physically pulls the activation cable. Automatic deployment is triggered by sensors on the bottom of the aircraft near the rear strut cross beam.
The automatic deployment system is enabled through a switch mounted below the master switch panel. The switch is push activated and protected by a guard. When active, the message ARMED will be illuminated. The automatic deployment system should be armed only when less than 500 feet (150m) from the surface of the water, and when airspeed is less than 80 KIAS.
4.3 Accidental Deployment
Following an accidental in-flight inflation without a water landing, the helicopter shall be flown a suitable landing site where repairs can be made as soon as practicable.
4.4 Water Landing
Landings should be made with minimal vertical airspeed when contacting the water. When performing an autorotation to a water landing, collective should be used to reduce vertical speed before touchdown.
4.5 On Water Operations
The helicopter can be maneuvered on the water by applying a small amount of up collective coupled with forward cyclic to control speed. Steering should be performed using the anti-torque pedals.
4.6 Repacking
To repack the floats, click the white helium reservoir tank, then select Repack from the menu.
5 NORMAL PROCEDURES
The following Normal Procedures augment those published in the rotorcraft flight manual.
5.1 Pre-Flight Procedures
Exterior Checks
- Check that float are stowed and covers are in proper condition.
- Inspect inflation hoses, tubing and fittings for condition and security.
- Check reservoir pressure as follows:
- Turn on master switch.
- Read current OAT (Outside Air Temperature) from the VEMD display (Figure 3).
- Turn off master switch.
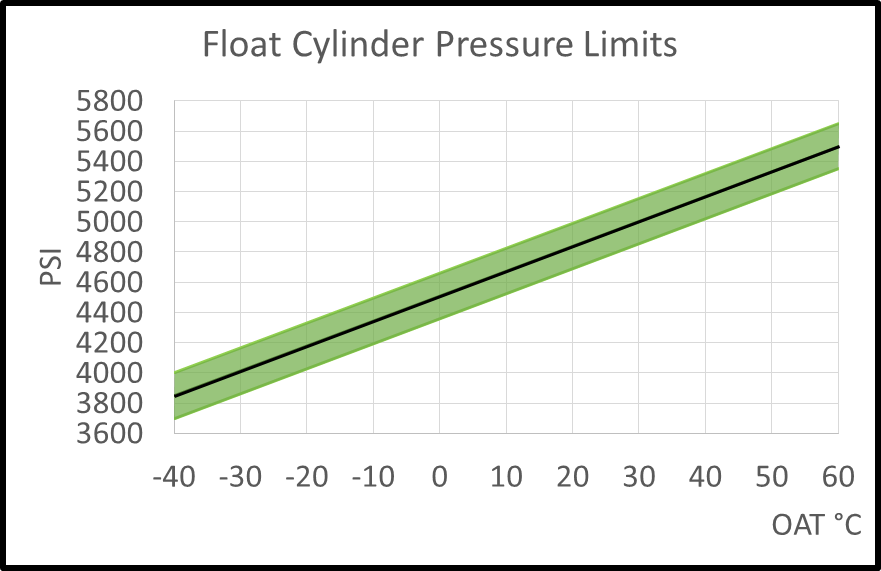
- Reference the current OAT on the Float Cylinder Pressure Limits Chart and check the range of acceptable pressures for the helium tank (Figure 4).
- Check the pressure gauge on the helium tank to verify it is within acceptable limits for the current OAT.
- Remove tank safety pin.
Interior Checks
- Remove cyclic safety pin (if overwater flight is planned)
- With master switch ON, open the guard on the EMER FLOATS button and press.
- Verify that ARMED indication is shown
- Press EMER FLOATS again and verify that ARMED indication goes out.
- Close guard.
5.2 In-Flight Procedures
5.2.1 Takeoff
If takeoff is to be over water, place the EMER FLOATS switch in the ARMED position. Otherwise, ensure the EMER FLOATS is in the disarmed position.
5.2.2 Cruise
Disarm EMER FLOATS floats upon reaching 500 feet above water, or prior to exceeding an airspeed of 80 KIAS. Ensure the ARMED message is extinguished.
5.2.3 Landing
If landing is over water, ensure the EMER FLOATS switch is in the ARMED position. After landing, ensure the EMER FLOATS switch is disarmed.
5.3 Post-Flight Procedures
Before leaving helicopter:
- Ensure the float handle safety pin is in place.
- Ensure the exterior reservoir safety pin is in place.
6 COMMAND SUMMARY
6.1 Menu Options
The main menu is accessed by clicking on the white helium reservoir tank. The main menu options are (available options may change depending on whether floats are deployed or packed):
| Button | Description |
|---|---|
| Refill | Refill the helium reservoir |
| @Level | Open sub-menu to access special reservoir commands |
| (*) Novice | Turn novice mode on/off. In novice mode, helium will not be lost over time, and exceeding the airspeed limitation will not result in float damage. |
| Repack | Refill the helium reservoir |
6.1.1 @Level Menu
The @Level menu button brings up the following sub-menu:
| Button | Description |
|---|---|
| +X Days | Acts as though X days have passed with regard to the amount of helium lost from the reservoir |
| X% | Sets the reservoir tank capacity to X% |
| BACK> | Return to the main menu |
6.2 Chat Commands
| Command | Description |
|---|---|
| s floatArm | Toggle the float arm switch to enable automatic deployment. |
| s floatArm-g | Toggle the guard on the float arm switch. |
| s floats | Manually deploy the floats. |
| s floatsafety | Toggle the cyclic mounted safety pin. |


