Kimbi Bucket
|
Kimbi Bucket |
Contents |
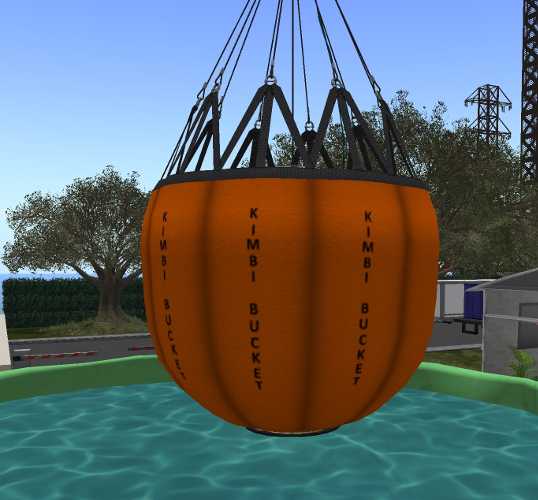
The Kimbi Bucket is designed as a modkit specifically for the Shergood Aviation Chinook CH-47 and S-61R. The Kimbi Bucket system is comprised of the bucket and cables for suspending it; a hook on the belly of the aircraft; an internal control panel; and a hud version of the control panel. Chat commands can also be used to control the bucket.
Features include:
- 2600/900 (CH-47/S-61R) gallon capacity with HD Fire compatability
- Fillable with system water, or from SA dip tank
- Configurable number of drops (up to 4)
- Configurable flow rate
- Confiurable max fill level
- Water weight affects helicopter handling
- Configurable foam concentration
- 110 gallon foam bladder compatable with SA foam totes.
- Control through internal control panel, chat commands or HUD
- Linked system ensures bucket can be used in or flown through no-entry parcels
- "On ground" mode for bucket for servicing and during pick-up/set-down procedures
- Animated cable during bucket pick-up
1 OVERVIEW
1.1 Installation
To install the Kimbi Bucket modkit, perform the following steps:
- Rez a fresh CH-47 (v1.2 or later) or S-61R (v1.2 or later) without the modkit. Ensure power is off and that there are no occupants.
- Rez the "SA - Kimbi Bucket Kit v1.1" object within 10m of the aircraft.
- Copy the installer script matching your aircraft model into your aircraft
- Grant link privileges to the modkit.
- Wait for installation to complete.
NOTE: Once you drop the installer script on the aircraft, the aircraft will be in a non-functional state until the modkit installation is complete.
1.2 HD FIRE COMPATIBILITY
This system is designed to be compatible with HD Fire v2016.06.21 or later. Kimbi Bucket may work partially with older versions of HD Fire, but may not be as effective.
1.3 PRODUCT UPDATES
Product updates are checked when rezzing the helicopter with the bucket attached to it.
2 OPERATION
2.1 DEPLOYING/HIDING BUCKET
The bucket is deployed using the "fb show" chat command, and hidden using the "fb hide" command. If the helicopter is on the ground when the show command is issued, the bucket will be deployed in "ground" mode several meters in front of the aircraft. While in ground mode, the foam reservoir may be serviced. If the aircraft is greater than about 90 feet (30 meters), the bucket will be deployed while in the hanging state. Attempting to show the bucket while not on the ground, but at less than 90 feet will result in an error message.
2.2 CONTROL PANEL AND HUD
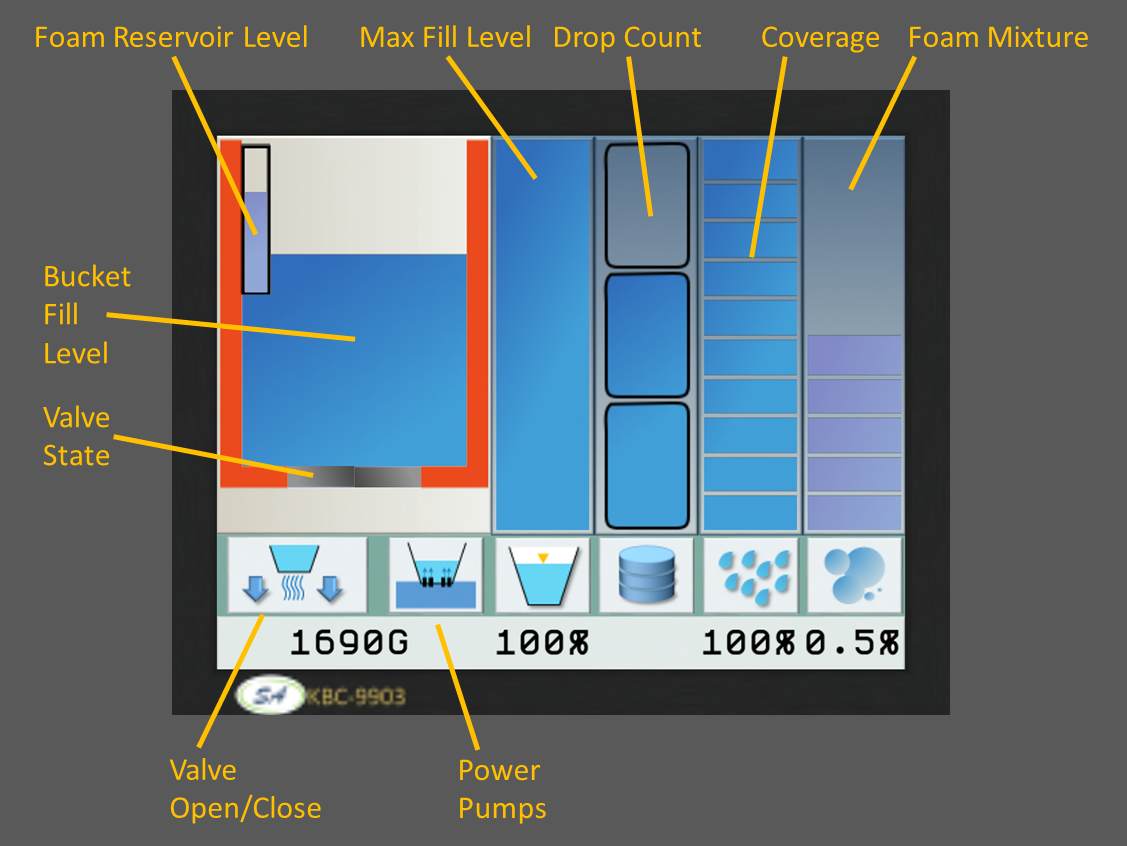
The control panel and HUD have the exact same layout and functionality. The control/panel HUD layout is shown in Figure 1 . The upper left corner of the panel shows the basic state of the bucket including the water level, the foam reservoir level and the current valve position. Under the bucket diagram are soft buttons for opening/closing the valve, and for turning the power pumps on/off. Below the bucket soft buttons is a readout showing the current volume of water in gallons contained by the bucket.
The remainder of the display shows various bucket configuration options. Left to right these are:
- Maximum Fill Level - This is the maximum capacity to which the bucket should be filled. The maximum fill level can be set to any level between 25% and 100%. Touching the bar scale will set a fill level directly. Touching the soft button under the bar will increase the max fill level to the next 25% increment (cycling back to 25%). When the bucket has been filled beyond the configured maximum fill level, the valve will automatically open when the bucket has been overfilled to shed the excess water until it has fallen to the set level.
- Drop Count - This is the number of drops to be performed with the water held in the bucket. Pressing the softbutton allows the number of drops to be cycled through values between 1 and 4. The bar graph shows the number of configured drops, and which drops have been used. When more than one drop has been configured, the valve will automatically close at the end of the drop (except that the valve will remain open after the final drop). The size of the drops is based on the amount of water in the bucket when the drop count is configured. The "used" drops on the display are reset when any water is added to the bucket, or the drop count is changed.
- Coverage - This is the amount by which the valve is opened during a drop. Coverage may be set to any value between 10% and 100%. Pressing the bar scale will set coverage to an exact value, and pressing the soft button under the bar will increment the coverage to the next 10% increment (cycling back to 10%). Note coverage setting does not affect the valve position when shedding water to meet the configured maximum fill level.
- Foam Mixture - Sets the percent of foam concentrate to be added to water dropped from the bucket. The concentration can be configured between 0% and 1%. Pressing the bar scale will set foam mixture to an exact value, and pressing the soft button under the bar will increment the mixture to the next 0.1% increment (cycling back to 0%). Note: The cap on the foam outlet must be removed before flight in order to use the foam system. See the SERVICING section for details.
2.3 PICKING UP WATER
Water can be picked up either from Linden system water, or from the included dip tank. There are three mechanisms by which the bucket can be filled:
- Total submersion - Totally submerging the bucket below the level of the rim will allow water to flow over the edge into the bucket.
- Open Valve - If the valve is open when submerging the bucket, water can enter the bucket through the bottom. If the bucket is only partially submerged, the bucket will be filled to match the level of the surrounding water. Keeping the valve open when fully submerged can decrease the time needed to fill the bucket.
- Power Pumps - The Kimbi Bucket is equipped with power pumps to help fill the bucket in shallow water. The pumps are located on the bottom of the bucket and can operate with only the valve submerged. When using in shallow water, the valve should be closed while using the pumps. The pumps can also be used in part of a normal fill to further decrease the time to fill.
2.4 DROPPING WATER
Water is dropped by pressing the DROP button on the panel, or with the "fb drop" chat command. A drop can drop the full bucket, or depending on settings in up to four drops per bucketfull. Because the HD Fire system depends on dropping physical objects on the fire, you must be in a place you are allowed to rez to fight HD fires. If a drop is performed in a no-rez area, particle and other effects will continue to operate normally, but no HD Fire features will work.
2.5 USING THE DIP TANK
The dip tank can be useful when there are no Linden water sources near by. The tank holds approximately 10,000 gallons, with each bucket-full being 2600 gallons. Just dip the bucket into the tank to pick up some water. With each pick up, the level in the tank will go down slightly. To refill the tank, click the tank to get the menu, then choose [Level], then the desired water level for the tank. There is also an [Access] menu that lets you select who is allowed to set the water level in the tank (owner, group or public).
Bucket Pick-Up from Ground
2.6 GROUND PICK-UP AND SET-DOWN
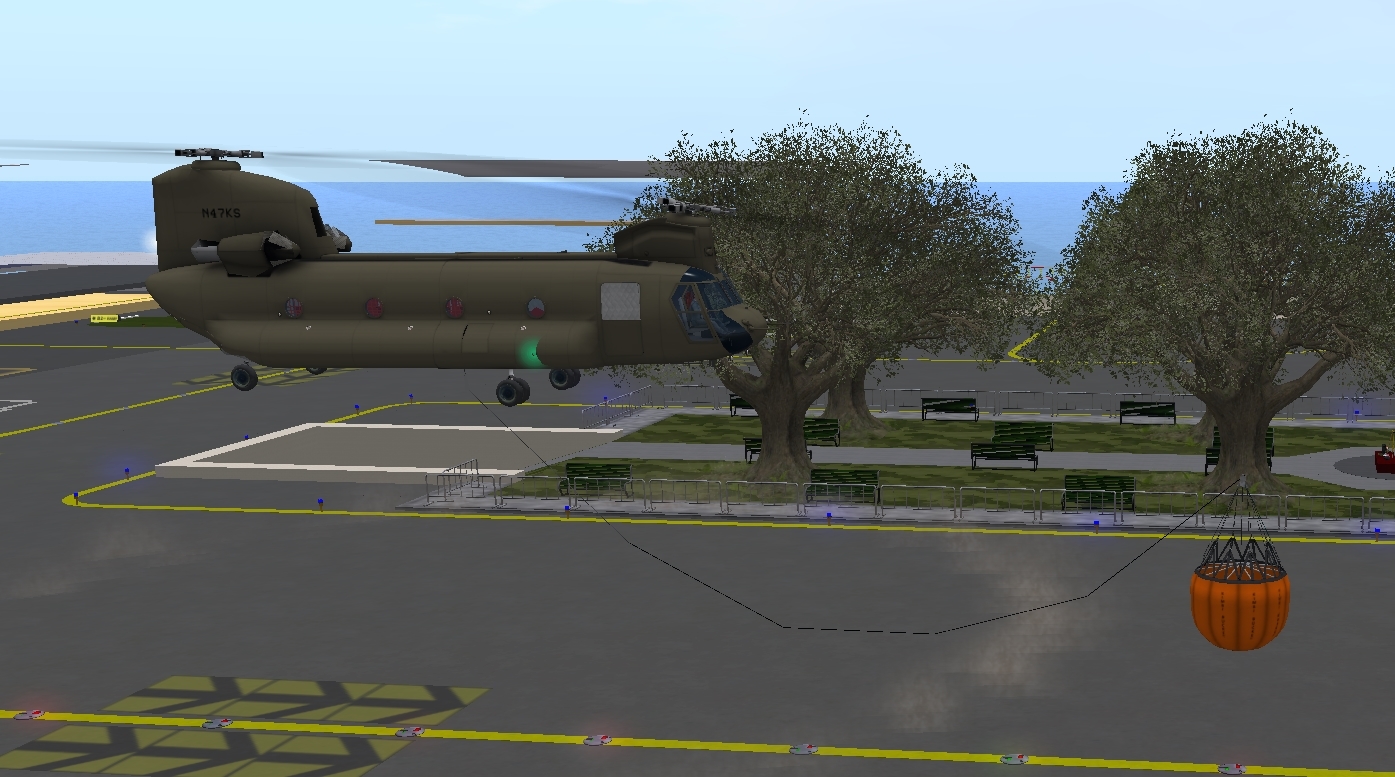
The Kimbi Bucket system allows you to pick-up and set-down the bucket to/from the ground. Note that the pick-up/set-down features of this bucket assume that it is being used from a large flat surface. To perform a pick-up, use the "fb show" command while the helicopter is on the ground. As the helicopter picks up, the bucket will remain in place on the ground and the cable prims will automatically adjust to drape between the bucket and the helicopter. Once the helicopter is high enough over the bucket, the bucket will pick up off the ground. The bucket must be picked up within 30 degrees of vertical, or the cable will break if stretched too far.
2.6.1 Pick Up
Recommended procedure for picking up the bucket are as follows:
- Begin with bucket in front of helicopter with the placement used when giving the "fb show" command.
- Pick up to an approximately 25 foot hover (use the radar altimeter).
- Hover the helicopter forward over the bucket.
- Pick up vertically with collective to approximately 125 feet. The bucket should break contact with the ground at approximately 90 to 100 feet.
- Enter forward flight maintaining at least 125 feet above the ground.
2.6.2 Set down
Recommended procedure for setting the bucket down are as follows:
- Fly an approach to a high (150-125 foot) hover over the landing position.
- Begin a slow vertical descent to about 50 feet.
- At 50 feet continue descending to about 25 feet while slowing backing up.
- At approximately 25 feet, stop descent and continue slow backward motion until bucket is visible.
- Once bucket is visible, slowly descent vertically to the ground.
2.7 CHAT COMMANDS
Most of the Kimbi Bucket functionality can be performed using chat commands. All bucket commands begin with "fb". The usable commands are:
| Command | Description |
|---|---|
| fb show | Show the bucket |
| fb hide | Hide the bucket |
| fb dump | Do a dump (same as pressing button) |
| fb fillto n | Set the max fill level for the bucket |
| fb foam n | Set the foam mixture for the bucket |
| fb dropcount n | Set the number of drops (1-4) |
| fb coverage n | Set the coverage level (0-100) |
| fb fast | Place bucket in fast drop mode (coverage 100%) |
| fb slow | Place bucket in slow drop mode (coverage 50%) |
| fb pump | Toggle pumps on/off |
| fb fill | Backdoor command to fill bucket |
3 SERVICING
3.1 Foam Bladder
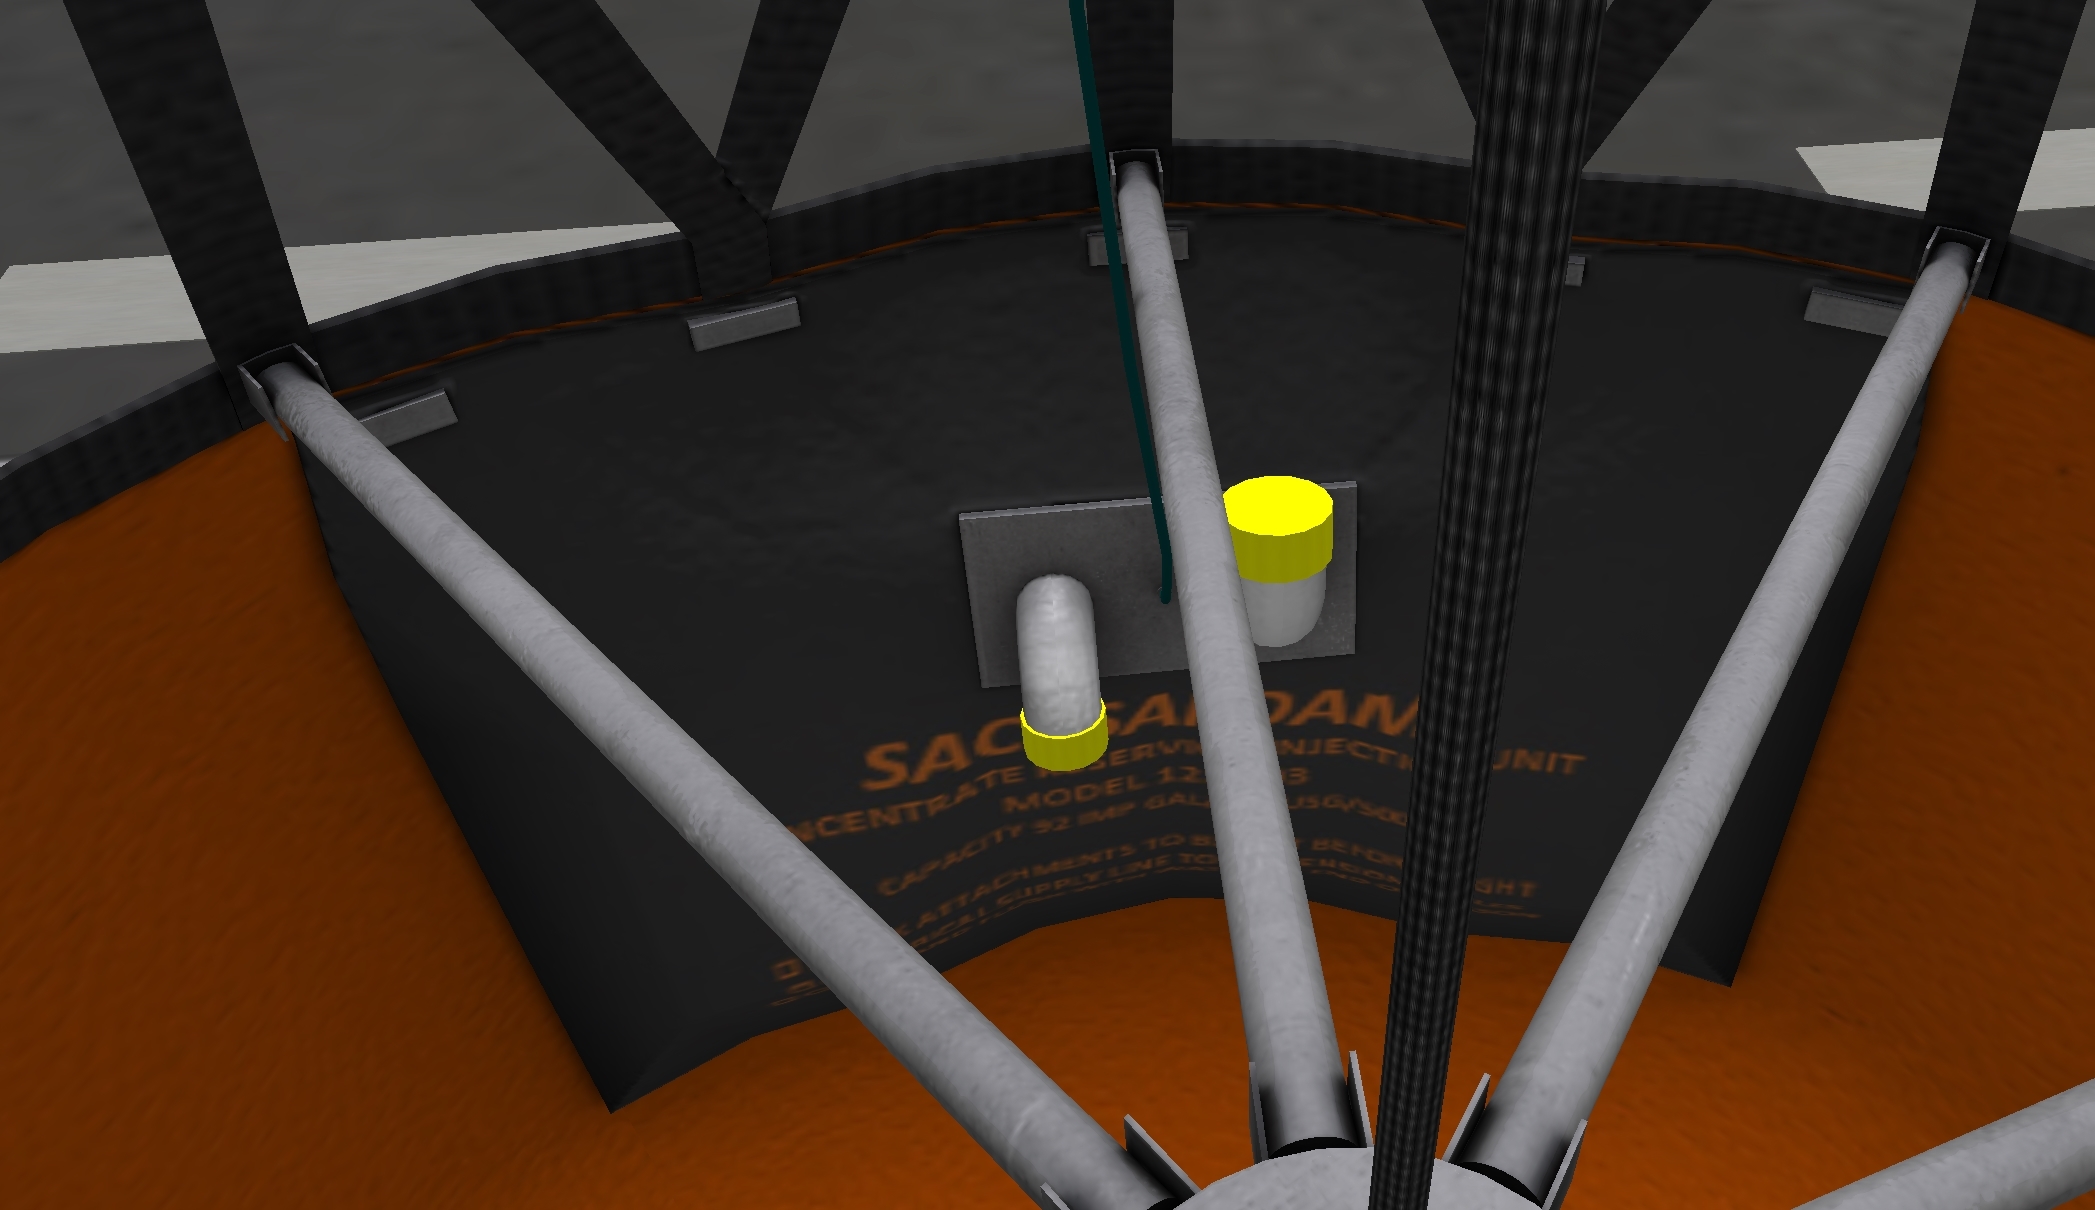
A 110 gallon foam bladder is located in a pouch attached to the inner wall of the bucket. The bladder may be accessed and serviced while the bucket is resting on the ground. You can used the "fb show" command while sitting in the helicopter on the ground to make the bucket visible in ground mode. The bladder has two yellow caps. The one facing up is for filling the bladder, and the one facing down is the foam outlet. The foam outlet cap must be removed before flight in order to use foam.
To fill the foam bladder, use the following procedure:
- Obtain a "SA - Class A Foam Tote", available for free at the Shergood main store.
- Place the "SA - Class A Foam Tote" within 10m of the bucket
- Open the yellow filler cap on the foam bladder inside the bucket.
- Click the tote and select "*Scan".
- When you are given a list of tail numbers, choose your tail number.
- Totes contain a total of 250 gallons. Once a tote has been depleted, you must obtain a new tote.


