EC-135/Aircraft and Systems Description
SECTION 7. AIRCRAFT AND SYSTEMS DESCRIPTION
Contents
1 COCKPIT LAYOUT
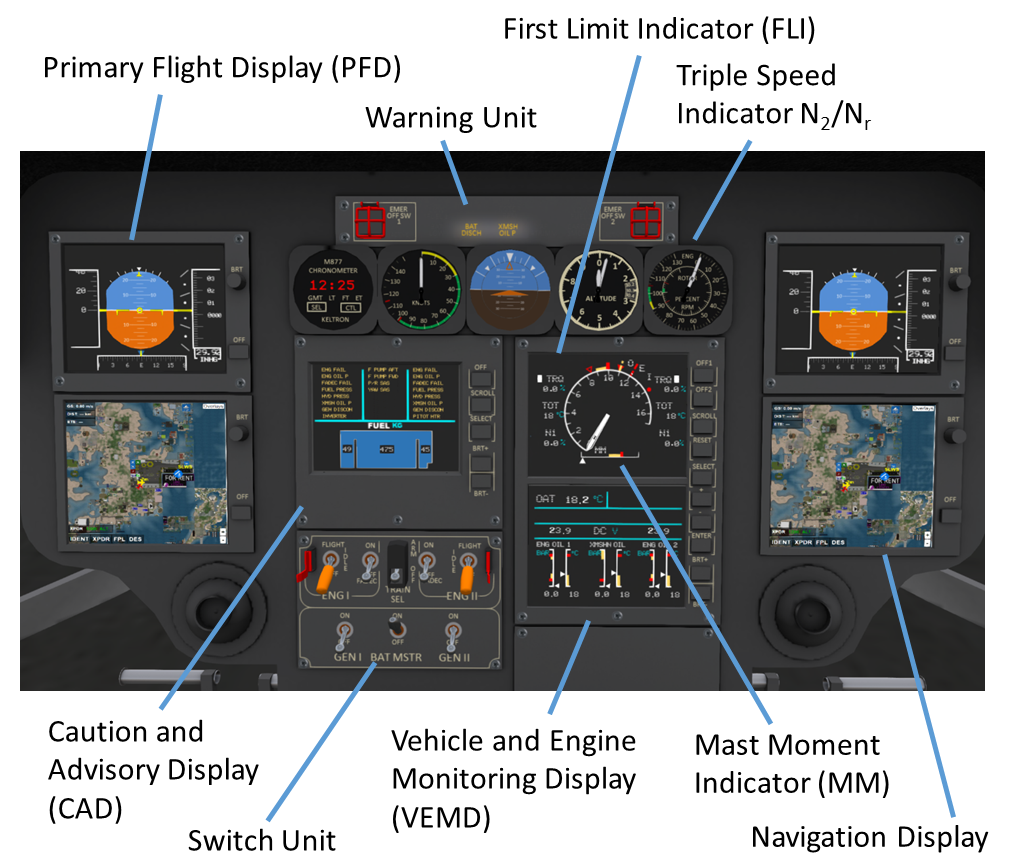
The main instrument panel contains most of the displays and control units installed in the helicopter. The instrument panel is divided into a center section, and a left and right section. The right section contains the PFD (Primary Flight Display) for the pilot on top, and the navigation display on the bottom. The left section duplicates these displays for the copilot. The center section contains the following units:
- Warn Unit - Various critical warning lights and the emergency fuel cutoff buttons for the engines.
- Analog Displays - Five back-up analog instruments including: clock, airspeed, attitude indicator, altimeter and triple speed indicator.
- Caution and Advisory Display (CAD) - Displays various alert messages and fuel quantity.
- Switch Unit - Primary switches for engine and electrical system control.
- Vehicle and Engine Monitoring Display (VEMD) - Divided into upper and lower halves:
- Top - First Limit Indicator (FLI) - Shows engine parameters closest to its limit.
- Bottom - Electrical and Engine Parameters
2 Flight Control Display System (FCDS)
The Flight Control Display System (FCDS) consists of a PFD (Primary Flight Display), a navigation display and a Flight Control Display Module (FCDM). There are two parallel channels, #1 for the copilot and #2 for the pilot. The FCDM processes data from various sensors and supplies that data to the display. A "FAIL" indication will be shown on the PFD display when no data is being supplied on that channel. The FCDMs are powered by the avionics master bus activated by the Avionics #1 and #2 switches on the overhead panel.
Note: Before starting engines, ensure that no power is supplied to the FCDMs to prevent damage due to transient voltage spikes.
2.1 Primary Flight Display (PFD)
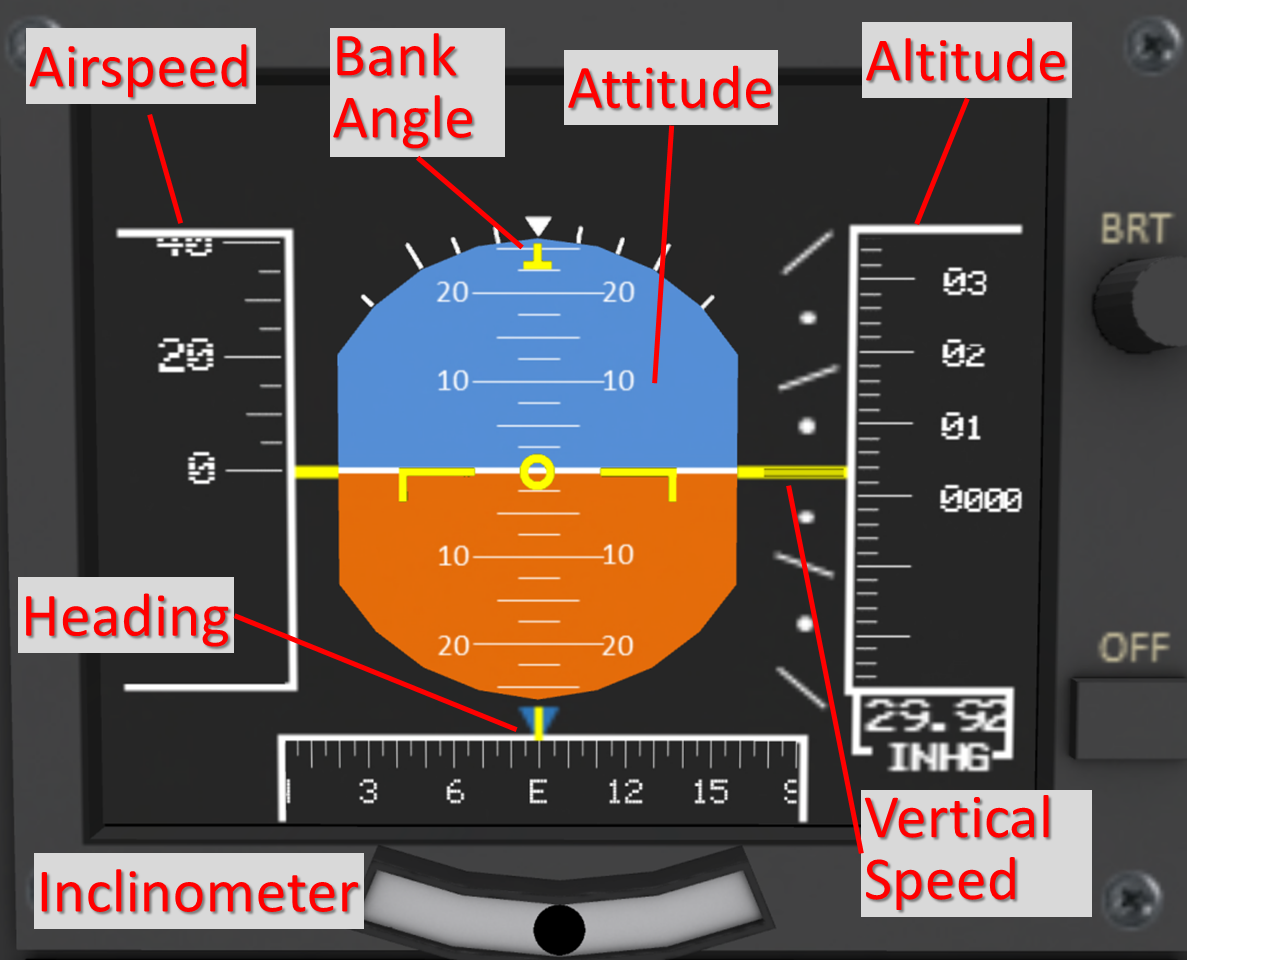
A PFD (see Figure 2) is provided for each pilot station on the upper left and right sides of the control panel. Each PFD displays the following information:
- Attitude - The center of the PFD is an attitude indicator that shows the relation of the aircraft's attitude with the horizon. Pitch angle can be read off the center of the display, while bank angle can be read off the upper edge.
- Altitude - The right hand side of the display shows altitude in feet above mean sea level. Sea level in SL is typically at 20m (65 feet) above the reference plane.
- Vertical Speed - Immediately to the left of the altitude indication is a vertical speed indicator. Vertical speed is shown by a yellow line. Each white line above the zero point represents 1000 feet/min, while the white dots represent 500 feet/min.
- Airspeed - The left hand side of the display shows airspeed in knots. Airspeed limits are shown on the indicator in red.
- Heading - Immediately below the attitude indicator is the heading indicator showing the current compass heading of the aircraft.
- Inclinometer - An ball-in-tube type inclinometer is mounted directly below the PFD. The inclinometer shows coordination during cruise flight. When the ball is off center, the pilot should apply pedal on the side the ball is deflected to (i.e., "step on the ball") to recenter it.
A GPS navigation display (see Figure 3) is located below each PFD. The navigation display shows your aircraft position and heading on a world map along with airport symbols and other nearby traffic. It also allows you to program routes either direct to your destination or via a set of waypoints. For more information on how to operate the navigation display please refer to the GPS Manual.
3 WARNING UNIT
The warning panel (see Figure 4), located in the upper center portion of the control panel, shows critical warning conditions. Takeoff should not be attempted with any warning lights illuminated. If a warning light should illuminate during flight, then a landing should be executed as soon as practicable.
3.1 Fire Detection and Suppression System
Buttons on either side of the warning units show the emergency fuel cutoff and fire warning and suppression system. The fuel cutoffs are covered by guards to prevent them from being accidentally triggered. When a fire is detected, the button will illuminate with a "FIRE" indication. Opening the guard and pushing the button will activate the fire suppression system. Once activated, an indicator showing "ACTIVE" will illuminate, fuel will be cut from the engine, and fire suppression will be trigger once N1 for the selected engine falls bellow 50%. If the cut-off button is pressed when no fire is indicated, the fuel cut-off valve will be closed, but the fire suppression system will not be triggered.
3.2 Warning Messages
The following alert lights are located on the Warning Unit
| Light | Description |
|---|---|
| LOW FUEL 1 | Engine #1 fuel tank is low |
| ROTOR RPM | Rotor RPM is low (when collective is not full down) |
| LOW FUEL 2 | Engine #2 fuel tank is low |
| BAT LOW | Battery voltage is low |
| BAT DISCH | Battery is being discharged |
| XMSH OIL P | Transmission oil pressure |
| AP ATRIMM | Autopilot failure |
| CARGO SMOKE | Smoke detected in cargo area |
4 Caution and Advisory Display (CAD)
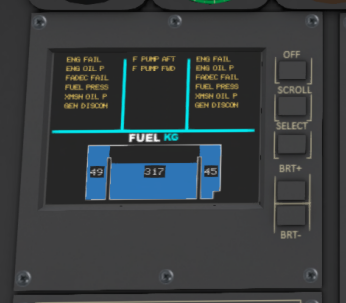
The CAD displays (see Figure 5) various alert message in the top portion, and the current fuel quantity in the lower part of the display. The alert section is divided into three columns. The left and right columns of the CAD show warnings for the #1 and #2 engine systems, respectively. The middle column shows various miscellaneous alerts. Each column has 8 lines for alerts and shows the 8 highest priority alerts. Alerts in the following sections are shown from high to low priority.
4.1 Engine Alerts
| Light | Description |
|---|---|
| ENG FAIL | Engine is failed or not running. |
| ENG OIL P | Engine oil pressure is low |
| ENG CHIP | Engine chip detected |
| FADEC FAIL | FADIC has failed or is not running |
| FUEL PRESS | Fuel pressure is low |
| ENG IDLE | Engine is at idle speed |
| TRAINING | Training mode is enabled |
| TRAIN IDLE | Engine is at simulated idle |
| AUTOPILOT | Autopilot is not running |
| ENG MANUAL | Engine is in manual mode |
| TWIST GRIP | Engine manual twist grip has been used |
| PRIME PUMP | Fuel prime pump running |
| HYD PRESS | Hydraulic pressure is low |
| OVSP | Engine is overspeeding |
| GEN DISCON | Generator is off or disconnected |
| INVERTER | Inverter has not been activated |
| FIRE EXT | Fire extinguisher active (or in test) |
| FIRE E TST | Fire detect/extinguisher test |
| STARTER | Starter is running |
| BUSTIE OPN | Bus tie is open |
| INP FAIL | Monitor system failure |
| PITOT HTR | Pitot heater is not active |
4.2 Miscellaneous Alerts
| Light | Description |
|---|---|
| XMSN CHIP | Chip detected in main transmission |
| TRGB CHIP | Chip detected in tail rotor system |
| ROTOR BRAKE | Rotor break engaged |
| AUTOPILOT | Autopilot failure |
| DOORS | Open door detected |
| F PUMP AFT | Aft fuel pump off or failed |
| F PUMP FWD | Forward fuel pump off or failed |
| EPU DOOR | EPU Door is open |
| BAT DISCON | Battery is disconnected |
| EXT POWER | External power is connected |
| SHED EMER | Emergency shed switch is active |
| P/R SAS | Pitch/Roll Stability Augmentation System Failed |
| YAW SAS | Yaw Stability Augmentation System Failed |
4.3 Fuel Indication
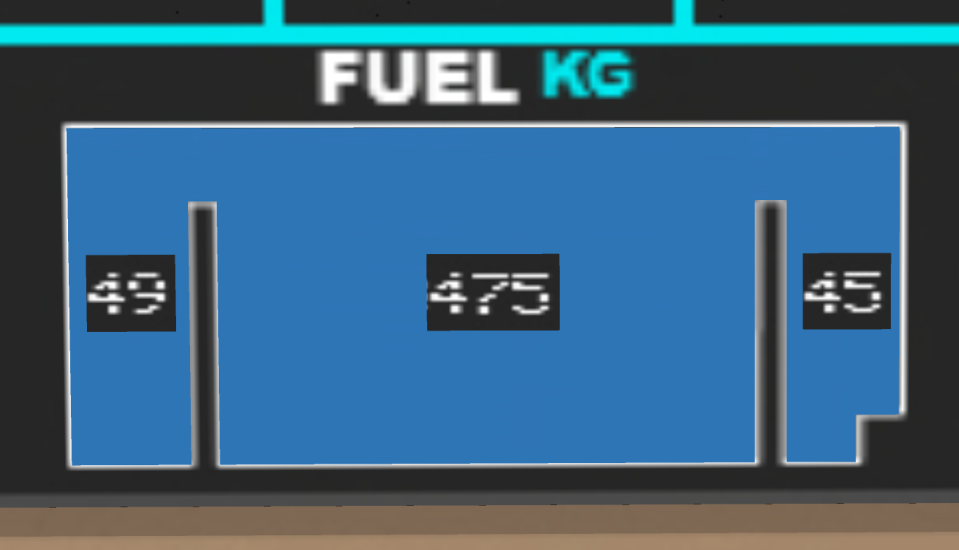
The fuel level indication portion (see Figure 6) of the screen is divided into three parts for each of the three tanks. Fuel levels are shown in kilograms (Kg). The left and right indicator show the level for the tanks feeding the #1 and #2 engines, respectively. The left tank has a capacity of 49 Kg, while the right tank has a capacity of 45 Kg. The differing tank capacities ensure that in the event of fuel exhaustion, both engines will not flame out simultaneously.
The main tank has a capacity of 475 Kg and feeds both the right and left tanks through forward and aft fuel pumps. Each pump feeds both left and right tanks with the second pump for redundancy.
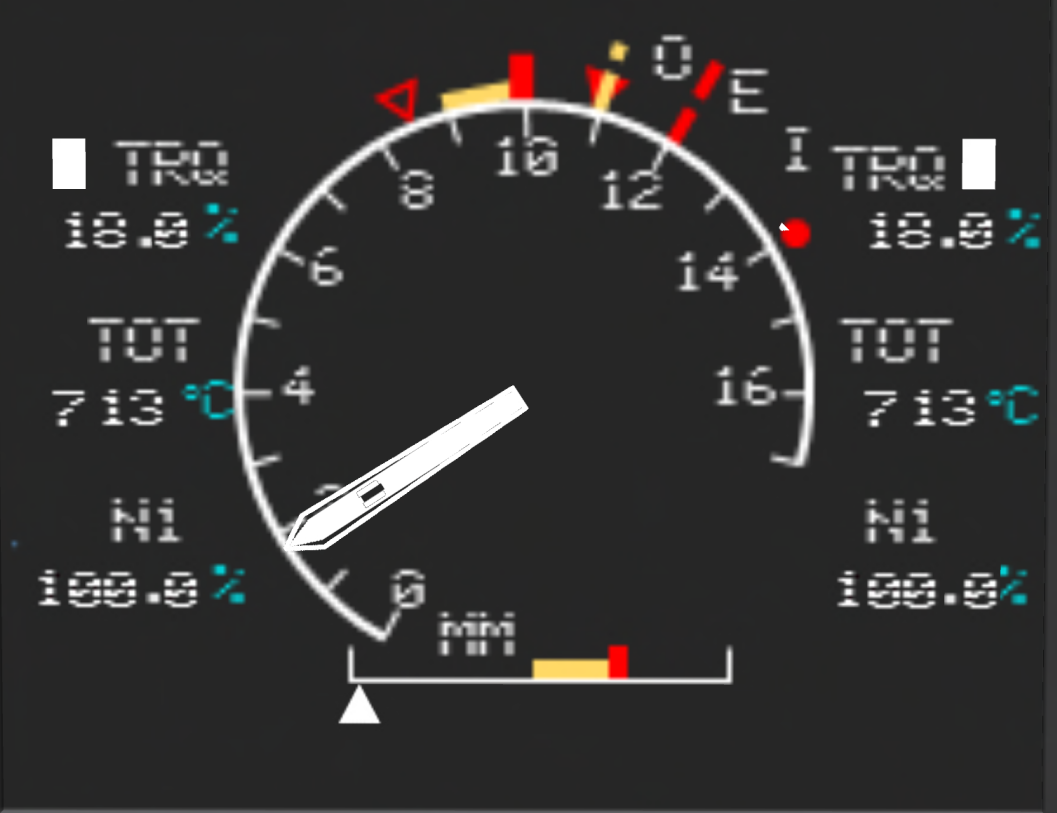
5 First Limit Indicator (FLI)
The first limit indicator (see Figure 7) includes the following information
- Engine Torque (TRQ)
- Turbine Outlet Temperature (TOT)
- N1 (compressor speed)
The FLI should be monitored during start-up to avoid a hot start, and during flight to ensure that limits are not exceeded.
5.1 Engine Limit Indications
TRQ, TOT and N1 values for each engine are shown on the left and right sides of the main dial. Values on the left side are for engine #1, while values on the right side are for engine #2. The main dial shows the indication that is closest to exceeding its limit. A white block next to one of the values indicates which is being displayed on the dial. Normally TOT is shown during start-up, and TRQ during normal operation.
The following limit markings are shown on the FLI:
5.2 Mast Moment Indicator
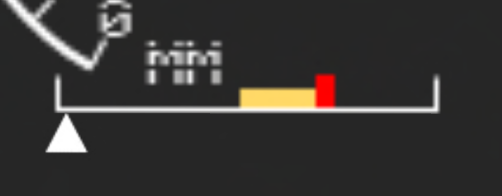
The lower portion of the FLI contains the mast moment indicator (see Figure 8) labeled "MM". The mast moment indicator is a horizontal bar with yellow and red limits. Mast moment is a measure of forces acting perpendicular to the main rotor shaft. Sudden or jerky cyclic movement, or flying out of trim can increase mast moment.
Exceeding mast moment limits puts stress on the rotor system and potentially lead to transmission or rotor failures.
6 Vehicle and Engine Monitoring Display (VEMD)
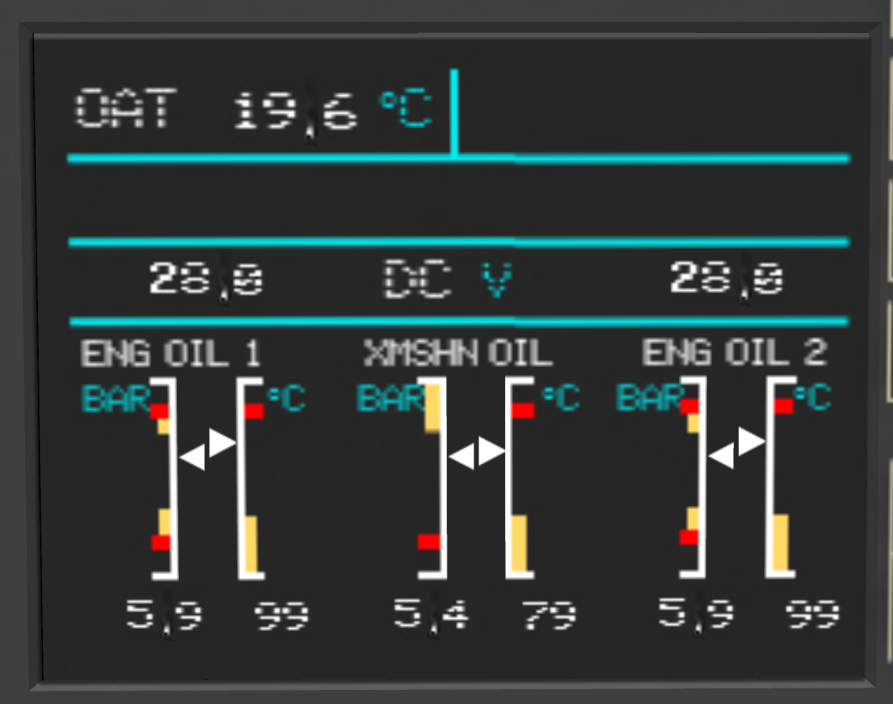
The lower portion of the VEMD (see Figure 9) is the Electrical and Engine Parameters Display. At the top of the display labeled OAT is the Outside Air Temperature in degrees C. Temperature varies by location, time and elevation with a lapse rate of 2 degrees C per thousand feet. Below OAT is the DC voltage for the #1 (left) and #2 (right) primary buses. The generators for each system produce 28V, while the battery produces 24V max. The bottom portion of the display shows oil pressure and temperature for each engine and for the main transmission. Caution ranges and operating limits are shown in yellow and red bars, respectively.
7 Lighting
7.1 EXTERIOR LIGHTING
The base model EC135 includes the following external lights:
- Beacon - Located on the top of the external stabilizer. To be turned on at all times rotor is running.
- Navigation/Position - Red/green lights located on sides of horizontal staiblizer. White light located on trailing edged of vertical stabilizer. To be turned on between sunset and sunrise, and at other times the pilot determines use of position lights will enhance safety.
- Strobe lights - Located on edges of horizontal stabilizer behind position lights. To be used at discretion of pilot before takeoff.
- Landing light - Located on front belly of aircraft. To be used for night landings at discretion of the pilot.
- Taxi light - Located on nose of aircraft. To be used while taxiing in night conditions at discretion of the pilot.
7.2 INTERIOR LIGHTING
This aircraft is equipped with the following internal lights:
- Instrument - Provides light for main panels and instruments. A separate dimmer switch allows intensity to be controlled.
- Standby Horizon - Sepearate dimmable lighting control for the standby artificial horizon indicator.
- Cargo - Dome light in cargo area.
8 ELECTRICAL SYSTEM AND GROUND POWER UNIT
8.1 Overview
This helicopters employs two 28V DC primary busses powered by generators on the #1 and #2 engines. A 24V battery can power both busses when the generators are not running. The battery is connected to each primary bus through bus ties that can be opened with switches on the rear of the upper console. Furthermore, and emergency shed switch can be used to disconnect all but essential items from the electrical system.
8.2 Using External Power
The external power port is located in the lower right rear corner of the aircraft and marked with an "E". Click on the panel to open it, then rez and click on the GPU (Ground Power Unit). The GPU will search for and list aircraft available to be powered. Once you select your aircraft, it will move itself into position and connect to the aircraft.
When external power is connected:
- 28V electrical power will automatically be applied to both DC busses.
- The battery will be disconnected, and will *not* be charged.
- The "EXT POWER" and "BAT DISCON" indications will display on the CAD.
9 ELT
This aircraft is equipped with an onboard ELT (Emergency Locator Transmitter). Controls for the ELT are on the upper console. The controls consist of a light that will flash to indicate an ELT alarm has been triggered, and a two position switch. When the switch is in the "Off" position, no ELT alarms will be triggered. When the ELT is in the "Arm" position, a sudden impact will trigger an ELT signal which can be tracked by search and rescue personnel. If the ELT has been triggered, the alarm can be cleared by moving the switch to the OFF position.
10 AFCS/AUTOPILOT
The AFCS (Automatic Flight Control System) is a system for reducing pilot workload by taking over some of the responsibilities for handling of the aircraft. The AFCS panel is located at the back end of the center console. The AFCS is capable of "holding" one or more of airspeed (IAS), heading (HDG), altitude (ALT) or vertical speed (V/S). It is controlled either by touching the buttons on the panel, or by using the chat commands in the command summary above. The main display shows the current settings for each of the four quantities with a green bar over a quantity indicating the AFCS is currently holding that value. When the value itself is highlighted the + and - buttons on the left side will increase or decrease the current setting for that value. The select button (SEL) selects which value will be adjusted with the + and - buttons.
The mode buttons, IAS, ALT, HDG and V/S on the top of the panel toggle a hold for each of four values. Note that a hold of altitude and vertical speed are mutually exclusive, and only one or the other can have a hold at once. When you enable a hold, the current setting will be set to value for the current aircraft state. For example, pressing the ALT button will enable altitude hold at the current altitude of the aircraft.
The AFSC works by moving the actual controls which can be "felt" by the pilot. While altitude and vertical speed hold is always controlled through collective inputs, the airspeed and heading control is slightly different depending on the airspeed. When airspeed is below 40 knots, airspeed is controlled by forward/back cyclic and heading is controlled with the pedals. At this low speed, the airspeed hold also includes a lateral movement hold which is maintained through lateral cyclic control. Above 40 knots, the lateral hold switches off and instead lateral cyclic is used to control heading, while the pedals are controlled only for trim.
Note that even when the AFCS is enabled, any pilot inputs to a control will take priority over the AFCS. The AFCS can be disabled by pressing the disconnect (DIS) button. The AFCS will also disconnect when rotor rpm is less than 80% or primary electric power is lost. A tone will sound when disconnect to alert the pilot.
The AFCS also includes an "autohover" button labeled HVR. The autohover button is a shortcut for enabling heading and altitude hold at current heading and altitude, and airspeed hold with an airspeed of zero. When enabled at cruise, the aircraft will gradually slow and come to a stationary hover. It is important to note that autohover works by controlling the inputs for zero motion, not to maintain a specific position. It is therefore the pilots responsibility to monitor any small drift that may occur with autohover enabled.
10.1 Common tasks using the AFCS
10.1.1 Takeoff with autopilot
Center controls and press the HVR button to enable autohover. The target altitude will be set to the current altitude. Change the target altitude to a value above the current value, and the aircraft will automatically lift into a hover at the selected altitude.
10.1.2 Landing with autopilot
From a hover, enter an altitude below the ground level (e.g. 0). The aircraft will descent and land lowering collective when it touches the ground. You may also enter a negative value for the vertical speed with the same result.
10.1.3 Adjusting position while in hover
When autohover is enabled (altitude, airspeed and heading hold), you can use small cyclic inputs to nudge the aircraft in a desired direction. The aircraft will move in the direction of the nudge, the re-stabilize at zero forward and lateral speed.
10.2 Chat Commands
The autopliot, or AFCS (Automatic Flight Control System), can be used to reduce pilot workload during long flights or in rescue situations. The AFCS has modes to "hold" airspeed, heading, altitude, vertical speed, or a combination of these. You can use the buttons on the device, or one of the following chat commands:
| Command | Description |
|---|---|
| ap IAS | Toggle airspeed hold |
| ap ALT | Toggle altitude hold |
| ap HDG | Toggle heading hold |
| ap V/S | Toggle vertical speed hold |
| ap HVR | Enter autohover mode |
| ap SEL | Change "selected" parameter |
| ap + | Increase value of selected parameter |
| ap - | Decrease value of selected parameter |
| ap DIS | Disconnect autopilot |
| ap IAS n | Set the target airspeed to n |
| ap HDG n | Set the target heading to n |
| ap L n | Set the target heading left by n degrees |
| ap R n | Set the target heading right by n degrees |
| ap ALT n | Set the target altitude to n |
| ap V/S n | Set the target vertical speed to n |
Autopilot will also disconnect when rotor rpm is less than 80% or primary power is lost. Note than when airspeed is less than 40 knots, heading hold will be accomplished with pedals, while when airspeed is greater than 40 knots, heading is controlled with lateral cyclic.
