Difference between revisions of "H-92/Painting Resources"
| (3 intermediate revisions by the same user not shown) | |||
| Line 5: | Line 5: | ||
Paint templates are available at: | Paint templates are available at: | ||
| − | * [https://shergoodaviation.com/aircraft/ | + | * [https://shergoodaviation.com/aircraft/h92/downloads/H92%20Paint.xcf H92 Paint.xcf] |
| − | * [https://shergoodaviation.com/aircraft/ | + | * [https://shergoodaviation.com/aircraft/h92/downloads/H92%20Paint.psd H92 Paint.psd] |
Alternatively, you can download the raw images for the layers here: | Alternatively, you can download the raw images for the layers here: | ||
| − | * [https://shergoodaviation.com/aircraft/ | + | * [https://shergoodaviation.com/aircraft/h92/downloads/h92%20flashing.png h92 flashing.png] - Metal trim around windows and doors. |
| − | * [https://shergoodaviation.com/aircraft/ | + | * [https://shergoodaviation.com/aircraft/h92/downloads/h92%20rivets.png h92 rivets.png] - Base rivet layer to be added on top of AO. |
| − | * [https://shergoodaviation.com/aircraft/ | + | * [https://shergoodaviation.com/aircraft/h92/downloads/h92%20markings.png h92 markings.png] - Arrows, signs and other markings placed on top of paint. |
| − | * [https://shergoodaviation.com/aircraft/ | + | * [https://shergoodaviation.com/aircraft/h92/downloads/h92-uvmap-full.png h92-uvmap-full.png] - Full UV map. |
| − | * [https://shergoodaviation.com/aircraft/ | + | * [https://shergoodaviation.com/aircraft/h92/downloads/h92-aomap-full.png h92-aomap-full.png] - Full Ambient Occlusion map. |
| + | * [https://shergoodaviation.com/aircraft/h92/downloads/h92-main-rotor-blur.png s92-main-rotor-blur.png] - Main rotor blur | ||
| + | * [https://shergoodaviation.com/aircraft/h92/downloads/h92-rotor-blades.png s92-rotor-blades.png] - Main rotor blades | ||
===Base Paint Textures=== | ===Base Paint Textures=== | ||
| Line 21: | Line 23: | ||
[[File:paint-post-process.png|thumb|right|<figure id='fig:ppp'><caption>Post processing of 2048 texture</caption></figure>]] | [[File:paint-post-process.png|thumb|right|<figure id='fig:ppp'><caption>Post processing of 2048 texture</caption></figure>]] | ||
| − | The | + | The H-92 paint is intended to be created as a 2048x2048 texture that gets divided into four 1024x1024 textures for upload to SL. When the textures are placed into an SA paint can (see instructions in paint can for details on how to use it), the textures for the quadrants should be named as shown in <xr id='fig:quads'/>. As an alternative, and for testing purposes, it is possible to apply the paint as a single 1024x1024 texture. To do this, simply specify the same paint or uuid for all four of the body textures. |
Because the main body crosses the boundary between the quadrants between body-1 and body-2, and between body-3 and body-4, some post processing of the textures may be necessary to avoid artifacts at the boundary when applied to the model. The artifact, usually a dark line, is caused because when SL renders a texture on a surface, there is always some bleed at the texture edge from the opposite edge. In order to prevent these artifacts, use the following steps before splitting 2048x2048 texture into separate textures. | Because the main body crosses the boundary between the quadrants between body-1 and body-2, and between body-3 and body-4, some post processing of the textures may be necessary to avoid artifacts at the boundary when applied to the model. The artifact, usually a dark line, is caused because when SL renders a texture on a surface, there is always some bleed at the texture edge from the opposite edge. In order to prevent these artifacts, use the following steps before splitting 2048x2048 texture into separate textures. | ||
| Line 29: | Line 31: | ||
<xr id='fig:ppp'/> illustrates this process. Note that this processing has already been applied to the AO map. If your paint has only base color texture and no artwork that crosses the boundary from left to right half of the texture, it may be possible to skip this post-processing step. | <xr id='fig:ppp'/> illustrates this process. Note that this processing has already been applied to the AO map. If your paint has only base color texture and no artwork that crosses the boundary from left to right half of the texture, it may be possible to skip this post-processing step. | ||
| + | |||
| + | ===Differences between the S-92 and the H-92 paint=== | ||
| + | Much of the UV map between the H-92 and the S-92 has been kept unmodified for any mesh parts that are shared by both. The primary differences are due to the addition of the winch, the change in the main cabin door, and the addition of the the rear cargo door. | ||
Latest revision as of 21:17, 21 January 2022
SECTION 9. PAINTING RESOURCES
1 Files
Paint templates are available at:
Alternatively, you can download the raw images for the layers here:
- h92 flashing.png - Metal trim around windows and doors.
- h92 rivets.png - Base rivet layer to be added on top of AO.
- h92 markings.png - Arrows, signs and other markings placed on top of paint.
- h92-uvmap-full.png - Full UV map.
- h92-aomap-full.png - Full Ambient Occlusion map.
- s92-main-rotor-blur.png - Main rotor blur
- s92-rotor-blades.png - Main rotor blades
2 Base Paint Textures
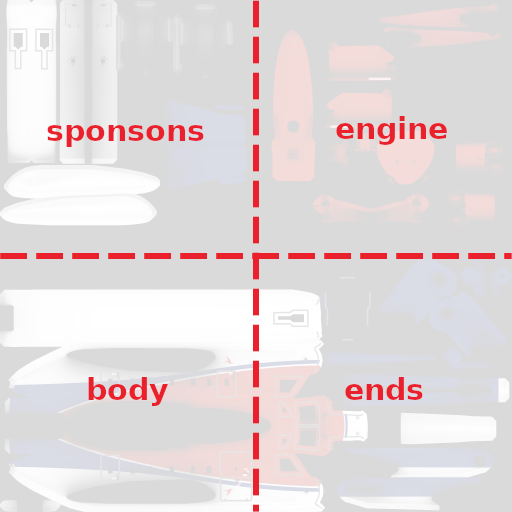
The H-92 paint is intended to be created as a 2048x2048 texture that gets divided into four 1024x1024 textures for upload to SL. When the textures are placed into an SA paint can (see instructions in paint can for details on how to use it), the textures for the quadrants should be named as shown in Figure 1. As an alternative, and for testing purposes, it is possible to apply the paint as a single 1024x1024 texture. To do this, simply specify the same paint or uuid for all four of the body textures.
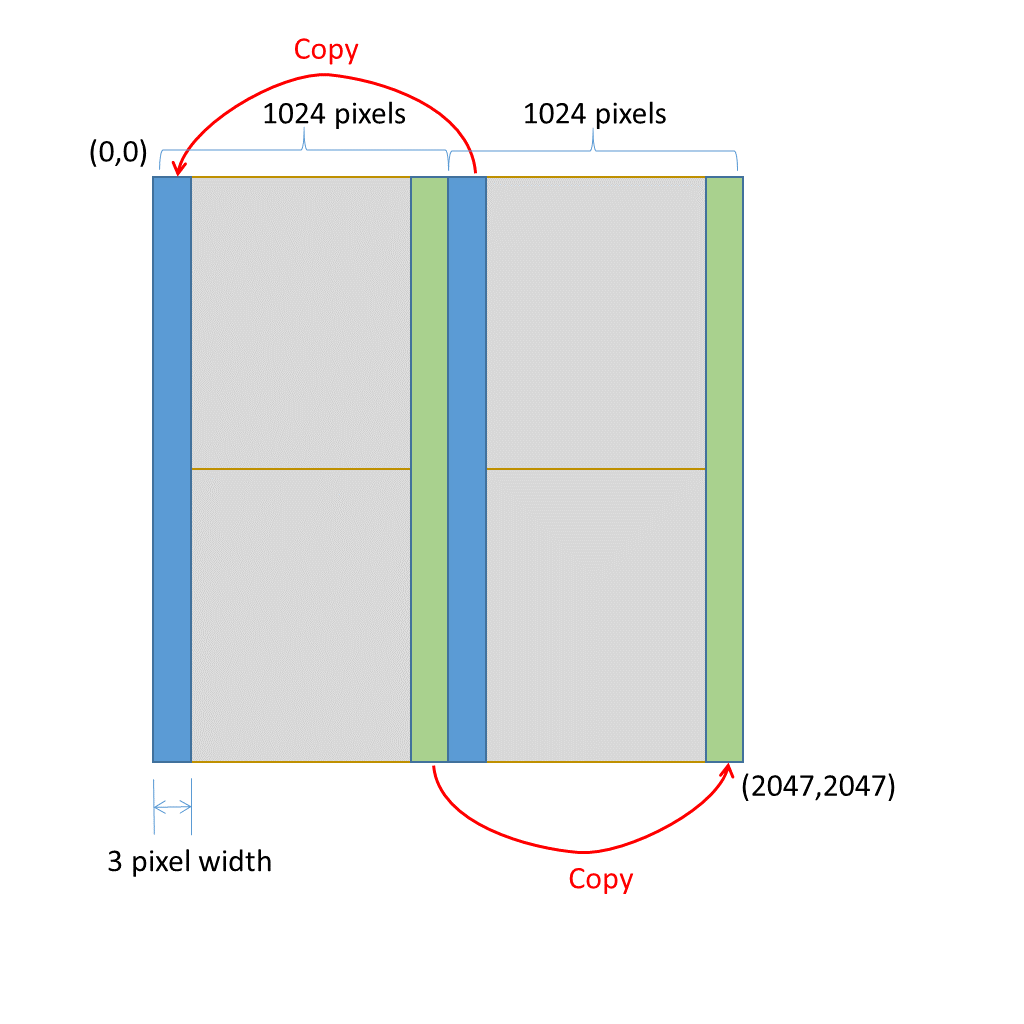
Because the main body crosses the boundary between the quadrants between body-1 and body-2, and between body-3 and body-4, some post processing of the textures may be necessary to avoid artifacts at the boundary when applied to the model. The artifact, usually a dark line, is caused because when SL renders a texture on a surface, there is always some bleed at the texture edge from the opposite edge. In order to prevent these artifacts, use the following steps before splitting 2048x2048 texture into separate textures.
- Copy a 3x2048 column of pixels from position (1024,0) to position (0,0).
- Copy a 3x2048 column of pixels from position (1021,0) to position (2045,0).
Figure 2 illustrates this process. Note that this processing has already been applied to the AO map. If your paint has only base color texture and no artwork that crosses the boundary from left to right half of the texture, it may be possible to skip this post-processing step.
3 Differences between the S-92 and the H-92 paint
Much of the UV map between the H-92 and the S-92 has been kept unmodified for any mesh parts that are shared by both. The primary differences are due to the addition of the winch, the change in the main cabin door, and the addition of the the rear cargo door.

